
Following up from my earlier blogs on training and using TensorFlow models on the edge in Python, in this seventh blog in the series; I wanted to cover a topic that’s generally not talked about enough—optimizing the performance and latency of your TensorFlow models.
Series Pit Stops
- Training a TensorFlow Lite Image Classification model using AutoML Vision Edge
- Creating a TensorFlow Lite Object Detection Model using Google Cloud AutoML
- Using Google Cloud AutoML Edge Image Classification Models in Python
- Using Google Cloud AutoML Edge Object Detection Models in Python
- Running TensorFlow Lite Object Detection Models in Python
- Optimizing the performance of TensorFlow models for the edge (You are here)
While it might not sound as fancy or exciting as other topics I’ve covered in the past, it’s one of the important ones. Running predictions with a TensorFlow model is a time- and energy-consuming process.
For example, using an edge classification model on a MacBook Pro roughly takes around 0.5 seconds for an image. This might not sound like a lot, but if you’re dealing with a lot of images, this is something that might be of concern to you and your users alike.
This post is a collection of some tips that have helped me speed up model inference by more than 80%. While I’ll be talking about models trained on Google Cloud’s AutoML, these tips should remain the same for all TensorFlow models, regardless of where the model is trained.
So without any further delay, let’s get started!
Tip 1: Balancing the size-vs-accuracy tradeoff of your model
This might seem like a no brainer, but it was surprising to see how long I had been ignoring this.
While training your model on Google Cloud, you have the option to select either the high accuracy variant (largest in size; highest latency) the low accuracy variant (smallest in size; lowest latency), and the variant with the best tradeoff between these two.
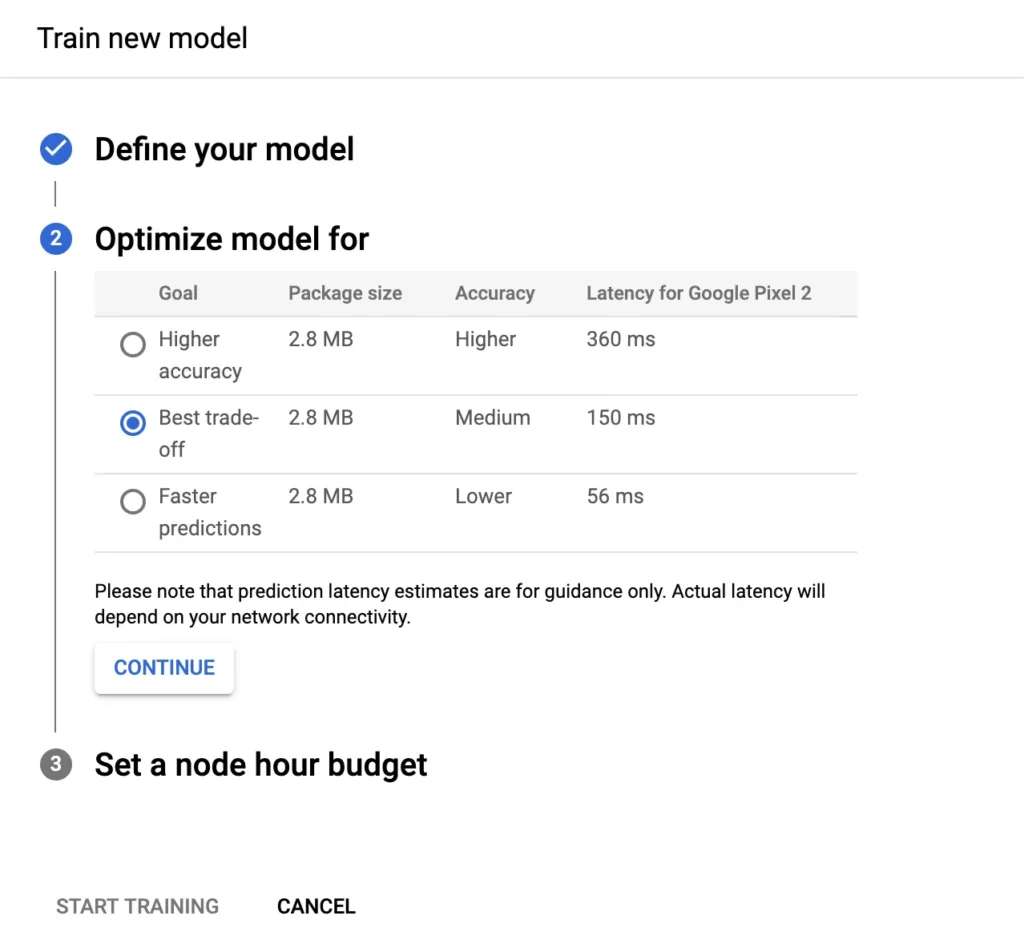
While a first instinct might be to go ahead with the model with the highest accuracy, it comes with its trade-offs; for instance, in the image above, you can see that the low accuracy model is more than 6 times faster than the model with high accuracy.
And it’s also possible that you don’t get a significant difference in the accuracy among these in the first place! For example, here’s a screenshot showcasing the accuracy that I got by training the same model for all three variants:
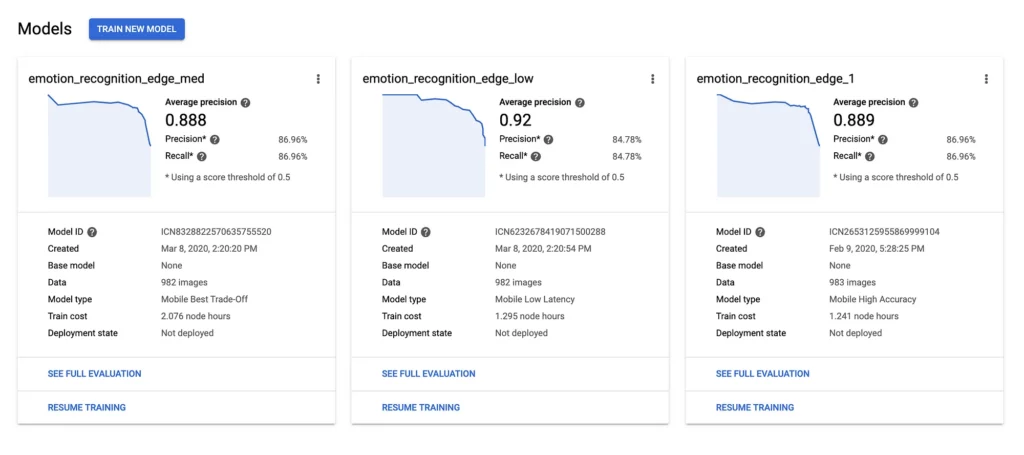
As you can see here, the average precision and recall scores of the low accuracy model were only 2% less than high accuracy models, while the medium accuracy and the high accuracy models had the exact same precision and recall!
So for this particular model, you’re better off of using either a medium-accuracy or a low-accuracy model instead of the high accuracy one, since it not only gives you faster predictions, but also a smaller size.
Put another way, a job that takes 1 hour on the low-accuracy model will take over 6 hours on the high-accuracy model; and the wait might not even be worth it.
Tip 2: Reuse your session and batch your inference requests
In case you’ve worked with TensorFlow model predictions involving multiple images, here’s what your code snippet might look like:
import tensorflow.compat.v1 as tf
tf.disable_v2_behavior()
import pathlib

for file in pathlib.Path(image_path).iterdir():
  # get the current image path
  current_image_path = r"{}".format(file.resolve())

  # image bytes since this is what the ML model needs as its input
  img_bytes = open(current_image_path, 'rb').read()

  session = tf.Session(graph=tf.Graph())

  # loading the model into our session created above
  tf.saved_model.loader.load(session, ['serve'], model_path)

  # pass the image as input to the ML model and get the result
  result = session.run('scores:0', feed_dict={
            'Placeholder:0': [img_bytes]})
Now, there are 2 things wrong with this code.
The first might be quite obvious to veteran programmers—the code isn’t reusing the session variable created in line number 12. The initialization of a session takes a lot of time, and if we’re not reusing it for subsequent requests, we end us wasting a lot of time in the setup of each inference request.
More efficient code that fixes this might look like this:
import tensorflow.compat.v1 as tf
tf.disable_v2_behavior()
import pathlib

session = tf.Session(graph=tf.Graph())

# loading the model into our session created above
tf.saved_model.loader.load(session, ['serve'], model_path)

for file in pathlib.Path(image_path).iterdir():
  # get the current image path
  current_image_path = r"{}".format(file.resolve())

  # image bytes since this is what the ML model needs as its input
  img_bytes = open(current_image_path, 'rb').read()

  # pass the image as input to the ML model and get the result
  result = session.run('scores:0', feed_dict={
            'Placeholder:0': [img_bytes]})
Notice how we took the session out of the for-loop!
The second issue might be a bit harder to spot since it has nothing to do with programming and more to do with TensorFlow.
You see, whenever we want to run inference on the model, TensorFlow expects a ByteArray as input and returns an array containing the probability that the input was a particular label (in case of classification) or a particular object (in case of object detection). In this case, where I have 50 items in the loop, this process will be repeated 50 times!
For better performance in the code above, we can instead batch our requests and make exponentially fewer calls to the session’s run method:
import tensorflow.compat.v1 as tf
tf.disable_v2_behavior()
import pathlib

session = tf.Session(graph=tf.Graph())

# loading the model into our session created above
tf.saved_model.loader.load(session, ['serve'], model_path)

images = []

for file in pathlib.Path(image_path).iterdir():
  # get the current image path
  current_image_path = r"{}".format(file.resolve())

  # image bytes since this is what the ML model needs as its input
  img_bytes = open(current_image_path, 'rb').read()

  # add the current image into a list
  images.append(img_bytes)

# output probabilities for all the images
results = session.run('scores:0', feed_dict={
            'Placeholder:0': images})

# clear the array once the processing completed
images.clear()
Here, instead of calling session.run() every time in the loop, we instead maintain an array of the images and make a single call to session.run() once the loop ends. Doing so results in reduced latency; for example, when tested with 3000 images, batched results proved to be 10 minutes faster than previously.
However, do consider setting a fixed batch size for your images instead of letting them accumulate in the list, as shown above. Passing too many images to the run() method might result in an out of memory error, and all your requests might fail.
For me personally, a limit of 100 seems to work well on an 8 GB machine, but the limit might vary from person to person.
Here’s what the code with batching and a fixed batch size might look like:
import tensorflow.compat.v1 as tf
tf.disable_v2_behavior()
import pathlib

session = tf.Session(graph=tf.Graph())

# loading the model into our session created above
tf.saved_model.loader.load(session, ['serve'], model_path)

images = []
BATCH = 100
for i, file in enumrate(pathlib.Path(image_path).iterdir()):
  # get the current image path
  current_image_path = r"{}".format(file.resolve())

  # image bytes since this is what the ML model needs as its input
  img_bytes = open(current_image_path, 'rb').read()

  # add the current image into a list
  images.append(img_bytes)

  if i % BATCH == 0:
    # output probabilities for all the images
    results = session.run('scores:0', feed_dict={
            'Placeholder:0': images})
    # clear the array once the processing completed
    images.clear()
Tip 3: Using TensorFlow while_loop instead of Python’s loop
The code above can be further optimized to use the while_loop provided by TensorFlow instead of the Python-provided loop.
Using TensorFlow’s while_loop results in less context switching between TensorFlow and Python, resulting in faster inference execution.
Here’s an answer outlining how you can use complex conditions and methods inside the TensorFlow while_loop:
Tip 4: Use Intel-optimized TensorFlow
Last but not the least, if you’re using TensorFlow on an Intel CPU, you can install the Intel-optimized version of TensorFlow instead of the regular one.
To see if you’re already running the Intel-optimized TensorFlow on your system, simply create a Python script, import TensorFlow in it, and run it.
If you get a warning as follows, that means you can speed up your installation to use the Intel-optimized TensorFlow:
To install it, you can simply head over to Intel’s official website and find the compatible binaries for your system:
Once installed, running the same script should result in the following message:
And that’s all! These were the tips that I used personally to speed up my existing TensorFlow installation, and I hope that they help you as well.
In case you have any other tips or suggestions that I might have missed, feel free to share them in the comments below, and I will gladly add it to the main post.
Thanks for reading! If you enjoyed this story, please click the 👏 button and share it to help others find it! Feel free to leave a comment 💬 below.
Have feedback? Let’s connect on Twitter.
Comments 0 Responses