This blog is the sixth blog in the series and a follow-up to my previous blog post on running TensorFlow Lite image classification models in Python. If you haven’t read that post, you can read it here:
Series Pit Stops
- Training a TensorFlow Lite Image Classification model using AutoML Vision Edge
- Creating a TensorFlow Lite Object Detection Model using Google Cloud AutoML
- Using Google Cloud AutoML Edge Image Classification Models in Python
- Using Google Cloud AutoML Edge Object Detection Models in Python
- Running TensorFlow Lite Image Classification Models in Python
- Running TensorFlow Lite Object Detection Models in Python (You are here)
- Optimizing the performance of TensorFlow models for the edge
This blog post assumes that you already have a trained TFLite model on hand. If you don’t or need to build one, you can take a look at the blog post that I have written here:
Contrary to image classification models that classify an input image into one or more different categories, object detection models are designed to identify target objects and provide you with a bounding box around them (to track its location).
With that context established, let’s jump into how to implement these models in a Python setting.
Step 1: Downloading the TensorFlow Lite model
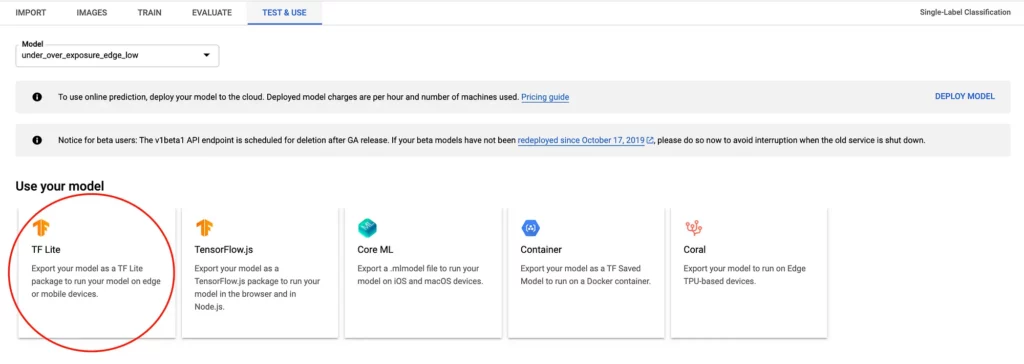
Assuming that you’ve trained your TensorFlow model with Google Cloud, you can download the model from the Vision Dashboard, as shown in the screenshot here:

Once downloaded, we’re ready to set up our environment and proceed with the next steps.
Step 2: Installing the required dependencies
Before we go ahead and write any code, it’s important that we first have all the required dependencies installed on our development machine.
For the current example, these are the dependencies we’ll need:
We can use pip to install these dependencies with the following command:
Step 3: Loading the model and studying its input and output
Now that we have the model and our development environment ready, the next step is to create a Python snippet that allows us to load this model and perform inference with it.
Here’s what such a snippet might look like:
import numpy as np
import tensorflow as tf

# Load TFLite model and allocate tensors.
interpreter = tf.contrib.lite.Interpreter(model_path="object_detection.tflite")

# Get input and output tensors.
input_details = interpreter.get_input_details()
output_details = interpreter.get_output_details()

interpreter.allocate_tensors()

# input details
print(input_details)
# output details
print(output_details)
Here, we first load the downloaded model and then get the input and output tensors from the loaded model.
Up next, we print the input and outputs tensors we obtained earlier.
If you run the code, this is what the output might look like:
Unlike the output of the classification model, this output looks like a bit too much to process! But let’s go through it nevertheless.
Looking at the input tensor, we see that it has a single entry that takes in an RGB image of size 512 x 512 as its input at index 596.
Conversely, the output tensor has 4 entries, which means that unlike the previous case where we got a single-element array, here we have 4 elements in the output array.
The bounding boxes for the object that we need, along with their confidence scores, will be in two of these 4 elements. Typically, the output elements are ordered by the array of rectangles followed by the array of scores for these rectangles.
After using some trial and error, I identified that the element named TFLite_Detection_PostProcess contains my rectangles, and the element named TFLite_Detection_PostProcess:2 contains the scores of these rectangles.
The element named TFLite_Detection_PostProcess:3 contains the total number of detected items and the element TFLite_Detection_PostProcess:1 contains the classes for the detected elements.
In our current case, printing the output of TFLite_Detection_PostProcess:1 should print an array of zeros.
However, if you have trained an object detection to detect multiple objects; this element might have different outputs for you.
For example, here’s a sample output of this node for an object detection model trained to detect 2 objects:
Over here, if a particular index has the value 0; then the box and score at that particular index belong to the first object and if it has the value 1; then the box and score at that index belong to the second object.
These values might increase if you have trained your model to detect more objects.
In the next step, we’ll pass an image to the model and see the output for these outputs in action.
Step 4: Reading an image and passing it to the TFLite model
Up next, we’ll use Pathlib to iterate through a folder containing images that we’ll be running inference on. We’ll then read each image with OpenCV, resize it to 512×512, and then pass it to our model.
Once done, we’ll print the file name and the output number (0 and 2) for that file to see what that means:
import tensorflow as tf
import numpy as np
import cv2
import pathlib

interpreter = tf.contrib.lite.Interpreter(model_path="object_detection.tflite")

input_details = interpreter.get_input_details()
output_details = interpreter.get_output_details()

print(input_details)
print(output_details)

interpreter.allocate_tensors()

for file in pathlib.Path('images').iterdir():

    img = cv2.imread(r"{}".format(file.resolve()))
    new_img = cv2.resize(img, (512, 512))

    interpreter.set_tensor(input_details[0]['index'], [new_img])

    interpreter.invoke()
    rects = interpreter.get_tensor(
        output_details[0]['index'])
    scores = interpreter.get_tensor(
        output_details[2]['index'])

    print("For file {}".format(file.stem))
    print("Rectangles are: {}".format(rects))
    print("Scores are: {}".format(scores))
Upon running this code, here’s what the output might look like:
Upon closer inspection, you’ll see that here again the number of elements in the array of rectangles and the array of scores are the same!
The elements in the scores array are all probabilities for each of the rectangles detected; so we’ll only take those rectangles whose scores are greater than a particular threshold, say 0.5.
Here’s a code snippet that applies this filter to the code snippet above:
import tensorflow as tf
import numpy as np
import cv2
import pathlib

interpreter = tf.contrib.lite.Interpreter(model_path="object_detection.tflite")

input_details = interpreter.get_input_details()
output_details = interpreter.get_output_details()

print(input_details)
print(output_details)

interpreter.allocate_tensors()

for file in pathlib.Path('images').iterdir():

    img = cv2.imread(r"{}".format(file.resolve()))
    new_img = cv2.resize(img, (512, 512))

    interpreter.set_tensor(input_details[0]['index'], [new_img])

    interpreter.invoke()
    rects = interpreter.get_tensor(
        output_details[0]['index'])
    scores = interpreter.get_tensor(
        output_details[2]['index'])

    for index, score in enumerate(scores[0]):
        if score > 0.5:
            print("For file {}".format(file.stem))
            print("Rectangles are: {}".format(rects[index]))
Running this should result in an output like this:
As you can see here, after setting a filter of 0.5 on the scores, we get a substantially reduced number of rectangles (1 in most of the cases).
Up next, we will use OpenCV to plot these rectangles on the original image and show it on the screen.
Step 5: Plotting the detected rectangles with OpenCV
In order to calculate the x and y coordinates of the rectangle to be drawn, we’ll be using a helper function that takes in the detected box and converts its elements into proper x and y coordinates of a rectangle that OpenCV can use.
Here’s what that looks like:
def draw_rect(image, box):
    y_min = int(max(1, (box[0] * image.height)))
    x_min = int(max(1, (box[1] * image.width)))
    y_max = int(min(image.height, (box[2] * image.height)))
    x_max = int(min(image.width, (box[3] * image.width)))

    # draw a rectangle on the image
    cv2.rectangle(image, (x_min, y_min), (x_max, y_max), (255, 255, 255), 2)
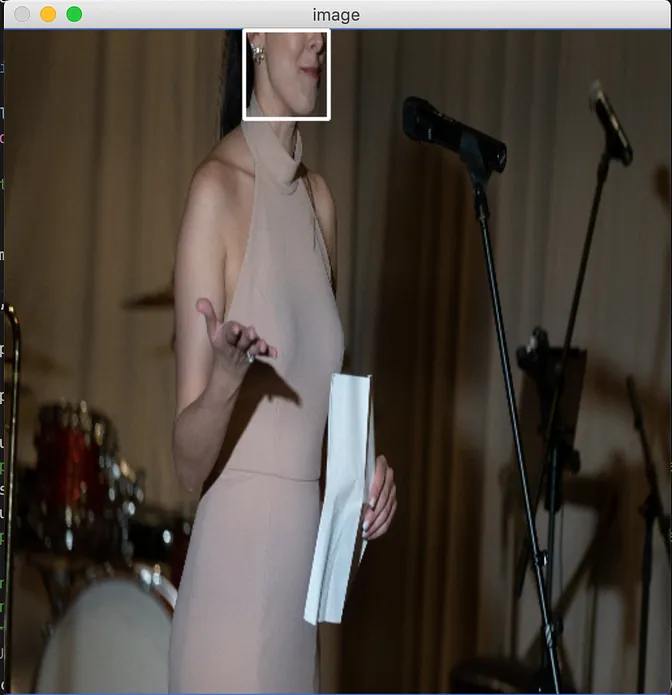
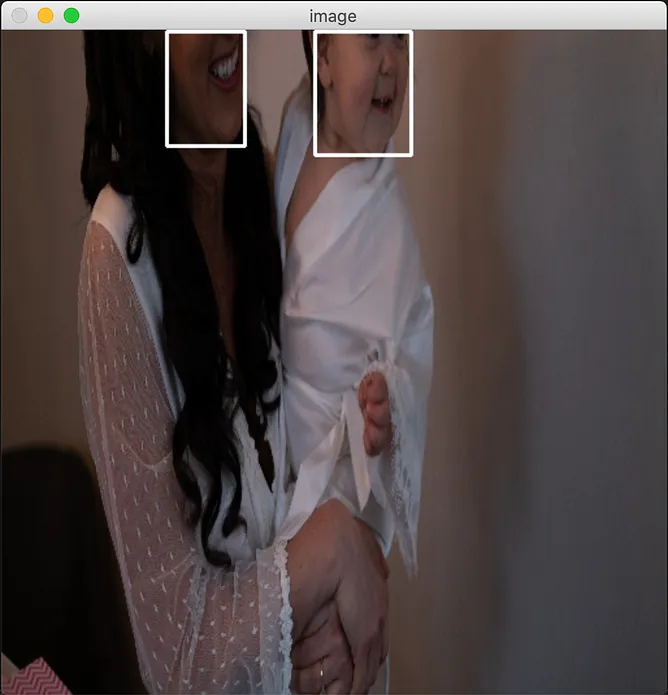
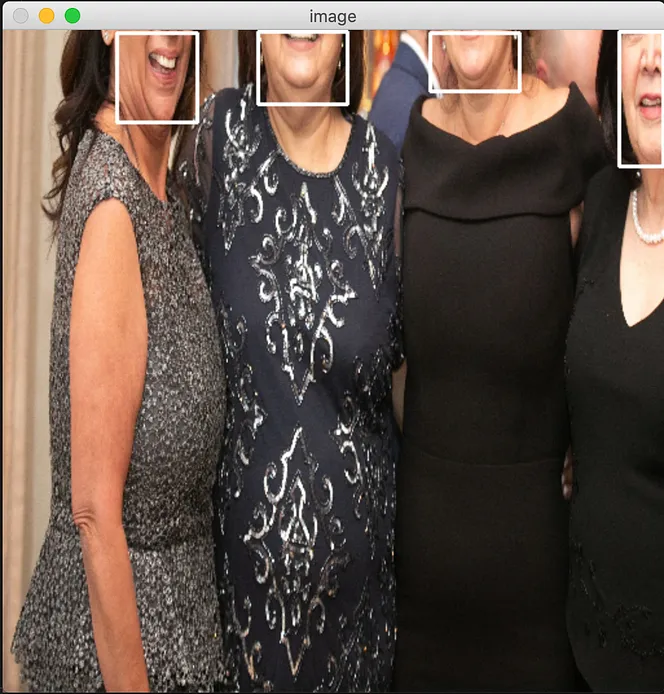
And that’s it! Upon running the complete code, integrated with this helper method above, here’s what you should see:


As seen here, the model does an excellent job of identifying and detecting occluded faces in an image.
In case you’re looking for the complete source code of the example, here’s what it looks like:
import tensorflow as tf
import numpy as np
import cv2
import pathlib

interpreter = tf.contrib.lite.Interpreter(model_path="object_detection.tflite")

input_details = interpreter.get_input_details()
output_details = interpreter.get_output_details()

print(input_details)
print(output_details)

interpreter.allocate_tensors()

def draw_rect(image, box):
    y_min = int(max(1, (box[0] * image.height)))
    x_min = int(max(1, (box[1] * image.width)))
    y_max = int(min(image.height, (box[2] * image.height)))
    x_max = int(min(image.width, (box[3] * image.width)))

    # draw a rectangle on the image
    cv2.rectangle(image, (x_min, y_min), (x_max, y_max), (255, 255, 255), 2)

for file in pathlib.Path('images').iterdir():

    if file.suffix != '.jpg' and file.suffix != '.png':
        continue

    img = cv2.imread(r"{}".format(file.resolve()))
    new_img = cv2.resize(img, (512, 512))
    interpreter.set_tensor(input_details[0]['index'], [new_img])

    interpreter.invoke()
    rects = interpreter.get_tensor(
        output_details[0]['index'])

    scores = interpreter.get_tensor(
        output_details[2]['index'])

    for index, score in enumerate(scores[0]):
        if score > 0.5:
          draw_rect(new_img,rects[0][index])

    cv2.imshow("image", new_img)
    cv2.waitKey(0)
And that’s it! While not always the most effective solution, in the last post and this one we saw how easy it is to load and run TensorFlow Lite models in a Python-based setting.
If you have any questions or suggestions about this post, feel free to leave a comment down below and I’ll be happy to follow up!
Thanks for reading! If you enjoyed this story, please click the 👏 button and share it to help others find it! Feel free to leave a comment 💬 below.
Have feedback? Let’s connect on Twitter.

Comments 0 Responses