As a developer, it’s crucial for your business to have access to your user’s details. Be it to monitor their usage patterns, send promotional campaigns, notify them of critical updates to your services, or for additional cross-selling of new services.
One effective technique to gather user data is via authentication. Or, put simply, a login system that lets your app know when a particular user is using the app.
Implementing a secure authentication system of this kind from the ground up might require weeks of effort, along with you having to learn a server-side framework to build the backend for the same.
But thanks to Firebase, as a mobile (or web) developer, you don’t have to worry about doing all this, as Firebase provides simple APIs that let you easily handle user authentication.
Along with the classic email + password mechanism for authentication which we’ll cover here), Firebase also provides a social and phone number login system, which allows a user to sign in with their social accounts and phone number, respectively—we’ll cover the latter in a future tutorial.
About authentication with Firebase
As outlined earlier, Firebase allows us to perform user authentication by the following means:
- Email and password-based authentication (covered in this post)
- Social account-based authentication using Google, Twitter, Facebook, etc.
- Phone number based authentication
In this blog post, we’ll be covering the first of the three authentication methods in detail. So without any further ado, let’s get started!
Setting up a Firebase project for the app
Before starting, we need to ensure that the app in question is connected to Firebase. To do so, you can find a good tutorial here:
Once done, you need to add the following dependency in order to use Firebase Auth:
dependencies {
    ...
    implementation 'com.google.firebase:firebase-auth:19.2.0'
}
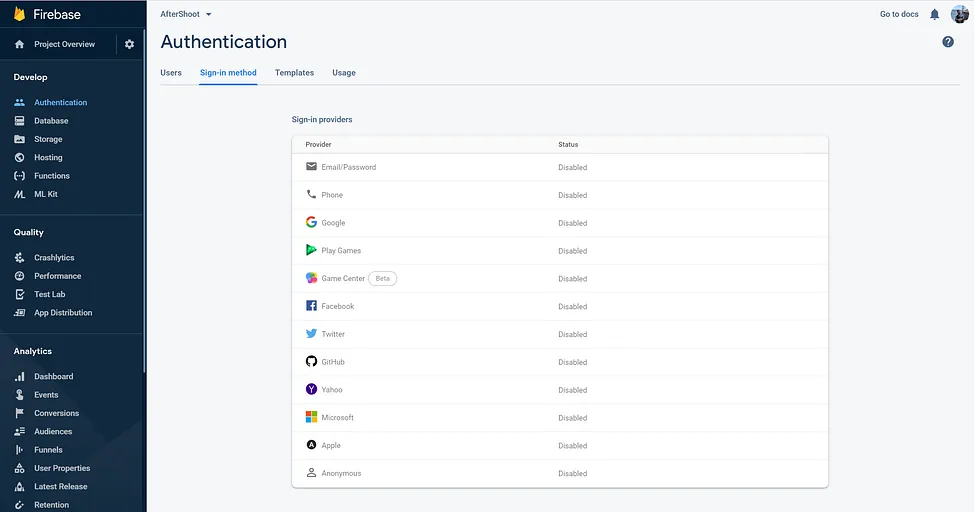
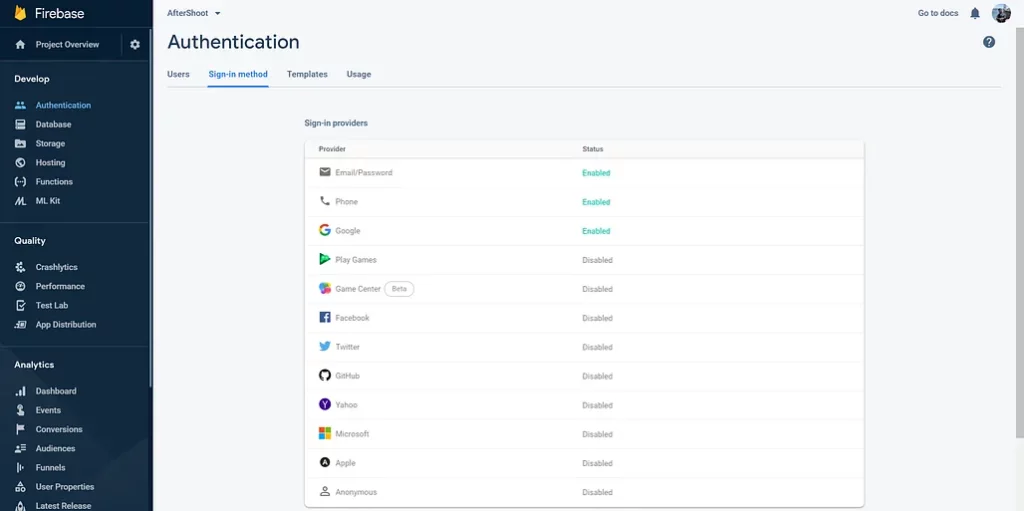
You also need to go to your newly-created app’s Firebase Console and enable the sign-in providers from the Authentication section:
Once you have the project configured, it’s time to get started with the actual authentication implementation.
Step 1: Create a sign-in UI that allows users to provide email and password
Before doing anything else, we need to have a basic UI in place that allows the users to enter their email and password. It should allow users to either create an account or log in to an already-existing account.
<LinearLayout
                android:id="@+id/llLogin"
                android:layout_margin="4dp"
                android:layout_width="match_parent"
                android:layout_height="0dp"
                android:layout_weight="1"
                android:orientation="vertical">

            <EditText
                    android:inputType="textEmailAddress"
                    android:ems="15"
                    android:layout_gravity="center"
                    android:layout_width="wrap_content"
                    android:layout_height="wrap_content"
                    android:id="@+id/etEmail"/>

            <EditText
                    android:inputType="textPassword"
                    android:ems="15"
                    android:layout_gravity="center"
                    android:layout_width="wrap_content"
                    android:layout_height="wrap_content"
                    android:id="@+id/etPassword"/>

            <LinearLayout android:layout_width="match_parent"
                          android:layout_height="wrap_content"
                          android:gravity="center"
                          android:orientation="horizontal">

                <ImageButton
                        android:src="@drawable/ic_login"
                        android:layout_width="72dp"
                        android:layout_height="72dp"
                        android:scaleType="centerCrop"
                        android:id="@+id/btnLogin"
                        android:layout_gravity="center"/>

                <ImageButton
                        android:src="@drawable/ic_sign_up"
                        android:layout_width="72dp"
                        android:layout_height="72dp"
                        android:scaleType="centerCrop"
                        android:id="@+id/btnSignUp"
                        android:layout_gravity="center"/>

            </LinearLayout>

        </LinearLayout>
Here’s a basic XML layout that has 2 EditText widgets allowing us to enter the email and password, followed by 2 Buttons that let the user either sign up or log in to the app.
Step 2: Using Firebase to receive input and perform the login
Once the user decides to either sign up or log in, we have to receive the input provided by them and perform the desired action. The code for doing so is shown below:
class MainActivity : AppCompatActivity() {

    override fun onCreate(savedInstanceState: Bundle?) {
        super.onCreate(savedInstanceState)
        setContentView(R.layout.activity_main)
        ...

        btnLogin.setOnClickListener {
            // get the email and password from the EditText
            val email = etEmail.text.toString()
            val password = etPassword.text.toString()
            // get access to an instance of FirebaseAuth and perform login
            FirebaseAuth.getInstance()
                .signInWithEmailAndPassword(email, password)
                .addOnSuccessListener {
                    // login successful, update the UI
                    Log.e("TAG", it.user.email)
                }
                .addOnFailureListener {
                    // login failed, probably bad email-password combo or a network issue
                    it.printStackTrace()
                }
                .addOnCompleteListener {

                }
        }

        btnSignUp.setOnClickListener {
            val email = etEmail.text.toString()
            val password = etPassword.text.toString()
            // get access to an instance of FirebaseAuth and create the user account
            FirebaseAuth.getInstance()
                .createUserWithEmailAndPassword(email, password)
                .addOnSuccessListener {
                    // account creation successful, upate the UI and send an account verification email
                    Log.e("TAG", it.user.email)
                }
                .addOnFailureListener {
                    // account creation failed, probably the account already exists or bad network connection
                    it.printStackTrace()
                }
        }


    }

}
Let’s go through the content covered in the code snippet above.
To login an already-existing user, we use the signInWithEmailAndPassword() method available in the FirebaseAuth class. This method has various callbacks like onSuccess, onFailure, and onComplete, each of which is used to relay the success or failure of the method call.
It’s possible that the user is trying to log into the app without creating an account in the first place. It’s also possible that their email and password combination is wrong—as so on and so forth. The onFailure method comes with an exception that you can use to figure out the exact cause of the failure and handle it accordingly.
Similarly, to allow a new user to sign up, we used the createUserWithEmailAndPassword method, which will create a new user instead. Once the user has been created, we can get their details (like email, UID, etc.)
Step 3: Getting the user’s details and implementing log-out functionality
Once the user has logged in, you can fetch the user by calling the getCurrentUser() method on an instance of the FirebaseAuth class. Depending on the log-in provider, the details you get might vary. The code below showcases all the possible details you can get from a logged-in user:
class MainActivity : AppCompatActivity() {

      override fun onCreate(savedInstanceState: Bundle?) {
        super.onCreate(savedInstanceState)
        ...
        FirebaseAuth.getInstance().currentUser?.let { currentUser ->
            // the user is already logged in, so get the details from him/her

            // uid is unique for every logged in user, and wil always be not-null
            val uid : String = currentUser.uid
            // rest of the parameters might be null depending on the auth provider used
            val name: String? = currentUser.displayName
            val email: String? = currentUser.email
            val profilePic : Uri? = currentUser.photoUrl
            val contactNumber = currentUser.phoneNumber

        }?: kotlin.run {
            // currentUser is null, that means the user is not logged in yet!
            signIn()
        }
      }
}
You can then use these details to update your app’s UI and let the users know that they have been logged into the app.
However, once a user has logged in, you might also want to provide them the possibility of logging out of the app. Firebase allows us to do this in an easy manner. To log out a currently logged in user, simply call the following method:
Doing this will set the currentUser to null and sign out the currently logged in user. If you want to perform an action once the user has logged out, you might want to attach an AuthStateListener to FirebaseAuth, allowing you to know when the user has logged in or logged out.
class MainActivity : AppCompatActivity() {

      override fun onCreate(savedInstanceState: Bundle?) {
        super.onCreate(savedInstanceState)
        ...
        FirebaseAuth.getInstance().addAuthStateListener {

            // this is called everytime the authentication state changes (either the user logs in or logs out)

            it.currentUser?.let {
                // the user is logged in
            }?: kotlin.run {
                // the user is logged out
            }

        }
      }
}
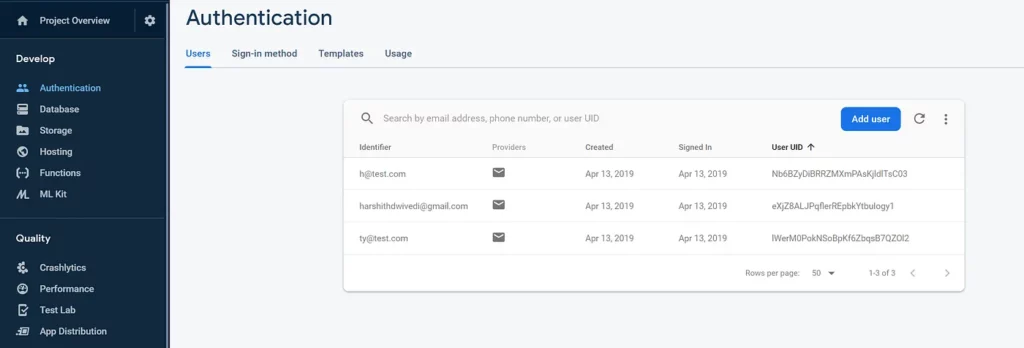
With that, the basic email and password auth are now finally implemented in the app, and upon logging into the app, if you go to the Firebase Console, you can see that the user has also been created there.
Step 4: Verifying the created user’s email
To ensure that the user isn’t using gibberish or false emails to create an account in your app, the FirebaseAuth class has a helper method that sends a verification email to the user, and until the user has verified their email, the user is marked as unverified.
To implement this, we can add a small code snippet to our app that will handle this for us:
class MainActivity : AppCompatActivity() {

      override fun onCreate(savedInstanceState: Bundle?) {
        super.onCreate(savedInstanceState)
        ...
        FirebaseAuth.getInstance().addAuthStateListener {

            it.currentUser?.let {firebaseUser ->
                // the user is logged in
                if(firebaseUser.isEmailVerified){
                    // the user's is verified, proceed normally
                }else{
                    // the user's email is unverified
                    Toast.makeText(this, "Please verify your email", Toast.LENGTH_SHORT).show()
                    firebaseUser.sendEmailVerification()
                }
            }?: kotlin.run {
                // the user is logged out
            }
        }
      }
}
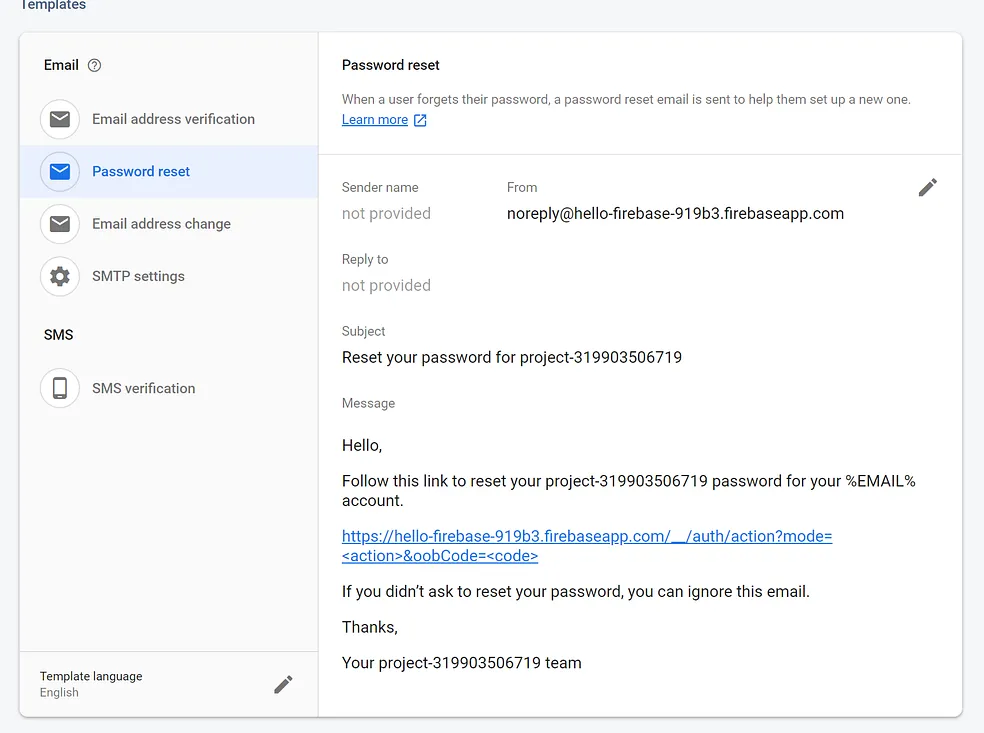
To configure the email that’ll be sent to the users, you can head over to your Firebase Console and go to the Templates tab in the Authentication section.
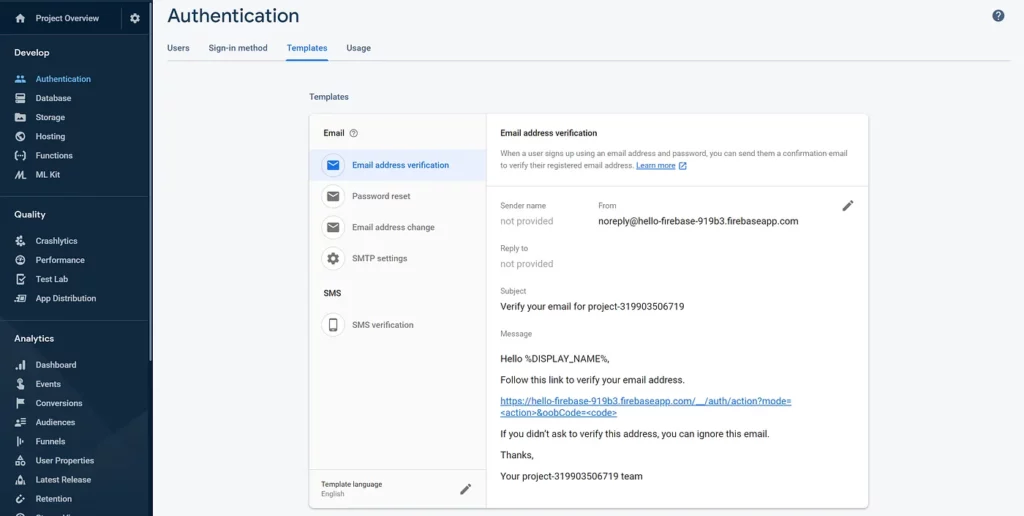
Once here, feel free to edit the email as you’d like.
Step 5: Letting the users change their email and password
As with any authentication system, it’s crucial that you have a system in place that allows your users to update or reset their email and password. Again, as with email verification, Firebase also has helper methods that let you implement this easily. Let’s look at how to implement these features:
class MainActivity : AppCompatActivity() {

    fun resetPassword(user: FirebaseUser) {
        FirebaseAuth.getInstance().sendPasswordResetEmail(requireNotNull(user.email))
                .addOnSuccessListener {
                    Toast.makeText(this, "Email sent!", Toast.LENGTH_SHORT).show()
                }
    }

    fun updatePassword(user: FirebaseUser) {
        user.updatePassword("newPassword")
                .addOnSuccessListener {
                    Toast.makeText(this, "Password Updated, please log in again!", Toast.LENGTH_SHORT).show()
                    FirebaseAuth.getInstance().signOut()
                }
    }

    fun updateEmail(user: FirebaseUser) {
        user.updateEmail("[email protected]")
                .addOnSuccessListener {
                    Toast.makeText(this, "Email Updated, please log in again!", Toast.LENGTH_SHORT).show()
                    FirebaseAuth.getInstance().signOut()
                }
    }

}
As you can see, the methods are more or less self-explanatory. Each of the methods has a success and failure listener that you can use to notify the user about the action and have them respond appropriately.
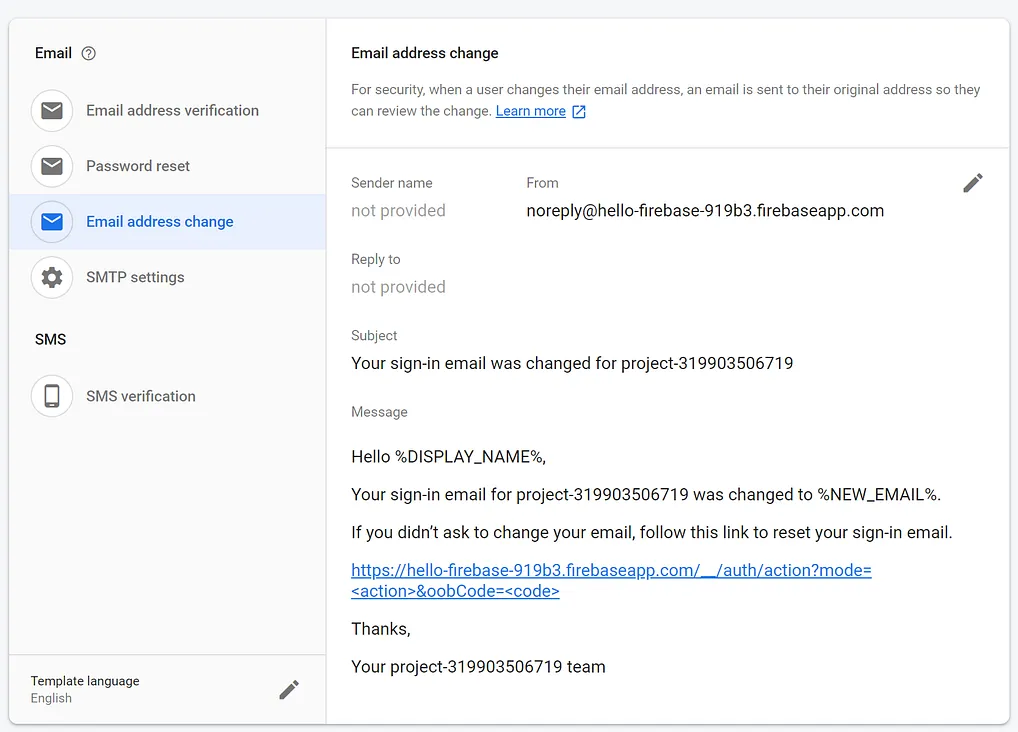
As with email verification, you can also configure the email that’s sent when the user opts in to reset their password or updates their email. You can do so by going to the Firebase Console:
And that’s it! By adding a sleek UI, you can create a fully-functional and robust authentication system for free!*
- Firebase authentication is free for 25,000 users—past that, you’ll have to pay for the service.
Conclusion
In a follow-up post, I’ll cover how one can implement social log-in using a handy library created by the Firebase developers to ease the entire process.
Thanks for reading! If you enjoyed this story, please click the 👏 button and share it to help others find it! Feel free to leave a comment 💬 below.
Have feedback? Let’s connect on Twitter.

Comments 0 Responses