
With recent advancements in deep learning and artificial intelligence, machines can now do increasingly complicated things. Those things can be related to image, video, audio, or other complex data. Today, we have a massive amount of data, and we also have adequate infrastructure to process that data and make use of them.
Nowadays, there are applications available for cell phones that predict your age. But have you ever thought about how these apps can tell your age? Here comes the role of deep and machine learning. The model detects your face and passes the face data through a deep learning classifier that returns your (approximate) age.
In this article, I will introduce you to a similar technique, where you’ll build a model that can classify a person’s age as: young, middle, or old. Finally, you’ll provide your image, and it will tell you if you are young, middle-aged, or old.
This article will use a convolutional neural network (CNN), a deep learning approach, to train our image data. In brief, CNNs help us more effectively process image data.
More specifically, CNNs have a layer structure that helps the model to learn about the different features of an image. It has a convolution layer that helps in learning the different parts of images, and then we have a pooling layer that helps pool essential features of the image. Pooling reduces the size of input data by extracting only the highlighted portion of the image.
And we use ReLU as an activation function for our model. You can learn more about the basics of CNNs here:
For this tutorial, we’ll be using a Jupyter Notebook to train our model. In the Jupyter Notebook, we can run a set of code snippets and get the output we want.
Installing Jupyter Notebook
Jupyter Notebooks are a part of Anaconda distribution and are open-source Use this link for installation. Make sure to check the box at the end where it will ask to add Anaconda to the environment variable.
After installation is complete, open the Anaconda prompt and type “jupyter notebook”, and it will launch a Jupyter Notebook in your browser. Then, you’ll see an interactive window with some buttons and drop-downs.

Click on “new” to open your new Python Notebook.
Import Libraries
Once you have your Jupyter Notebook ready, paste the code below. These are the libraries we’re going to use for training, validating, and testing our model.
We’ll be using TensorFlow for building our deep learning model, and for data loading we will be using the ImageDataGenerator module in Python to load data based on the class folder:
import os, random, shutil
import numpy as np
import pandas as pd
import PIL
#import keras
import itertools
from PIL import Image

import tensorflow as tf

from sklearn.utils import shuffle
from sklearn.model_selection import train_test_split
from sklearn import preprocessing
#from skimage import feature, data, io, measure
from sklearn.metrics import confusion_matrix

import matplotlib.pyplot as plt
from matplotlib import ticker
import seaborn as sns
%matplotlib inline

import cv2
from tensorflow.keras import backend as K
from tensorflow.keras.models import Model
from tensorflow.keras.models import Sequential
from tensorflow.keras.layers import Input, Dropout, Flatten, Conv2D, MaxPooling2D, Dense, Activation
from tensorflow.keras.optimizers import RMSprop, Adam
from tensorflow.keras.layers import BatchNormalization
#from keras.callbacks import ModelCheckpoint, Callback, EarlyStopping
from keras.utils import np_utils
from tensorflow.keras.preprocessing.image import ImageDataGenerator, array_to_img, img_to_array, load_img
from tensorflow.keras.callbacks import TensorBoard
import io
import time
import datetime
from tensorflow.keras.optimizers import Adam,Adadelta
from tensorflow.keras.preprocessing.image import ImageDataGenerator
Data Format
We’re working with image data, and we’ll be dividing that data into three classes: Young, Middle & Old. This data I have downloaded from google images. You can search for a particular generation of people there and to download the image on google images I would suggest using chrome extension “Download All Images”. This extension is free to use. After downloading the images you can keep them in a separate folder. Our folder names are representative of the class names. I have created different folders for different classes. Please check the below image:
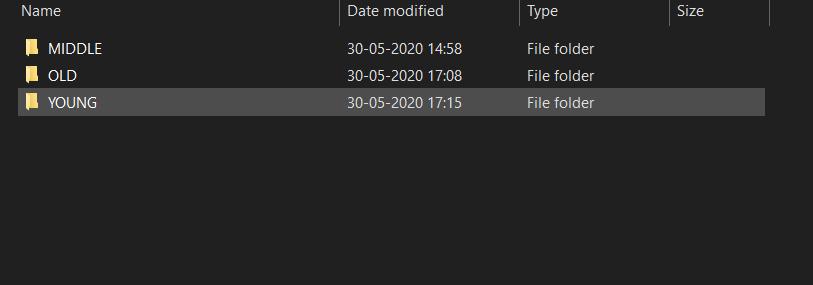
Here, our respective folders have images inside based on their class labels. I have around 5000 images per class. The more quality images you have, the better the model will be. Still, If you have fewer images, feel free to use image augmentation techniques.
Defining Parameters
Here, you need to define the number of classes, the batch size (based on your machine’s configuration), and image size. We can use images of any size—our model will itself convert them into a defined image size.
Reading Image Data
datagen = ImageDataGenerator(rescale=1.0/255.0)

train_path = 'Your Image Folder Path'
train_batches = datagen.flow_from_directory(train_path, target_size=(200,200), classes=classes_required, batch_size=batch_size_train)
Defining Model Structure
I have used a sequential model with three sets of convolutional, ReLU, and pooling layers, with batch normalization so that our model doesn’t overfit.
And finally, I’ve used one dense layer after flattening the data. You can use a different set of layers. There is no specific rule for the number of layers, but traditionally, we first have to use the convolutional layer, followed by the ReLU activation function, and then the pooling layer:
model=Sequential()
model.add(Conv2D(16,kernel_size=(3,3), activation="relu" ,input_shape=IMAGE_SIZE + [3], padding='same'))

model.add(Conv2D(32, kernel_size=(3,3), activation="relu",padding='same'))
model.add(BatchNormalization())
model.add(MaxPooling2D(pool_size=(2,2)))
model.add(Dropout(0.30))

model.add(Conv2D(64, kernel_size=(3,3), activation="relu",padding='same'))
#model.add(BatchNormalization())
model.add(MaxPooling2D(pool_size=(2,2)))
model.add(Dropout(0.35))

model.add(Conv2D(128, kernel_size=(3,3), activation="relu",padding='same'))
#model.add(MaxPooling2D(pool_size=(2,2)))
model.add(BatchNormalization())
model.add(Dropout(0.45))

model.add(Flatten())
model.add(Dense(64, activation="relu"))
model.add(Dense(num_classes, activation="softmax"))
Compiling Model
We need to define our optimizer and loss function. The optimizer uses the loss function to set the weight during backpropagation. There are many optimizers available, and we need to try different optimizers based on the data, as they behave differently.
The loss function we’re using is categorical_crossentropy loss. Categorical_crossentropy loss works with classification models.
Model Training
Finally, we have our data, model architecture, and optimizer ready. It’s time to train our model. By running the command below, your model will start training.
model.fit_generator(train_batches, steps_per_epoch=50, epochs=100, verbose=1)
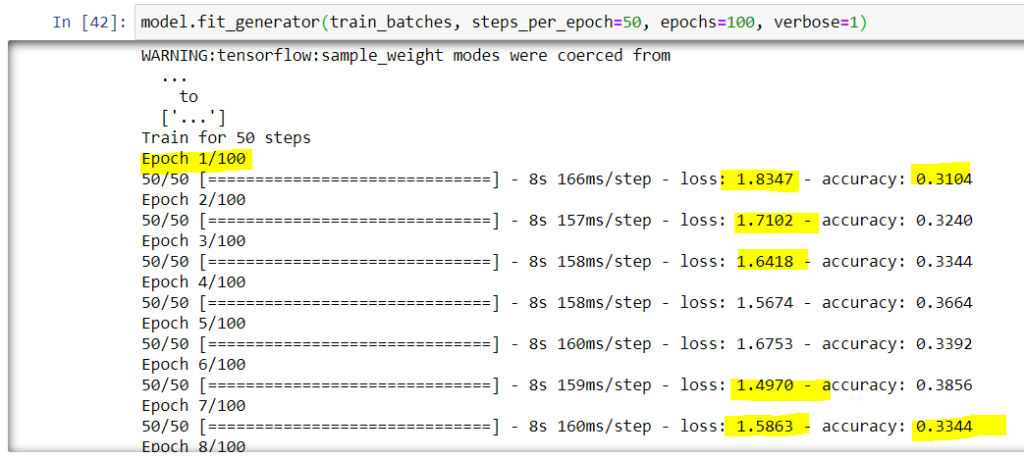
Sit tight, grab some tea or coffee, or go for a walk—model training can take around 1–3 hours based on your machine’s configuration, size of the dataset, and number of epochs you’re training for. While training, you can see the accuracy and loss in the Notebook itself (highlighted in the above image).
Save Your Model
Once model training is completed, make sure to save it so that you can use it anytime. Run the below command to save your model to your machine:

Load Saved Model
Once the model is trained and saved, if you want to use it on your website or model app, you won’t need to train it again. Just import the libraries and load your model. Now, it’s time for inference.

Running Inference Using the Model
We will use OpenCV to more efficiently load our images. You can load any image of your choice. Then, we need to pass it to the model, and if everything’s working correctly, the model will give us the age class to which the image belongs.
test_image=cv2.imread("IMAGE_PATH")
test_image = np.expand_dims(test_image, axis=0)
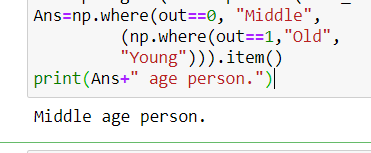
out=np.argmax(model_loaded.predict(test_image))
Ans=np.where(out==0, "Middle",
(np.where(out==1,"Old",
"Young"))).item()
print(Ans+" age person.")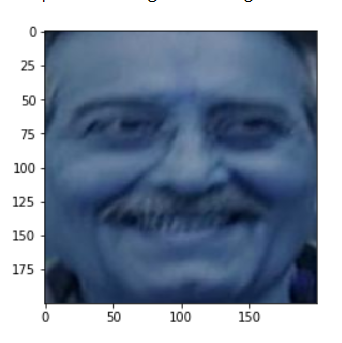
In Conclusion
First of all, congrats on building your age classifier model! We did a lot: structuring folder classes, getting data ready for modeling, defining our deep learning classifier, defining optimizer and loss function, training a model, and finally running inference to predict the age of an input image.
Try it out with your own images. You can fine-tune your model parameters or change the number of training epochs to build an even a better model.
Keep exploring data science!
Comments 0 Responses