
While TensorFlow Lite is amazing, it has certain shortcomings that surface when you’re trying to run a model containing custom operations that aren’t supported by the framework.
Trying to load and run such a model often results in exceptions similar to the following :
As you can see, the model I was trying to load needed 3 operations (Normalize, ExtractFeatures, and Predict) that were missing from TensorFlow Lite’s default dependency.
The solution to this problem is to compile a custom TensorFlow Lite build of your own that contains these custom operations and use that instead of the default gradle dependency provided by Google (org.tensorflow:tensorflow-lite:+).
While it sounds straightforward and simple, the relevant documentation is pretty vague and unstructured.
As someone who has no idea about Android NDK or the Bazel Build system, and who hasn’t touched C++ for years, this was somewhat challenging, and it took a good chunk of my week to fix this problem.
Fortunately, I succeeded in doing so, and I’ve decided to share the detailed steps on how I did it to possibly save you some time 🙂
Step 1 : Setup
First, you’ll need to set up your machine so it has all the tools and packages required to build the dependency.
You’ll need:
- Python 2.7/3
- Cloned GitHub repository for the TensorFlow project
git clone https://github.com/tensorflow/tensorflow/ - Android SDK
Personally, I prefer installing Android Studio since it automatically installs the required SDK. Simply go to the official Android Developer site, and download and install Android Studio. Once installed, simply launch it, and it will automatically download all the needed files. - Android NDK (version 15c recommended)
You’ll also need Android NDK for building this project. I won’t recommend downloading the latest release of NDK, as Bazel only supports releases until version 16b, and I had a lot of build issues with it. So simply go to the following link and download version 15c for your system.
https://developer.android.com/ndk/downloads/older_releases - Bazel
Bazel is a build system that we’ll be using to build our custom TensorFlow package, so feel free to visit the following link and install it on your system.
https://docs.bazel.build/versions/master/install.html
Step 2 : Configuration
Once you’re done with the steps listed above, simply cd into the cloned repository above, and from the root folder type:
This will start an interactive configuration wizard that’ll ask you some questions regarding the location of the tools and packages you just downloaded.
Since we won’t be needing most of the options suggested, I recommend that you answer them in the following manner to save you some time with the build:
- Provide the location for your Python installation or press Enter/Return if Bazel was able to detect it automatically.
- Provide the following answer for the subsequent questions :
1. GCP support: n
2. Hadoop support: n
3. AWS support: n
4. Apache Kafka support: n
5. XLA JIT support: n
6. GDR support: n
7. VERBS support: n
8. nGraph support: n
9. OpenCL SYCL support: n
10. CUDA support: n
11. Download a fresh release of clang : y
12 : MPI support: n - After this is done, you’ll be asked to provide optimization flags. Leave it as it is and press Enter/Return.
- Next up, you’ll be asked whether you’d like to configure your workspace for Android Builds. This is something that we need to configure properly so answer “y”.
- After this, you’ll be asked for a path to your Android NDK. Provide the full path to the extracted NDK that you downloaded above and press Enter.
For example, for me it was : /Users/harshitdwivedi/Downloads/android-ndk-r15c Note : If you downloaded the NDK via Android Studio, you can find it here :
Windows :
C:Users[username]AppDataLocalAndroidSdkndk-bundle
Mac :
/Users/harshitdwivedi/Library/Android/sdk/ndk-bundle - Next up, you’ll be asked for the path to your Android SDK. Again, provide the full path to the extracted SDK that you downloaded above and press Enter. Note : If you have Android Studio installed, bazel will automatically detect the Android SDK path, so no need to provide it a path— you can simply press enter at this step.
- You’ll then be asked to specify the Android SDK API and Build Tools version. Don’t select anything here. Bazel will automatically select the default one for you, so simply press Enter. Note : In case Bazel was unable to determine your API or Build Tools version, select the latest version and press enter.
- After you’re done with this, open a file named .tf_configure.bazelrc in the same directory and find a line named build –action_env ANDROID_NDK_API_LEVEL = x. Change the x to 21, as setting it to something else apparently causes some issues with the build.
All right, now your system is all set up and ready to go!
Step 3 : Copying the Custom Operations to the TensorFlow build path
This is the crucial step, which involves you copying the headers for your custom operations to your TensorFlow Lite build path.
To do this, navigate to tensorflow/lite/java/src/main/native and paste all your header files for the custom operations here.
For example, I pasted the header files for my custom ops (predict.h, normalize.h and extract_features.h) here.
Pro Tip : If you don’t have the header files (.h) and only have the source (.cc) files for your ops, simply rename the .cc file to .h and it should work. The C++ build system knows no difference between these two, so it’s all the same conventions.
Now, open the builtin_ops_jni.cc file and add headers for the custom ops that you just added above.
After modifying, it should look something like this :
...
#include "tensorflow/lite/java/src/main/native/normalize.h"
#include "tensorflow/lite/java/src/main/native/predict.h"
#include "tensorflow/lite/java/src/main/native/extract_feature.h"
namespace tflite {
...
You can see I added imports for the header files at the very top.
Next up, edit the BUILD file in the same directory as a text file. Find the block named hdrs and add your header files that you just copied above.
The result should look like :
...
hdrs = [
        "exception_jni.h",
        "nativeinterpreterwrapper_jni.h",
        "tensor_jni.h",
        "tensorflow_lite_jni.h",
        "normalize.h",
        "predict.h",
        "extract_feature.h",
    ],
...
And that’s it!
Off to the next step now— building the TensorFlow dependency with these custom ops.
Step 4 : Building the Custom TensorFlow Dependency
Go back to the root directory of your cloned GitHub repository and type in the following command to compile the TensorFlow Lite build :
bazel build --cxxopt='--std=c++11' -c opt
  --fat_apk_cpu=x86,x86_64,arm64-v8a,armeabi-v7a
  //tensorflow/lite/java:tensorflow-lite
That’s it! Go grab a beer and wait for the build process to complete… It’s going to take a while (took me around 15–20 mins on a 13′ MacBook Pro).
Note : If you encounter a build error that says something like this—
[Fatal Error] :150:34: The entity "oslash" was referenced, but not declared.
DEBUG: /private/var/tmp/_bazel_harshitdwivedi/5e14a8881660bff07fef13c4451c9f7c/external/bazel_tools/tools/osx/xcode_configure.bzl:87:9: Invoking xcodebuild failed, developer dir: /Applications/Xcode-beta.app/Contents/Developer ,return code 256, stderr: Process terminated by signal 15, stdout:
ERROR: /private/var/tmp/_bazel_harshitdwivedi/5e14a8881660bff07fef13c4451c9f7c/external/local_config_android/android.bzl:9:3: no such package '@androidsdk//': org.xml.sax.SAXParseException; lineNumber: 150; columnNumber: 34; The entity "oslash" was referenced, but not declared. and referenced by '//external:android/dx_jar_import'
ERROR: Analysis of target '//tensorflow/contrib/lite/java:tensorflow-lite' failed; build aborted: Analysis failed
Don’t fret! Simply go to the following link and scroll down until you find the Command Line Tools option. Download and extract the downloaded zip file and install the latest Android SDK platform tools and build tools using the sdkmanager binary inside the bin folder.
A detailed description on doing this can be found here:
TL;DR : You need to execute the following commands :
Once the build is complete, you should find the resultant .aar file in the following folder :
Simply cd here and you should see tensorflow-lite.aar, which is the custom TensorFlow Lite dependency we just built.
Step 5 : Importing the .aar file into your Android Project
Considering the steps we’ve gone through above, this step is relatively easy.
To import an .aar file into your Android Project, simply open your project in Android Studio and then go to File -> New -> New Module
Then from the options, select the option named, Import .JAR/.AAR package.
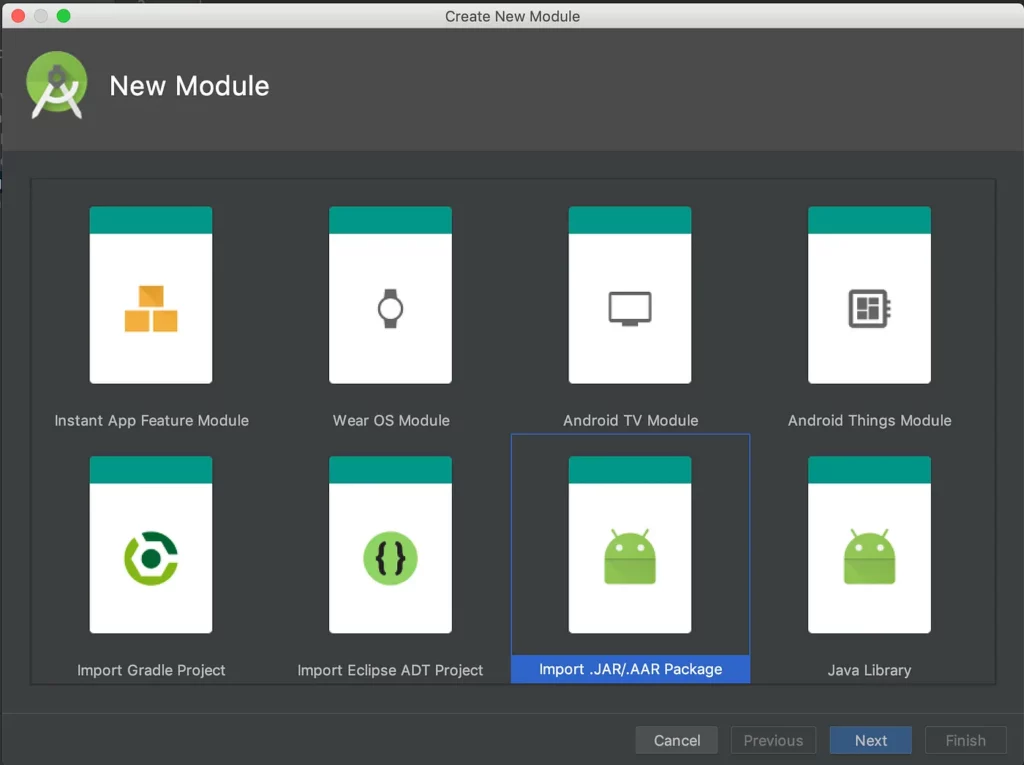
Next, specify the location for your .aar file (the same that was inside bazel-genfiles/tensorflow/contrib/lite/java/) and press Finish.
After this is done, you should see a new module added to your project with the name tensorflow-lite
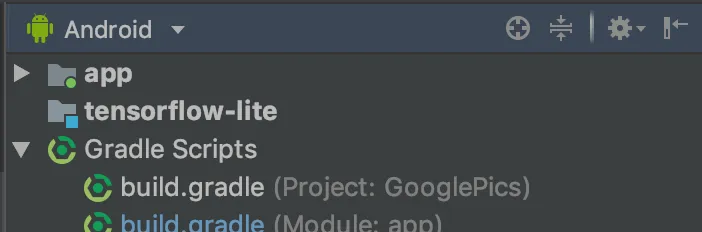
To include this module in your app, simply go to your app’s build.gradle file and add the following line under dependencies :
Note : Be sure to remove the default TensorFlow Lite dependency that you had added to your project earlier before adding this custom TensorFlow Lite build. Otherwise, you might get some unwanted results.
And that’s about it! 🙂 Congratulations on making it to the end. Hopefully you managed to produce your own TensorFlowLite build.
If you faced any errors, or if you felt there was something missing in the post, feel free to let me know in the comments below, and I’ll be happy to take another look!
I’ll see you later! 👋🏼👋🏼👋🏼
Thanks for reading! If you enjoyed this story, please click the 👏 button and share to find others! Feel free to leave a comment 💬 below.
Have feedback? Let’s connect on Twitter.
Do you want to start building awesome Android Apps? Check out my course on Coding Bocks .
Discuss this post on Hacker News and Reddit
Comments 0 Responses