
Let’s say you want to make an iOS app that can recognize audio signals in real time, followed by the triggering of an action. From a global point of view, we’d need to explore the crossroads of machine learning and and mobile development.
For the recognition of sound signals, it’s first necessary to collect data with which to train a machine learning model. Luckily, I found a very relevant dataset: a collection of 50 types of environmental sounds.
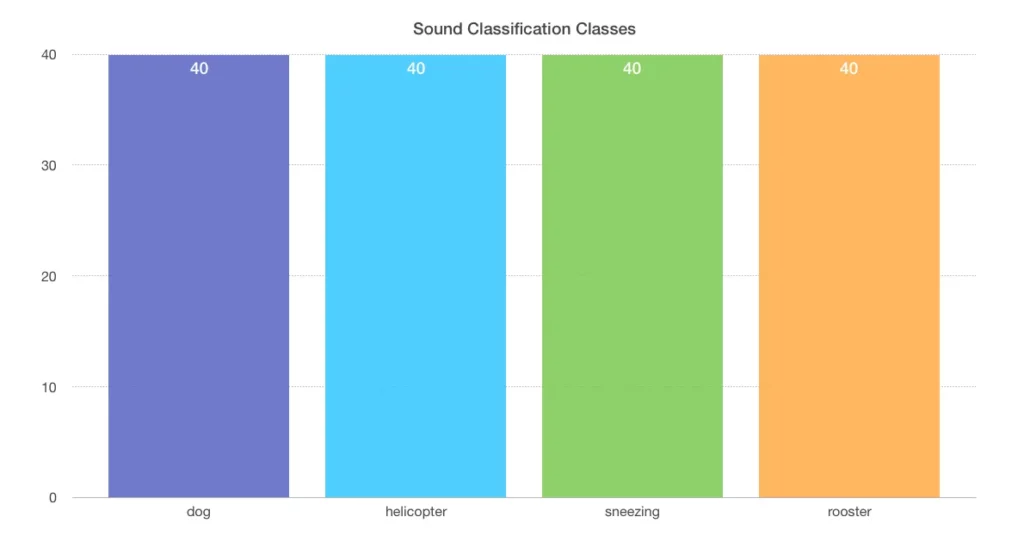
For each class or type of sound, there are 40 records of 5 seconds each. As a result, 2000 records labeled with their membership class are available for training our model.
The fact that the data is qualified—that is, information on their category is available—is very important. The model will be based on this knowledge and will learn to distinguish the different categories.
However, before we can train the model, we have to go through the feature engineering stage. This step involves transforming the data to simplify it and remove redundant information. This and the structure of the model which follows make it possible to generalize the result of the learning.
Indeed, the goal is not to have a model that knows the training data by heart, but, on the contrary, to have a model sufficiently independent of the training data that’s able to recognize a sound it’s never heard before. Feature engineering is often the key to success in this endeavor.
In the field of signal processing, and also specifically for sound signal processing, a common practice is to use frequency transformation for feature extraction. The frequency makes it possible, for example, to distinguish a bass sound, characterized by low frequencies, from an acute sound, characterized by high frequencies.
Luckily for us, turicreate does all of the heavy lifting for us.
Step 1: Data preparation
For the purpose of this article, I’m going to focus on four types of sounds that are clearly distinct, the data used is from the ESC-10 dataset and used as is:
- Dog

- Rooster

- Helicopter

- Sneezing

I’ve made sure to pick sounds that are very distinct from each others.
Step 2: Train the model
Before we can start writing our classifier, we need to make sure that the data is balanced, which means that the model will get the same amount of data for each class.
Now that we know our data is clean and balanced, we can start training the model.
Here are all the steps:
- GPU use: I’m using all the GPU I have in my computer, but you can change usage to (0) if none or (n) for the number of GPUs you want to use.
- Load the data: Loading the folder that contains all the audio data.
- Load the metadata: Loading the .csv file that outlines file names and corresponding labels.
- Using only ESC-10: Because my computer is not very powerful, I’ve only used ESC-10 and excluded all the record that isn’t a part of it. You can definitely skip this part by using the filter function.
- Split the data: Using only a small part of the data for training (fold 1 only ESC-10) and (fold 1) for testing.
- Create the model: Turi Create will do the work for us — we just need the training data and the number of iterations (the maximum number of allowed passes through the data). I chose 100 iterations because the default is only 10, which isn’t enough.
- Save the predictions: These predictions will be used to evaluate the performance of the model.
- Evaluate the model: The model will try to predict the testing data and compare it with the ground-truth data.
- Save the model: Saving the model so that we can use it later if we want to export it in another format.
- Export a .mlmodel file: That’s the file format that can be parsed by Xcode for our iOS application.
import turicreate as tc
from os.path import basename

tc.config.set_num_gpus(-1)

# Load the audio data and meta data.
data = tc.load_audio('/ESC-50/audio/')
meta_data = tc.SFrame.read_csv('/ESC-50/meta/esc50.csv')

# Join the audio data and the meta data.
data['filename'] = data['path'].apply(lambda p: basename(p))
data = data.join(meta_data)

# Drop all records which are not part of the ESC-10.
data = data.filter_by('True', 'esc10')

# Make a train-test split, just use the first fold as our test set.
test_set = data.filter_by(1, 'fold')
train_set = data.filter_by(1, 'fold', exclude=True)

# Create the model.
model = tc.sound_classifier.create(train_set,
                                   target='category',
                                   feature='audio',
                                   max_iterations=100,
                                   custom_layer_sizes=[200, 200])

# Generate an SArray of predictions from the test set.
predictions = model.predict(test_set)

# Evaluate the model and print the results
metrics = model.evaluate(test_set)
print(metrics)

# Save the model for later use in Turi Create
model.save('SoundClassification.model')

# Export for use in Core ML
model.export_coreml('SoundClassification.mlmodel')
How it works:
- Signal preprocessing
The preprocessing pipeline takes the audio data in the form of 975ms worth of audio as input (exact input length depends on sample rate) and produces an array of shape (96, 64). This part would probably be familiar to someone in the field of sound engineering.
At this stage there is no learning.
- Extracting features
Here, we use VGG feature extraction. VGG is a pre-trained convolutional neural network from Google for image classification and recognition.
I would highly recommend reading Google’s article to better understand this architecture.
- Neural network to make the predictions
Turi Create uses three layers, with the first two being dense layers (each neuron is simply connected to all the neurons of the previous layer. We can also refer to this layer as “fully connected”), with 100 unit tests (I’ve changed it to 200, it improves the accuracy).
The third one is a softmax layer. Softmax assigns decimal probabilities to each class of a multi-class problem. The sum of these decimal probabilities must be equal to 1. This additional constraint makes learning converge more quickly than it would otherwise.
iOS Application
Create a new project
To begin, we need to create an iOS project with a single view app:

Now we have our project ready to go. I don’t like using storyboards myself, so the app in this tutorial is built programmatically, which means no buttons or switches to toggle — just pure code 🤗.
To follow this method, you’ll have to delete the main.storyboard and set your AppDelegate.swift file like so:
func application(_ application: UIApplication, didFinishLaunchingWithOptions launchOptions: [UIApplication.LaunchOptionsKey: Any]?) -> Bool {
        window = UIWindow(frame: UIScreen.main.bounds)
        let controller = ViewController()
        window?.makeKeyAndVisible()
        window?.rootViewController = controller
        return true
    }
Setup the layout:
Label
We need a label to update the view with the appropriate prediction:
- Instantiate a UILabel
- Set up the layout and add it to the subview
lazy var label = UILabel()

    ///////////////////////////////////////////////////////////
    // MARK: - Setup the label layout and add it to the subview
    ///////////////////////////////////////////////////////////
    private func setupLabel() {
        label.translatesAutoresizingMaskIntoConstraints = false
        label.font = UIFont(name: "Avenir-Heavy", size: 100)
        view.addSubview(label)
        label.centerXAnchor.constraint(equalTo: view.centerXAnchor).isActive = true
        label.topAnchor.constraint(equalTo: view.topAnchor, constant: 120).isActive = true
    }
Get the inference and update the view:
To get the prediction and update the view, we need to follow some steps:
- Instantiate the model with SoundClassification().
- For the purpose of this tutorial, I’ve added a timer to go through different sound types.
- Get the audio file (remember that it has to be more than 975ms).
- Read the audio file.
- Create a MLMultiArray (which is a multidimensional array that is our input) and set to Core ML model.
- Get all the predictions.
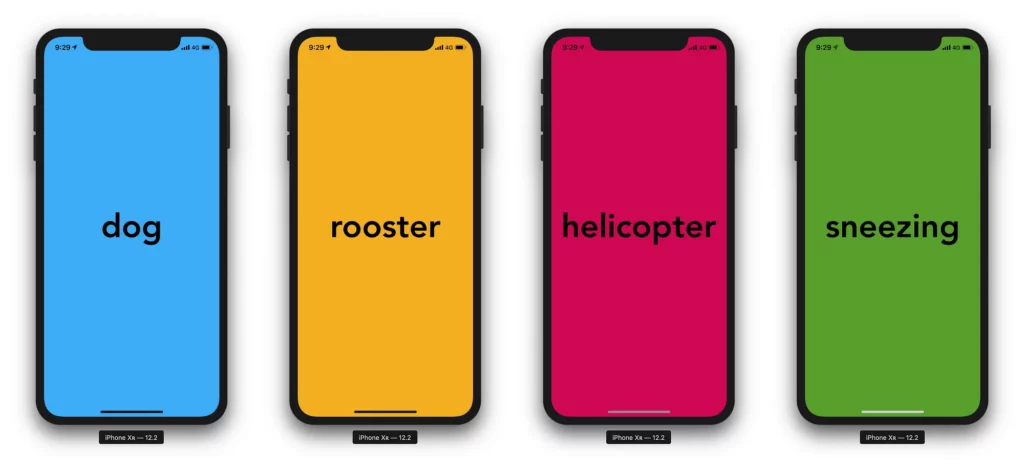
- Get the label with the maximum prediction.
- Change the view color and label the text with the best prediction.
/////////////////////////////////////////////////////////////////////////////
// MARK: - Get the inference for each sound and change the layout accordingly
    private func getInference() {
        //200 layers 100 iterations
        let model = SoundClassification()

        var count = 0
        _ = Timer.scheduledTimer(withTimeInterval: 5, repeats: true) { t in

            var wav_file: AVAudioFile!
            do {
                let fileUrl = URL(fileReferenceLiteralResourceName: "(self.output[count])_1_converted.wav")
                wav_file = try AVAudioFile(forReading:fileUrl)
            } catch {
                fatalError("Could not open wav file.")
            }

            print("wav file length: (wav_file.length)")
            assert(wav_file.fileFormat.sampleRate==16000.0, "Sample rate is not right!")

            let buffer = AVAudioPCMBuffer(pcmFormat: wav_file.processingFormat,
                                          frameCapacity: UInt32(wav_file.length))
            do {
                try wav_file.read(into:buffer!)
            } catch{
                fatalError("Error reading buffer.")
            }
            guard let bufferData = buffer?.floatChannelData else { return }

            // Chunk data and set to CoreML model
            let windowSize = 15600
            guard let audioData = try? MLMultiArray(shape:[windowSize as NSNumber],
                                                    dataType:MLMultiArrayDataType.float32)
                else {
                    fatalError("Can not create MLMultiArray")
            }

            // Ignore any partial window at the end.
            var results = [Dictionary]()
            let windowNumber = wav_file.length / Int64(windowSize)
            for windowIndex in 0..()
            for r in results {
                for (label, prob) in r {
                    prob_sums[label] = (prob_sums[label] ?? 0) + prob
                }
            }

            var max_sum = 0.0
            var max_sum_label = ""
            for (label, sum) in prob_sums {
                if sum > max_sum {
                    max_sum = sum
                    max_sum_label = label
                }
            }

            let most_probable_label = max_sum_label
            let probability = max_sum / Double(results.count)
            print("(most_probable_label) predicted, with probability: (probability)")

            let prediction: classes = classes.init(rawValue: most_probable_label)!

            switch prediction {
            case .dog:
                self.label.text = most_probable_label
                self.view.backgroundColor = #colorLiteral(red: 0.2392156869, green: 0.6745098233, blue: 0.9686274529, alpha: 1)
            case .helicopter:
                self.label.text = most_probable_label
                self.view.backgroundColor = #colorLiteral(red: 0.8078431487, green: 0.02745098062, blue: 0.3333333433, alpha: 1)
            case .rooster:
                self.label.text = most_probable_label
                self.view.backgroundColor = #colorLiteral(red: 0.9529411793, green: 0.6862745285, blue: 0.1333333403, alpha: 1)
            case .sneezing:
                self.label.text = most_probable_label
                self.view.backgroundColor = #colorLiteral(red: 0.3411764801, green: 0.6235294342, blue: 0.1686274558, alpha: 1)
            }
            print(count)
            if count >= 3 {
                t.invalidate()
            }
            count += 1
        }
    }
Make sure to convert your file because the input must only be one channel (mono not stereo), and also the sample rate has to be 160000 Hz .
I’ve used this website to convert all the audio files. Convert
But don’t worry, I’ve provided three samples for each class so that you can test the application.
One last thing (VERY IMPORTANT):
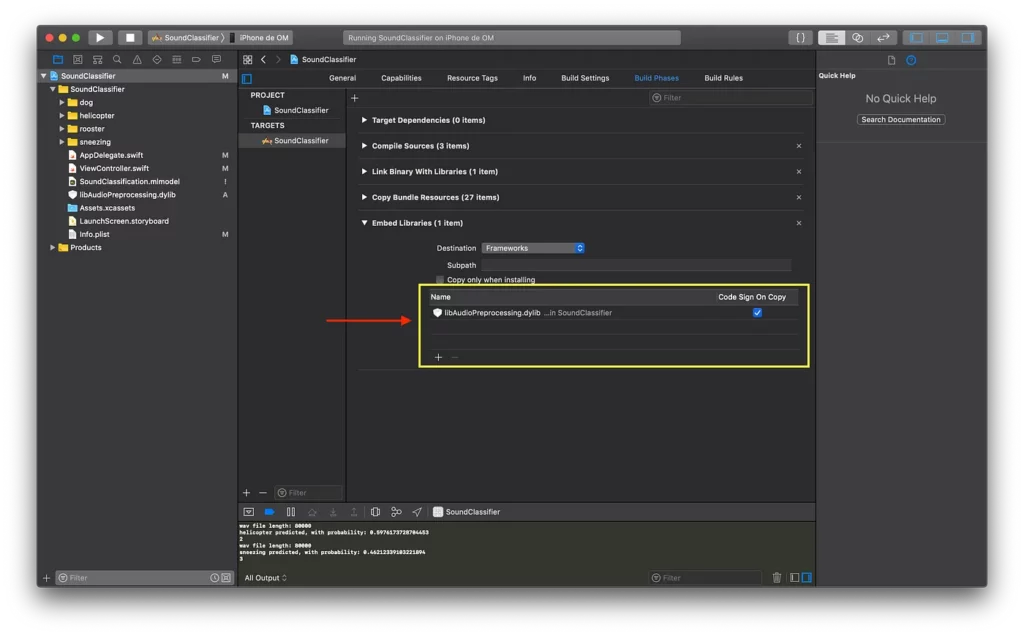
Before you can use the model you must download libAudioPreprocessing.dylib. This file is needed for the signal preprocessing stage, which is implemented as a custom Core ML model. The libAudioPreprocessing.dylib file can be found on Turi Create’s GitHub releases page. Once you’ve downloaded that file, drag and drop the arm64 file into your Xcode project as a folder reference .
- Under Project > Build Phases, add libAudioPreprocessing.dylib to Copy Bundle Resources.
- Under Project > General, add libAudioPreprocessing.dylib to Embedded Binaries and to Linked Frameworks and Libraries.
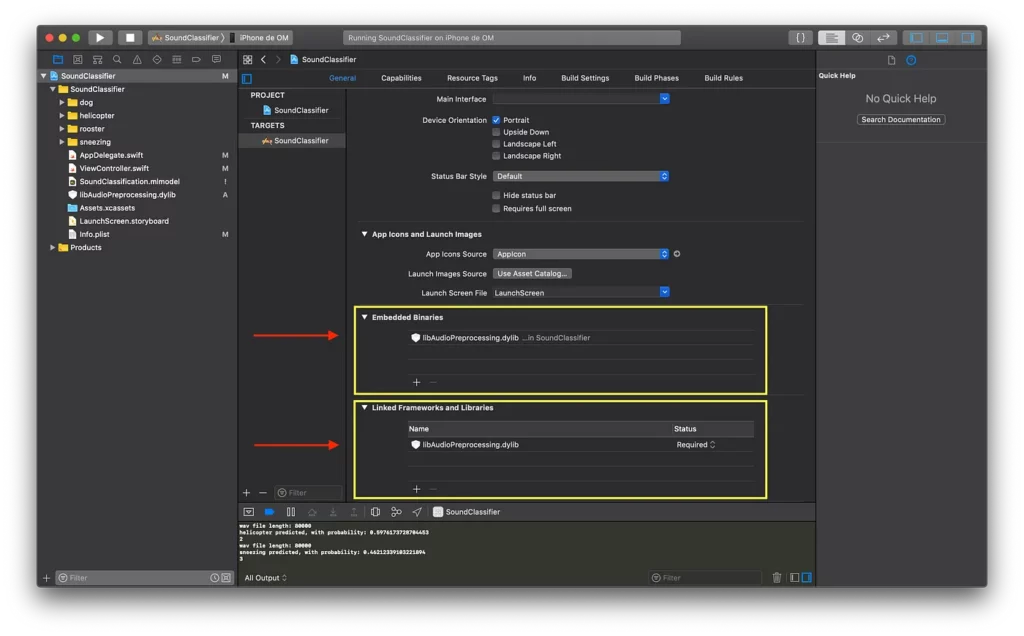
- Under Project > Build Phases, add libAudioPreprocessing.dylib to Embed Libraries.
Important note: ⚠️
The project will not work in the simulator—you have to test on your iPhone. That’s because the simulator will need the x86_64 libAudioPreprocessing.dylib file in order to work on your computer’s simulator.
The best solution is to use your own phone.
Final result:
There are, of course, many improvements to be made. The system works on the test dataset derived from the training dataset, but in a real-world case the performance isn’t yet satisfactory. I think that I could work on signal preprocessing and feature engineering to start, after exploring other models.
In conclusion, I want to highlight two things:
The first thing is that a data science/machine learning project can go much further than a learning-style data science challenge.
It represents a way to explore new territories with the help of rich learning resources, but machine learning isn’t just a challenge to find the best performance of a predictive model. There are also larger projects that require getting out of the comfort zone of a data scientist—beyond the “explore and predict” paradigm, so to speak.
Secondly, even if simplified, this project represents the work needed for a big data project, where the volume of data is much larger, is distributed in a cluster (which often runs on Linux), and automated processes are put into production to run repeatedly. In these cases, the reproducibility and cleanliness of machine learning tasks are essential.
In this context, it’s also essential for a data scientist to be able to interact with the data engineers who surround him so that the project can succeed. In an industrial context, such projects are more and more numerous and their business challenges are considerable.
I would also like to point out that in order to get a useful and close to real life scenario, you need to work with people that are in the field of sound engineering to really understand every aspect of the problem and take a look at the whole picture.
That’s all for today, thanks for reading. If you have any questions don’t hesitate to send me an email at [email protected].
Comments 0 Responses