Billions of people are using smartphones today—the devices are truly ubiquitous. Given this ubiquity, it’s essential to remember that some smartphone owners have poor vision, hearing aid, or mobility issues. A disability shouldn’t hinder the smartphone experience for any user. And that’s what accessibility is about at its core: building applications that are accessible to everyone.
While a lot of developers refrain from integrating accessibility in their applications due to time and budget constraints, including these features, in the long run, broaden your user base. Many government-backed applications today require developers to infuse accessibility features.
Apple also has been increasingly investing in its accessibility and assistive technology over the past few years, be it through their revolutionary VoiceOver system (a screen reader technology)or Voice Control (allowing users to tell their phones exactly what to do).
Our focus in this article will be on Apple’s VoiceOver technology. We’ll see how it helps people with visual impairments hear aloud what’s displayed on the screen. Before we test out the machine learning-powered VoiceOver in our own applications, let’s talk about SwiftUI, the new declarative framework for building UIs and how accessibility works within it.
Table of contents:
SwiftUI and Accessibility
The euphoria that the introduction of the SwiftUI framework, released during WWDC 2019, was unprecedented. While the relatively easy-to-use API got everyone talking, the list of bugs and the need to fall back to UIKit for a lot of components showed us that there’s a lot to look forward to in SwiftUI in the coming years.
Among the things that SwiftUI got absolutely right was accessibility. Apple’s Accessibility team worked closely with SwiftUI to ensure that the declarative framework has much improved functionality to implement automatic accessibility features.
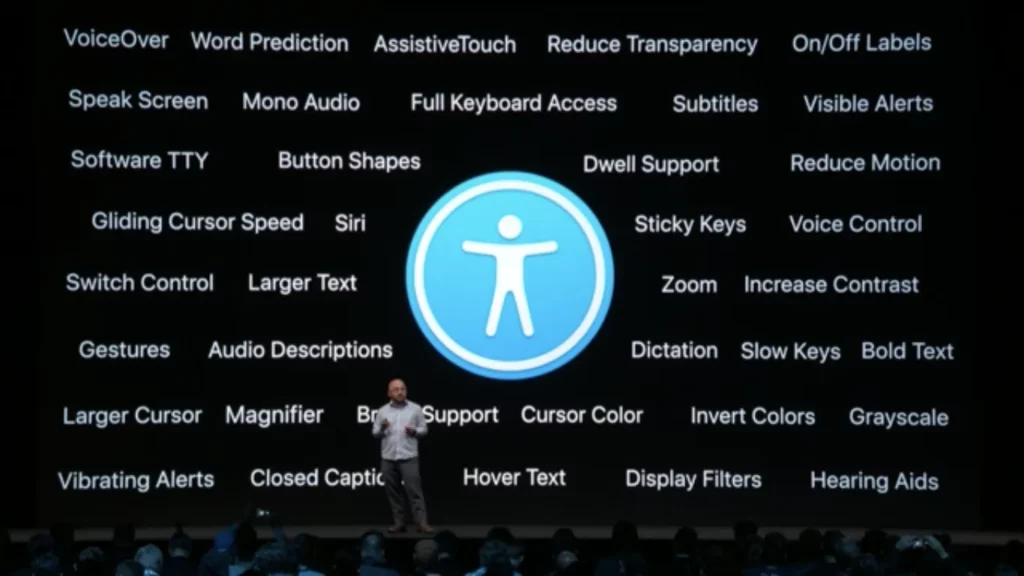
The image below illustrates the built-in accessibility features currently available on iOS:

Accessible features need to get ahold of the accessibility tree from the UI in order to perform their actions. SwiftUI automatically generates accessible elements from the UI. Moreover, with its state-driven nature, SwiftUI takes care of accessibility notifications — automatically notifying the accessibility feature (such as VoiceOver) about changes in the UI automatically.
With that in mind, let’s return to another important question: What are accessibility elements?
Accessibility Elements
To understand accessibility elements, let’s take a look at the following code snippet:
Each of the UI elements inside the VStack gets mapped to an accessibility element. An accessibility element is not a UIView or any Foundation class type. It’s essentially an object that holds information to be passed to the accessibility tree and the API.
An accessibility element holds:
- Label: A string that describes that UI. This is the first thing that gets read by the VoiceOver.
- Trait/Role: This is basically the type of that element — Text, Button, etc. For certain UI elements like Buttons and Toggles, the control name is read alongside the Label.
- Action: Indicates to the accessibility API what to do when a gesture is performed for that UI element.
- Value: Certain UI elements, like Toggles and Pickers, hold the content of the element, which represents a numerical value/boolean/text representation. This gets read out every time the user changes it.
In order to test VoiceOver on your device, you can enable it from your Settings | Accessibility page, or just ask Siri to do it! (iOS 13 bumped accessibility to the first page of Settings!)
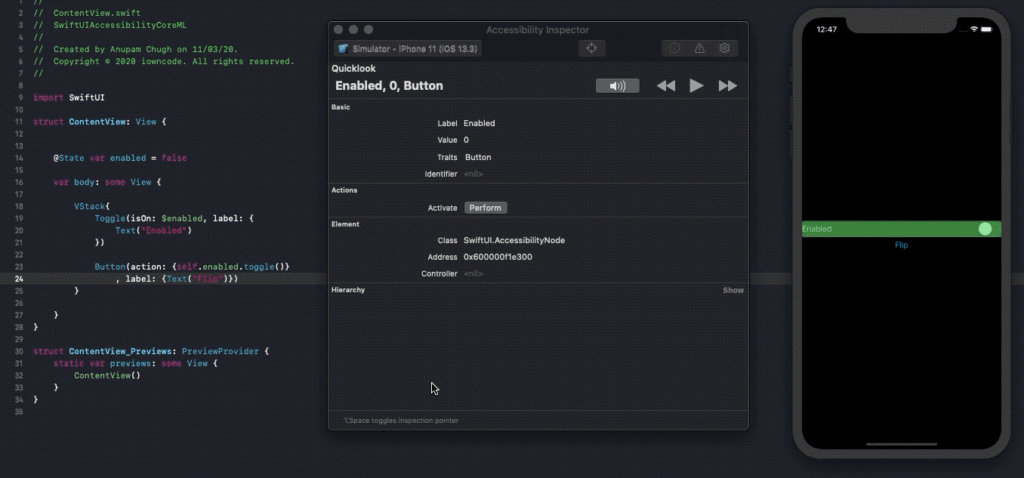
Xcode comes with an Accessibility Inspector application. This acts as a VoiceOver simulator, reading out the text while highlighting it on the screen. The following screengrab demonstrates the Accessibility Inspector in action:

While SwiftUI provides accessibility by default, which works well in most cases, sometimes you may need to customize it according to your application’s user interface. Gladly, we have the Accessibility API, which has been bolstered by the introduction of new modifiers for SwiftUI images, sorting elements, and more. Let’s take a look at a few accessibility modifiers.
Accessibility Modifiers
SwiftUI provides a bunch of accessibility modifiers that can be applied on any view to modify the default label/value/action/order.
We’ll start off with the sort priority accessibility modifier.
Sort Priority
By using this modifier, we can change the order of elements through which the VoiceOver navigates.
By default, VoiceOver reads the elements from the top left to bottom right. At times, we’d prefer to take control of the order of navigation, especially when in a ZStack that puts elements on top of each other. Using the accessibility(sortPriority:), we can change the order in which VoiceOver accesses the elements:
The sortPriority modifier is set on each of the views with a number assigned to it, such that the highest one is read first among the sibling views contained in the parent.
Labels and Values
Like we’d already seen in an earlier section, labels describe the UI element. Most SwiftUI controls require a label by default. For example:
Setting an appropriate label is important, especially in images. SwiftUI images, unlike with UIKit’s UIImageView, are accessible by default. This can lead the VoiceOver to read the file name only if the label is absent.
The accessibility label modifier can be assigned on a UI control in the following way:
Despite values being bound to most UI controls of SwiftUI, sometimes you’ll want to make them descriptive rather than simply reading out the numerical/text representation. By using the accessibility value modifier, we can add more context to the value, as shown below:
Without the accessibility(value:) modifier, the above UI control would just read out the number, which can get confusing for the user.
Traits and Groups
By assigning traits, we’re providing VoiceOver and other assistive technologies with more information around the SwiftUI element. For example, setting an isHeader trait on a Text element would enforce the screen reader to mention “header” along with the label of the text. And setting an isSelected trait on a button would let the VoiceOver mention that the button is selected.
We can add and remove a number of traits using accessibility(addTrait:) and (accessibility:removeTrait).
The following shows some of the traits available:

While traits help us indicate the role of the element, grouping helps reduce the number of accessibility elements in the tree. Take a SwiftUI list of 100 elements as an example. With each row consisting of a Text and Button, the number of elements in the accessibility tree would be 200. By using the following modifier, we can group elements and reduce the complexity of the tree.
Hiding Accessibility
Hiding an element is possible by setting .accessibility(hidden: true) on the view. With SwiftUI images being accessible by default, at times when we have both an image and text describing it, things get redundant. Alternatively, a SwiftUI image has a special initializer that skips reading the image as well. It is:
Building Accessible Applications
Well-designed accessible applications are easily understandable, navigable, and simple to use. To know if your application is truly accessible and the VoiceOver technology is behaving in the desired manner, try testing it with your eyes closed.
When VoiceOver is enabled, standard touch screen gestures are disabled. Instead, we have a set of new gestures that let the user navigate the phone without looking. The following are some of the gestures that can be used to perform VoiceOver actions in your application:
- Swipe Left or Right — Doing this takes the user to the previous or next accessible element.
- Tap — A single tap reads out that item, whereas a double-tap activates the selection — such as pressing a button.
- Three Finger Scroll — Doing this in up or down direction takes the user to the next or previous page.
- Three Finger Tap and Hold — Indicates to the user the position of the currently-selected accessible element on the screen.
For a complete list of VoiceOver gestures, refer here.
Now, let’s move onto the final leg of this article, where we’ll see how Apple harnessed the powered of machine learning to make the VoiceOver even smarter.
Machine Learning-Powered VoiceOver on Images
Previously, we saw that images in SwiftUI can be described using labels. That works fine for static images, but what happens when we’re dealing with remote images? How do we identify the content of an image downloaded at runtime and pass it on to the assistive technology?
VoiceOver in iOS 13 uses a built-in Core ML model. This model helps in classifying objects in a given image. From determining the number of faces, to what the person is wearing to the background, and other objects, this classification model provides quite a bit of helpful information. Additionally, it’s able to determine whether an image includes text or not, and is smart enough to recognize known faces from your Photos application.
As a result, the AI-powered VoiceOver can provide high-quality descriptions of an image’s contents. This only further strengthens how serious Apple is about their accessibility platform, and it should only get better moving forward.
Let’s look at a sample SwiftUI sample application that consists of a list of images. We’ll enable VoiceOver on our iOS device to hear how it describes the user interface of the application.
As you can see, the machine learning capabilities of VoiceOver are pretty powerful. It can accurately describe the images, among which one contained a printed text image. Let’s see if Apple decides to include text recognition for images in VoiceOver’s screen reader technology.
Closing Thoughts
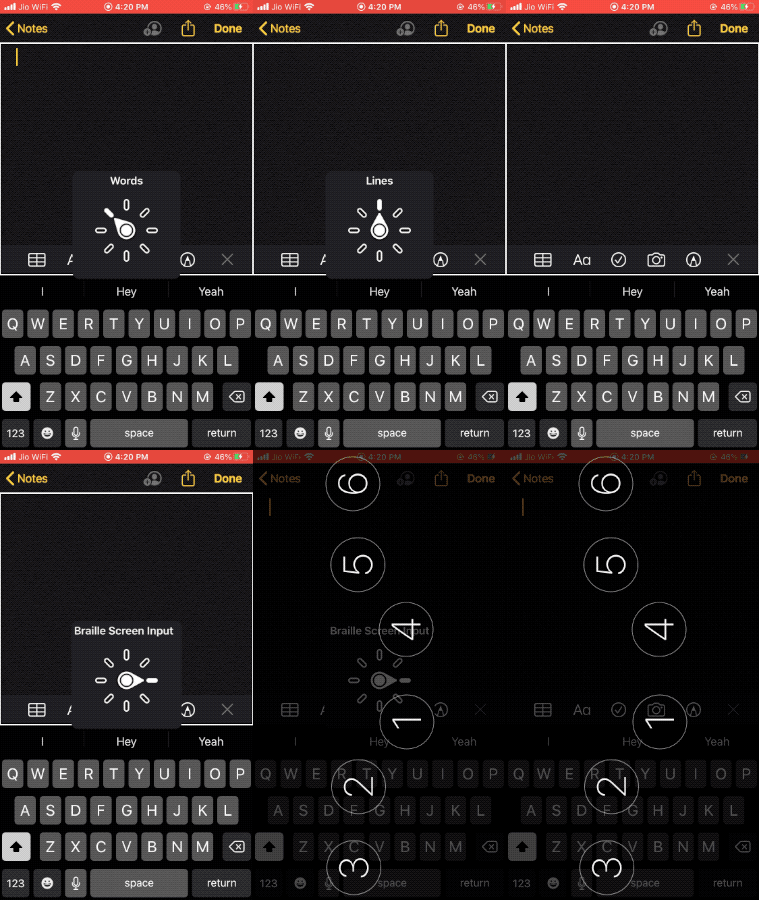
VoiceOver also possesses a rotor for choosing how the reader should work. You can change the speaking rate, switch pages, or enable Braille Input for typing if the selected element is of an input type, simply by doing a two-finger gesture rotation on the screen as shown below:

Moving forward, now that we’ve got a good look at accessibility in SwiftUI, we can create our own text recognition Core ML model that could bolster the performance of VoiceOver even more. Furthermore, we can use speech recognition to validate/moderate the information read out by VoiceOver.
I hope this inspires you to build machine learning-powered accessibility applications in iOS.
That’s it for this one. Thanks for reading.

Comments 0 Responses