
Following up on my blog post on training a TensorFlow Lite model with AutoML Vision Edge, this blog post aims to teach you how to load that .tflite model into an Android app and run inference (i.e. predictions) on it.
If you haven’t read that previous blog on training your own TensorFlow Lite model, I highly suggest that you do so before proceeding with this blog:
Table of contents
Prologue
I’m currently training a few machine learning models to use them in my app AfterShoot, and while AutoML Vision Edge allows us to upload images and see how well the model performs, I still have to download and embed the trained model on a mobile device for practical usage.
In this blog, I’ll be outlining how to do just this in an Android app. Specifically, we’ll be loading in a quantized version of a TFLite model (more on what that’s all about later). Let’s get started!
Step 1: Download the trained model from AutoML Vision Edge
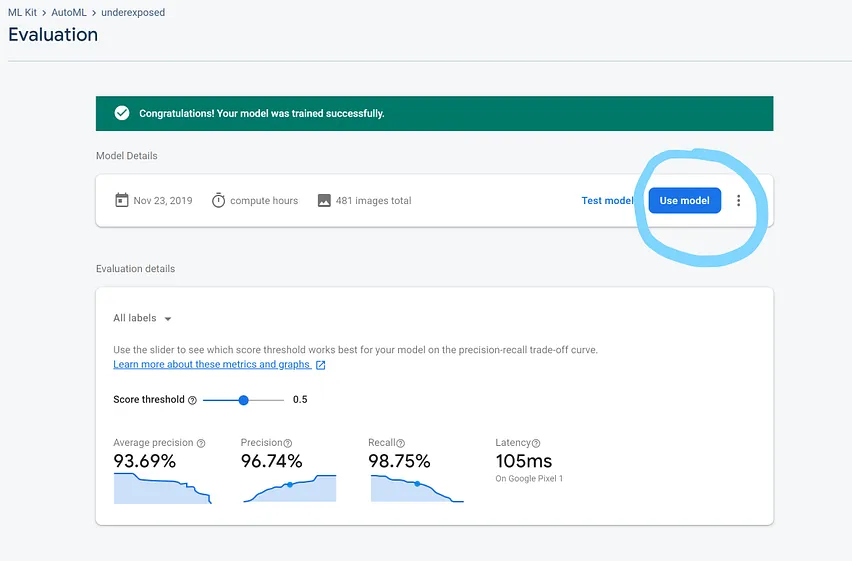
The first step is to download the trained .tflite model onto your local system. You can do this from your Firebase console by clicking the “Use Model” button from your model’s page, and then selecting the option to “Download” the trained model.
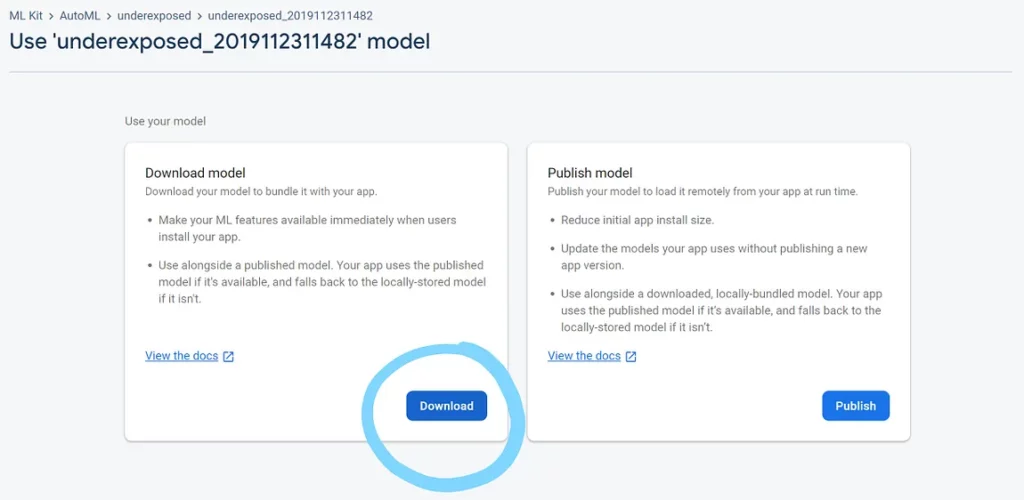
Upon clicking the Download button, you’ll have a zip file containing your .tflite file and a dict.txt file containing the labels that your model is trained on.
Step 2: Find out the input and output parameters of the model
The next step is to figure out what type of input your model expects and what output it will eventually return once it’s processed the input image.
An easy way to do this is to navigate to Netron and upload your model there.
The input and outputs for my model look like the following:
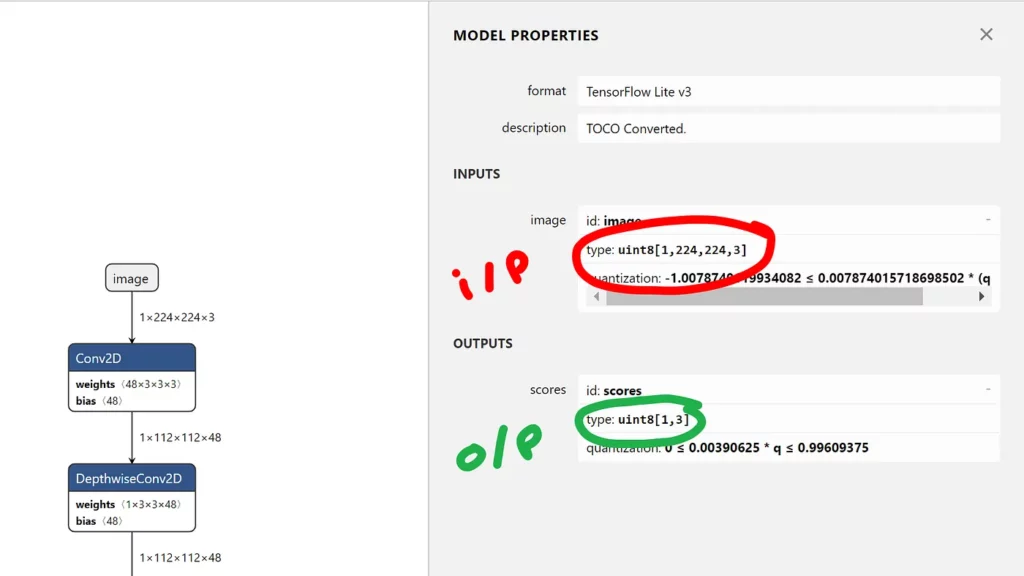
What this essentially means is that my model expects a 224×224 RGB image as input and it returns a 2-D array containing a single row that itself has an array of 3 items, each of which contains an integer.
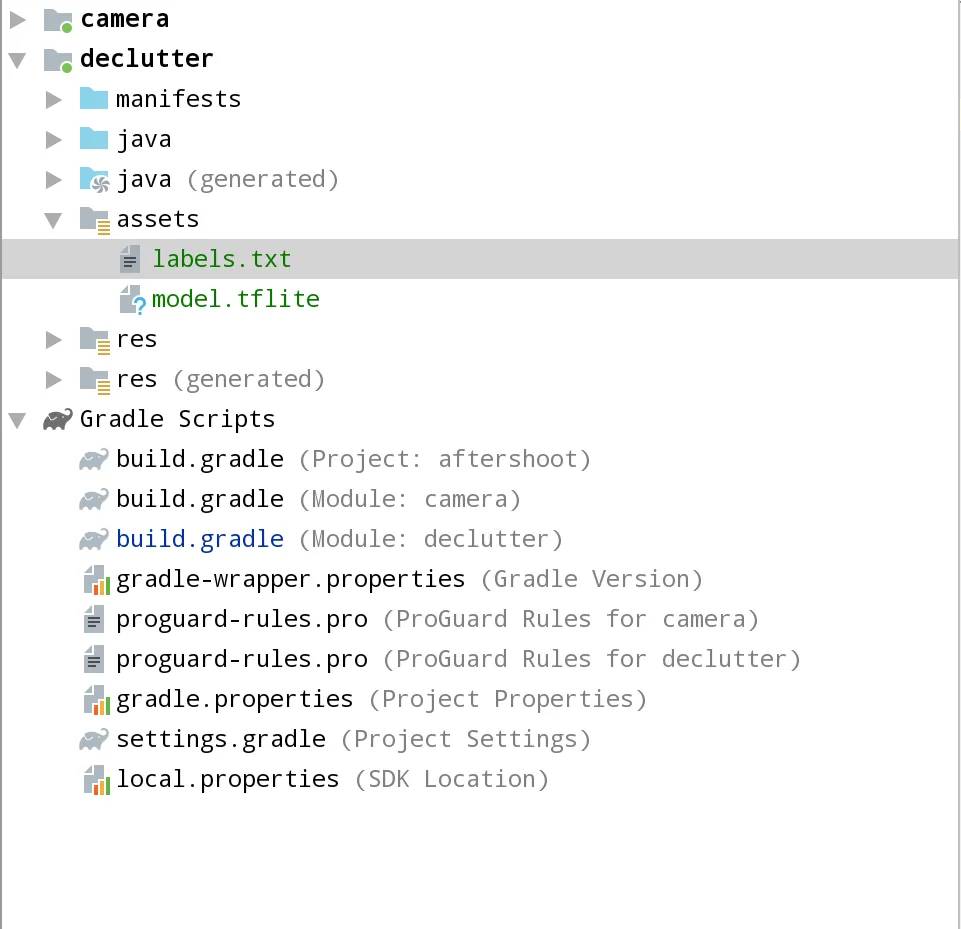
Step 3: Add the model and TensorFlow to your app
In step 3, add the model’s file and the TensorFlow dependency to your app.
To add the model, open Android Studio and select “File -> New Folder -> Assets Folder”. This should create an assets folder in your app—move the tflite model to this folder, along with the dict.txt file containing your labels.
Once done, it should look like this:
After this, open your app’s build.gradle file and add the following dependency to your dependencies block:
dependencies {
  ...
  implementation 'org.tensorflow:tensorflow-lite:+'
  ...
}
Step 4: Load the model file from assets
To actually use the model, you first need to load it from the assets folder. To do this, you can use the following method:
class ProgressActivity : AppCompatActivity(){
    ...
    private fun loadModelFile(): MappedByteBuffer? {
        val fileDescriptor: AssetFileDescriptor = assets.openFd("model.tflite")
        val inputStream = FileInputStream(fileDescriptor.fileDescriptor)
        val fileChannel: FileChannel = inputStream.channel
        val startOffset: Long = fileDescriptor.startOffset
        val declaredLength: Long = fileDescriptor.declaredLength
        return fileChannel.map(FileChannel.MapMode.READ_ONLY, startOffset, declaredLength)
    }
    ...
}
The method above will read our tflite model and return a MappedByteBuffer object. We can then use this object to create our interpreter like so:
class ProgressActivity : AppCompatActivity(){
...
    val interpreter by lazy {
        Interpreter(loadModelFile())
    }

    private fun loadModelFile(): MappedByteBuffer {
        val fileDescriptor: AssetFileDescriptor = assets.openFd("model.tflite")
        val inputStream = FileInputStream(fileDescriptor.fileDescriptor)
        val fileChannel: FileChannel = inputStream.channel
        val startOffset: Long = fileDescriptor.startOffset
        val declaredLength: Long = fileDescriptor.declaredLength
        return fileChannel.map(FileChannel.MapMode.READ_ONLY, startOffset, declaredLength)
    }
...
}
Step 5: Preparing the input
Before we pass any image to this interpreter, it’s important that we prepare the input accordingly.
Since the model here accepts a single RGB image with dimensions 224 x 224 pixels, we need to resize our input bitmaps before we perform any inference on them.
Before we go ahead, let’s first initialize a few variables (the need for these variables is explained in the comments below):
class ProgressActiviy : AppCompatActivity(){
    ...
    // Our model expects a RGB image, hence the channel size is 3
    private val channelSize = 3

    // Width of the image that our model expects
    var inputImageWidth = 224

    // Height of the image that our model expects
    var inputImageHeight = 224

    // Size of the input buffer size (if your model expects a float input, multiply this with 4)
    private var modelInputSize = inputImageWidth * inputImageHeight * channelSize

    // Output you get from your model, this is essentially as we saw in netron
    val resultArray = Array(1) { ByteArray(3) }
    ...
}
Next up, let’s make a helper function that will convert the input image into a ByteBuffer, which is essentially a more optimized way of storing byte arrays. You can read more about ByteBuffers here:
This is what the method looks like:
private fun convertBitmapToByteBuffer(bitmap: Bitmap): ByteBuffer {
        // Specify the size of the byteBuffer
        val byteBuffer = ByteBuffer.allocateDirect(modelInputSize)
        byteBuffer.order(ByteOrder.nativeOrder())
        // Calculate the number of pixels in the image
        val pixels = IntArray(inputImageWidth * inputImageHeight)
        bitmap.getPixels(pixels, 0, bitmap.width, 0, 0, bitmap.width, bitmap.height)
        var pixel = 0
        // Loop through all the pixels and save them into the buffer
        for (i in 0 until inputImageWidth) {
            for (j in 0 until inputImageHeight) {
                val pixelVal = pixels[pixel++]
                // Do note that the method to add pixels to byteBuffer is different for quantized models over normal tflite models
                byteBuffer.put((pixelVal shr 16 and 0xFF).toByte())
                byteBuffer.put((pixelVal shr 8 and 0xFF).toByte())
                byteBuffer.put((pixelVal and 0xFF).toByte())
            }
        }

        // Recycle the bitmap to save memory
        bitmap.recycle()
        return byteBuffer
}
Note that the method looks a little different as compared to what you will find in other tutorials around loading and running a TensorFlow Lite model.
This is because AutoML Vision Edge generates quantized TFLite models instead of a standard .tflite model. Since quantization converts 32-bit floats into 8-bit integers, the resulting model take lower memory and CPU consumption. Hence, quantized models are smaller and perform better than typical TensorFlow Lite models, with little-to-no degradation in model accuracy.
You can read up more on the benefits of using a Quantized model below:
Lastly, let’s also resize the bitmap so that it’s 224 x 224 pixels. This can be done as shown in the code below :
companion object {
        class LoaderTask(private val progressActivity: ProgressActivity) : AsyncTask, Int, Unit>() {
        ...
            override fun doInBackground(vararg images: List) {
                val imageList = images[0]

                imageList.forEachIndexed { index, image ->
                    // Read the bitmap from a local file
                    val bitmap = BitmapFactory.decodeFile(image.file.path)
                    // Resize the bitmap so that it's 224x224
                    val resizedImage =
                            Bitmap.createScaledBitmap(bitmap, progressActivity.inputImageWidth, progressActivity.inputImageHeight, true)

                    // Convert the bitmap to a ByteBuffer
                    val modelInput = progressActivity.convertBitmapToByteBuffer(resizedImage)
                }
            }
        ...
        }
}
Step 6: Pass the input to the interpreter and get the output
The last step is to pass the input prepared above to the interpreter and extract the output from it:
companion object {
        class LoaderTask(private val progressActivity: ProgressActivity) : AsyncTask, Int, Unit>() {
        ...
            override fun doInBackground(vararg images: List) {
                val imageList = images[0]

                imageList.forEachIndexed { index, image ->
                    // Read the bitmap from a local file
                    val bitmap = BitmapFactory.decodeFile(image.file.path)
                    // Resize the bitmap so that it's 224x224
                    val resizedImage =
                            Bitmap.createScaledBitmap(bitmap, progressActivity.inputImageWidth, progressActivity.inputImageHeight, true)

                    // Convert the bitmap to a ByteBuffer
                    val modelInput = progressActivity.convertBitmapToByteBuffer(resizedImage)

                    // Perform inference on the model
                    progressActivity.interpreter.run(modelInput, progressActivity.resultArray)
                }
            }
        ...
        }
}
To print the output, you can do the following:
companion object {
        class LoaderTask(private val progressActivity: ProgressActivity) : AsyncTask, Int, Unit>() {
        ...
            override fun onProgressUpdate(vararg values: Int?) {
                super.onProgressUpdate(*values)
                // A number between 0-255 that tells the ratio that the images is overexposed
                Log.d(TAG, "Overexposed : ${abs(resultArray[0][0].toInt())}")
                // A number between 0-255 that tells the ratio that the images is good
                Log.d(TAG, "Good : ${abs(resultArray[0][1].toInt())}")
                // A number between 0-255 that tells the ratio that the images is underexposed
                Log.d(TAG, "Underexposed : ${abs(resultArray[0][2].toInt())}")
                progressActivity.tvStatus.text = "Processing : ${values[0]} out of ${imageList.size}"
            }
        ...
        }
}
Since the output was supposed to be a 2-D array, we have double square brackets [] in the Log statement above.
Do note however that the output that you get here, is signed, hence you might get some negative values here.
To convert these negative values into positive values, you can simply convert the byes to their positive representation as follows:
resultArray[0][0] & 0xFF
After this, we should get a number between 0 and 255, in byte form. In full, here’s what your probability might look like:
val value = labelProbArray[0][i] & 0xFF
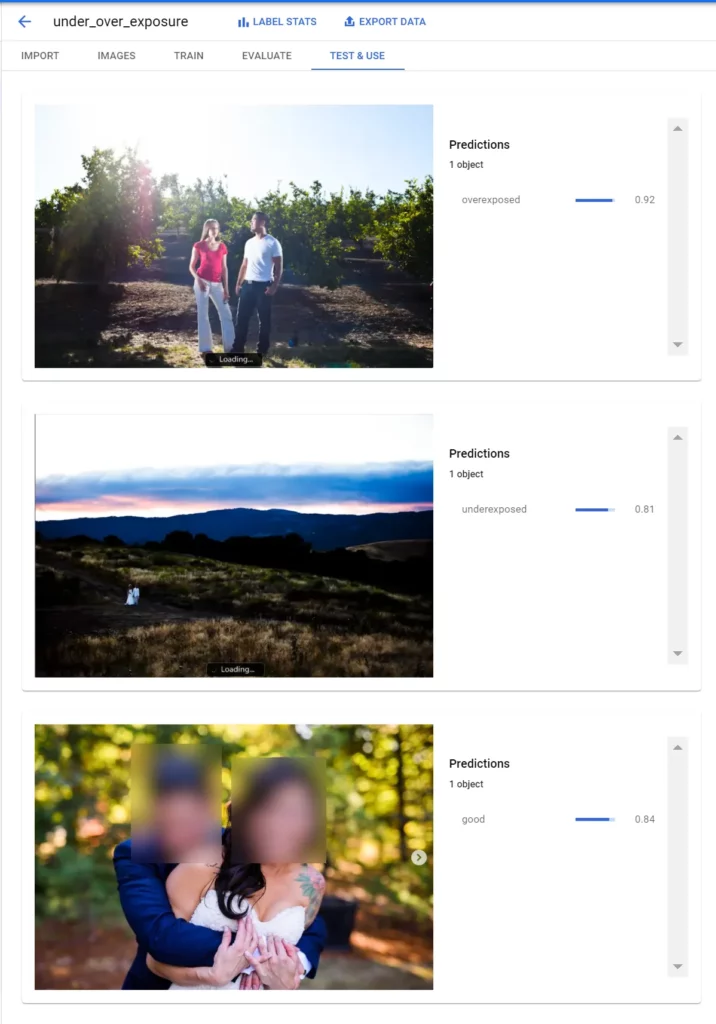
If you want to get the prediction probabilities, you can divide each of the outputs by 255, and that should give you a number between 0–1—i.e, the likelihood of each image being either overexposed, good, or underexposed.
You can find all the code in the GitHub repo for the AfterShoot app here :
Look for the ProgressActivity.kt file to find the code above.
And that’s it! You now know how to train, load and run a quantized TFLite model if your app. It can’t get easier than this to add ML features to your apps, so feel free to go ahead and see how your existing app can leverage TensorFlow to its benefit.
Thanks for reading! If you enjoyed this story, please click the 👏 button and share it to help others find it! Feel free to leave a comment 💬 below.
Have feedback? Let’s connect on Twitter.
Comments 0 Responses