Imagine you have to read a document that’s very dense and has numerous words you don’t know the meanings of.
What would you do?
The answer seems obvious—get out your phone, open a search engine or online dictionary, and search for the word’s meaning.
Instead of typing, what if you could instead find out all you needed to know about a word, displayed on your smartphone, just by pointing at the word on the document?
When I read documents written in English, I often do this—search for the meanings of words I don’t know. Especially with printed documents, I usually go through a similar process of typing those words into a search engine or online dictionary.
Typing on our mobile devices is a familiar UX we’ve been using since the first smartphones came out, but it’s also a function that requires effort and often results in typos and poor autocorrects.
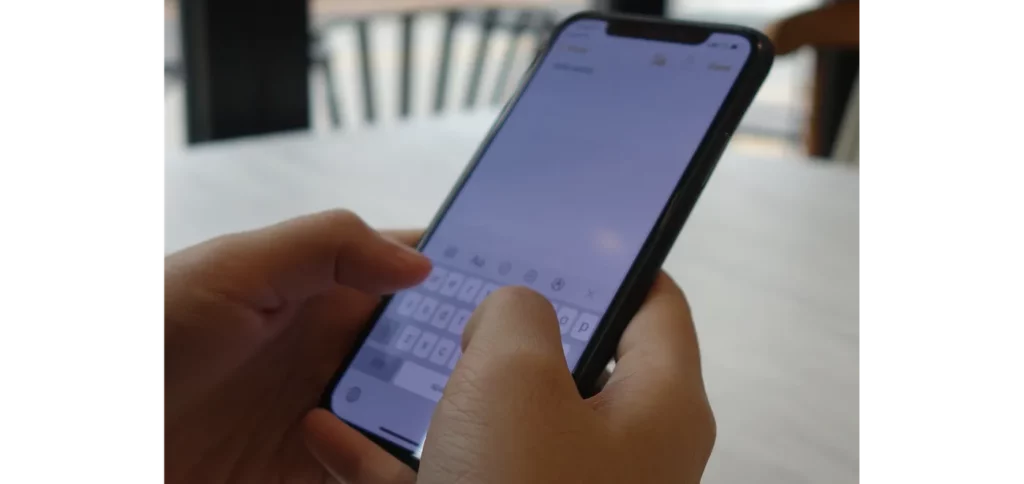
Pointing, on the other hand, is one of the foundational ways we all communicate, going back to when we were young children. Thinking of these two means of communication, I wanted to create a pointing interaction that would serve as a way to ask our phones something, much like we’d ask our teachers or friends.
Introducing Just Point It
In an attempt to create this different kind of interaction between humans and their phones, I built the Just Point It app, which Figure 2 shows in action. It’s a dictionary application for iOS that allows users to search a word’s dictionary entry just by pointing at it—all on-device and without any network connection.

Implementations
Application Pipeline
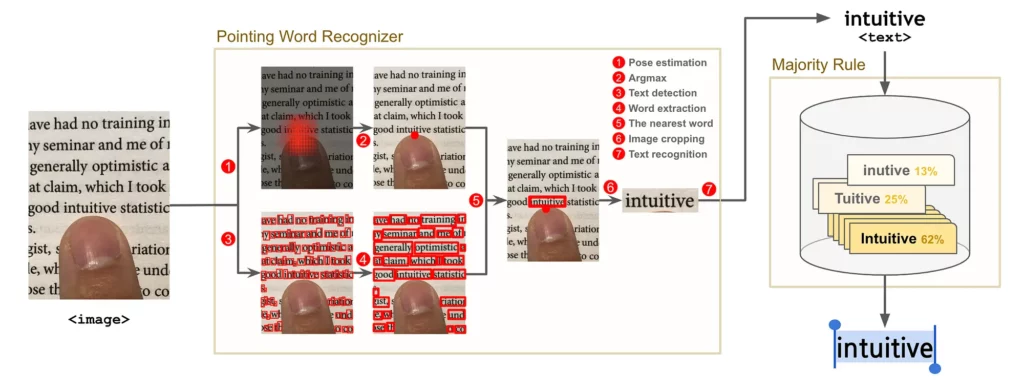
The entire app pipeline is represented in Figure 3. The pointing word recognizer takes an image as input and returns text as output.
The recognizer has a process for finding the pointing location (fingertip detection) and extracting the word (OCR). In the last step, a process called majority rule is performed to achieve higher accuracy.
In this article, I’ll explain how to solve the problem step-by-step and discuss the tools I used while developing the application.
How to read the word — Using pre-trained models
OCR, Optical Character Recognition, is a technology that detects letters from images (localizing) and recognizes them as text (encoding). For this project, the OCR was implemented by using pre-trained models and rule-based methods.
1. Get the pre-trained model API
I first looked at the APIs provided by a few mobile machine learning frameworks before starting to build my own OCR. The items in the following list are mobile ML frameworks supporting pre-trained models for this purpose:
- Core ML — Text detection, face tracking, face detection, landmarks, rectangle detection, barcode detection, object tracking, etc.
- ML Kit — Text recognition, image labeling, face detection, barcode scanning, landmark detection, etc.
Given these options, I decided to build the app’s OCR with Core ML’s text detection and ML Kit’s text recognition API.
2. Check the functionality and performance of APIs
Next, I checked the functionality and performance of the pre-trained model APIs.
ML Kit’s text recognition API: This API takes images as input and returns the text in those images and the area in which the word is situated. Figure 4 shows the result of inference on various images with the text recognition API.
The more text contained in an image, the more time inference took. On an iPhone X, the API took 65 ms when the image contained only two words, and about 200 ms on 200 words.
Core ML’s text detection API: This API takes the images and returns the areas in which the text is situated. Inference time is 12 ms which is significantly faster than ML Kit’s text recognition.
The reason could be that the result of the text detection API has less information than ML Kit’s recognition API.
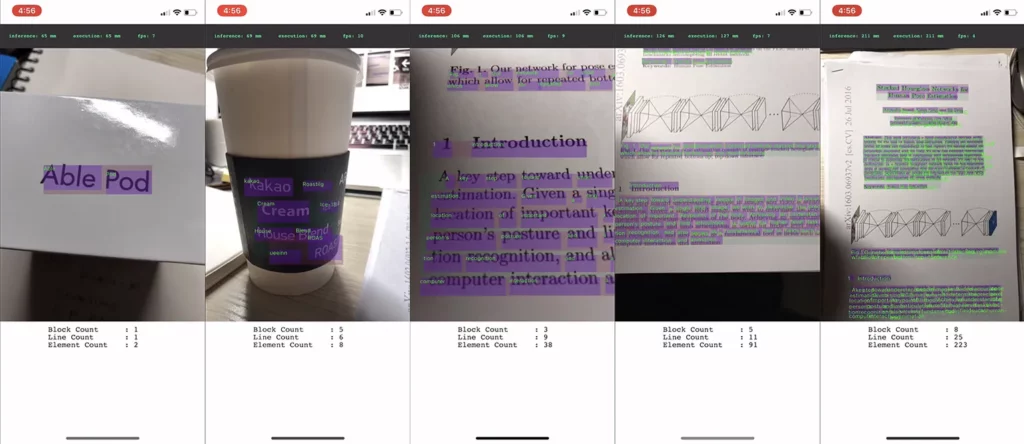
One thing to note about ML Kit’s text recognition API is that inference time depends on the nature of the input image. Input images containing more text take more inference time. This property could provide bad UX. So I decided to detect using Core ML’s text detection first and then recognize with ML Kit with only the cropped image.
3. Concatenate the APIs
To concatenate detection and recognition, I needed some rule-based functions, because Core ML’s text detection returned the areas of a character while ML Kit’s text recognition performed at a word unit level. These functions are listed below;
- Word extraction: Group the areas of character by word.
- Nearest word: Find the word nearest a pointing finger. For finding the pointing word, we calculate the distance in the space doubled in the x-axis.
- Image cropping: Crop the image from the selected word area.
After text detection, word extraction, nearest word, and image cropping are performed sequentially, an image containing only one word is returned. At this point, I performed text recognition with the image.
In cases where the input image contained many words, the inference time of text detection + recognition now became 3.5 times faster than text recognition only. This is because detection and recognition became significantly faster when I used a small cropped image.
How to detect the “pointing point” — Training and converting a pose estimation model
Pose estimation is the process of locating a human’s keypoints from an image. Typically, pose estimation takes an image containing a human body (or body part) and returns keypoints represented in heatmap format.
Figure 5 represents the output of full body pose estimation. Once you extract the point with the highest confidence value, you can draw the human skeleton, as seen in the left-most picture of Figure 5.

However, there is no API for finger detection on any of the mobile ML frameworks I tried to work with. So I decided to train a custom pose estimation model with a hand pose dataset instead of a body pose dataset.
1. Prepare dataset
There are two methods for preparing a dataset:
- Use an open dataset.
- Use a custom dataset.
I found quite a few open datasets, but I decided to create my own because of licensing issues (i.e. restrictions on non-academic or for-profit use). For two weeks, I took many (many) pictures of my fingers in order to collect about 10,000 pictures.
It wasn’t a lot of data, but it was enough to create a prototype model with data augmentation (i.e. rotating, flipping, or scaling).
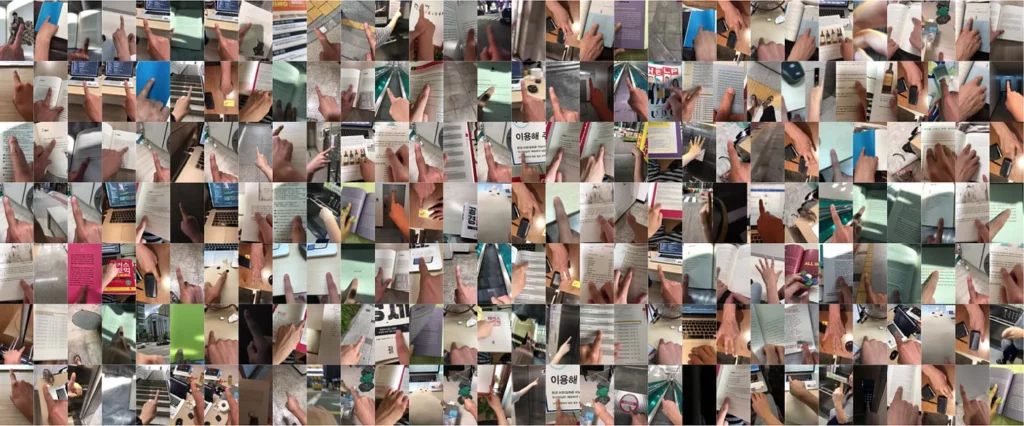
To create a full, workable dataset, I needed not just images but also annotation information. For this task, I made my own annotation tool—KeypointAnnotation—to create my fingertip annotations. With this, I’d created my own dataset in three days.
2. Train with TensorFlow
I used the Stacked Hourglass architecture and MobileNet V2 and referenced both the PoseEstimationForMobile and tf-tiny-pose-estimation repositories to train the model. In fact, I treated the graph building part as a black box. Because I was more focused on data pre-processing, the prototype model could be made quickly.
3. Convert to a Core ML model
I then converted the TensorFlow model to a Core ML model format with this guide, which uses tf-coreml. After the model was run on a mobile device, it was able to achieve pretty convincing results.
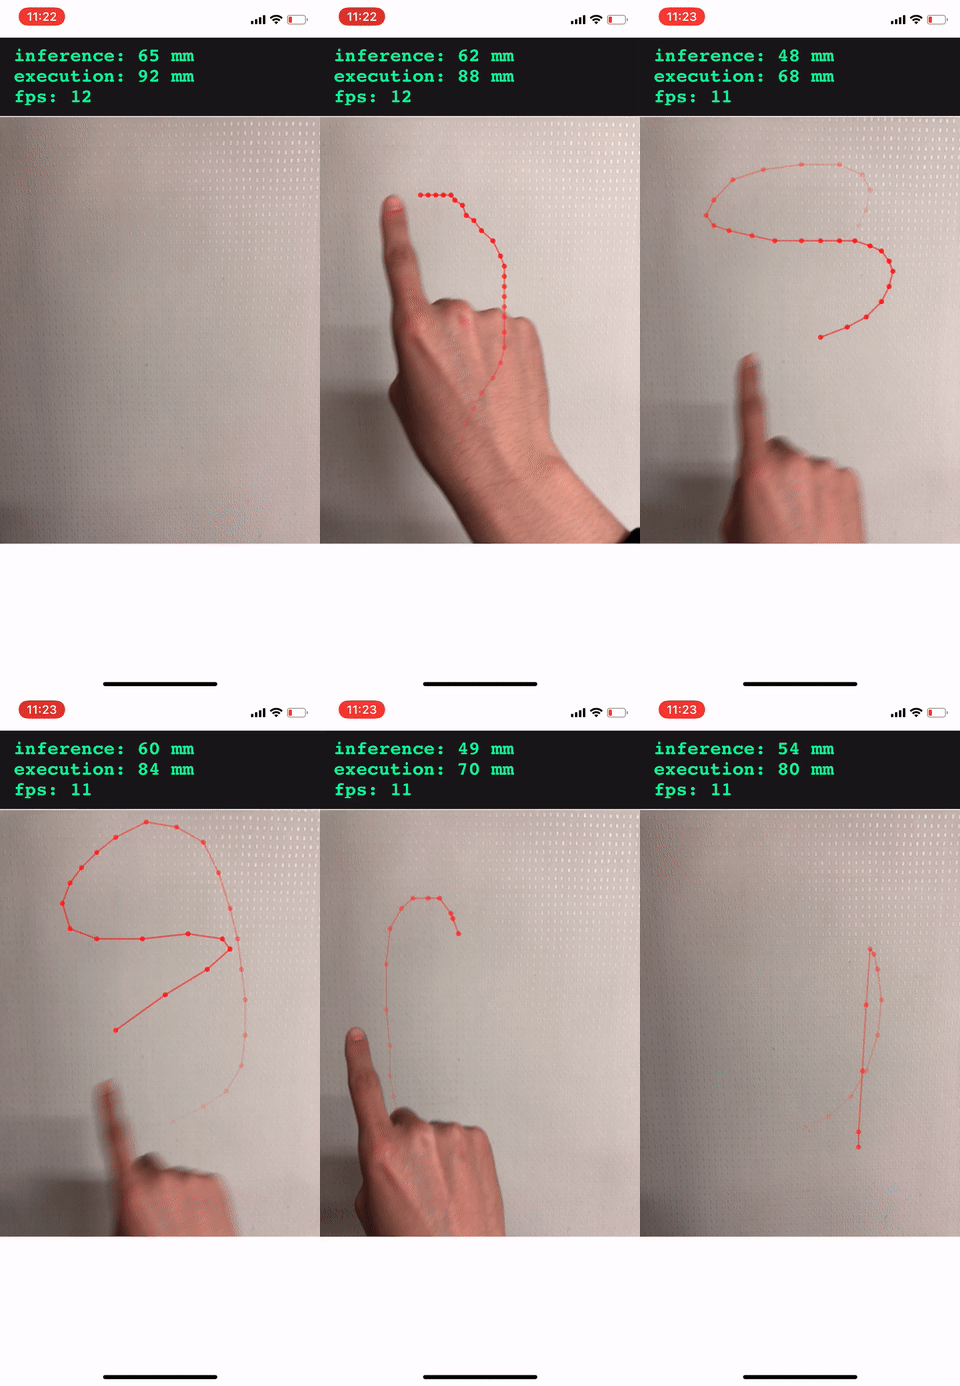
The model size was 2.3MB, and inference time was about 60 ms (70 ms after post-processing) on an iPhone X. Figure 7 shows the finger coordinates on the image via argmax from the heatmap result.
Once the fingertip detection was concatenated with OCR, the pointing word recognizer was finished!
Increasing Accuracy with the Majority Rule
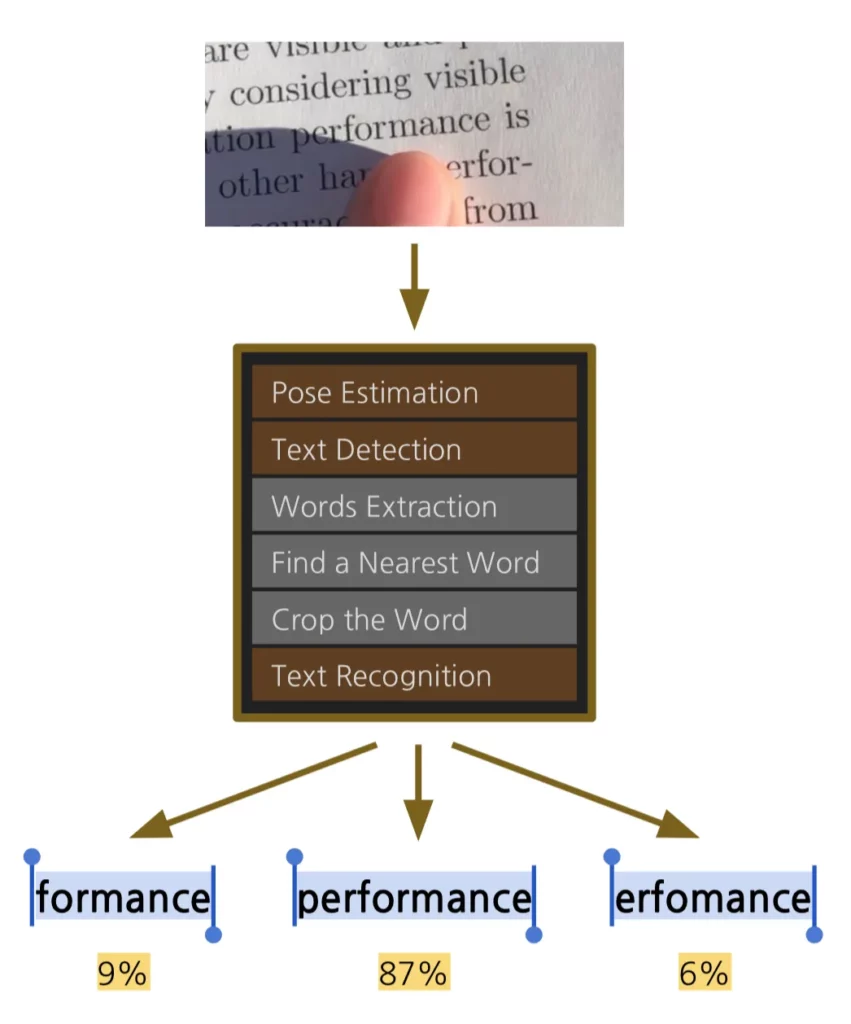
At this point, the app was able to recognize the pointing word. However, that recognition is performed through three ML models and three rule-based algorithms, which results in a higher error rate than if each was performed separately. For example, the following picture should recognize the word “performance”, but “formance” or “erfomance” was returned one out of ten times.
To improve the accuracy I used the majority rule algorithm.
The majority rule algorithm used in the app would select a word if it goes over the threshold count (5 times) within the limit count (10 times) and the timeout period (2 seconds).
Once the word recognition is completed, the recognized word is put in the word pool. Alternatively, the word would be removed from the word pool when it exceeded the time limit or the threshold count.
Conclusion
This experience using ML on mobile devices was a very interesting project for me because I was able to solve the problem in a way I’d never thought of before.
Although there were times when I felt the project was somewhat large and difficult, in the years to come, it should become easier to implement ML on mobile devices when more tools exist to improve the development process (especially in the conversion pipeline).
Lastly, let me introduce some things that you should be aware of when using ML on mobile.
Precautions of Mobile ML
1. Do you have to run ML on the mobile?
Even with recent hardware improvements, performing ML can still be a huge burden for small devices like mobile phones. In particular, if the core feature does not require the use of ML, I’d recommend avoiding it whenever possible.
2. Are there already pre-built APIs and models?
If you decide to use ML, you should first look for any APIs that are already available. If there are already APIs available (just as I was able to implement OCR through Core ML and ML Kit APIs without training), then you might have better performance than trying to build your own model from scratch.
3. What’s the first step for training?
If you’re building a production app that includes work from multiple teams, and you’re planning to train a custom model, you’ll need to quickly build the pipeline to have less dependency on the schedules between your data science/ML team and your mobile development team.
The pipeline contains the process of training, converting, and mobile inferencing. Build a pipeline first, as you may encounter unexpected problems at the time of model conversion or in testing and optimizing model inference on mobile.
4. What to do before deploying the app?
Even if the implementation of features is done, the work isn’t over. Since inference is a big task for mobile devices, there may be problems caused by using too many resources on mobile. You’ll need to optimize the app by testing for memory, CPU or GPU usage, battery consumption, etc.
What should you do next
If you want to download the app…
If you want to make your own app…
I would like to thank Jaewook Kang and Eric Kim, who reviewed this project and post carefully; and beta readers, Dongsuk Yang, Yonggeun lee and Jeong-ah Shin, who read the draft. And thanks to Soojin Kim for always supporting me.

Comments 0 Responses