
As an undergraduate I took a course on emergent phenomena — collective behaviors that arise from individual action. One of the most elegant examples we studied was Conway’s Game of Life. Devised by British mathematician John Conway, the Game of Life is played on an infinite 2-dimensional grid where each cell can occupy one of two states: dead (0) or alive (1). The world is initialized in a random state and three simple rules govern how each grid cell evolves [1]:
- Any live cell with two or three live neighbors survives.
- Any dead cell with three live neighbors becomes a live cell.
- All other live cells die in the next generation. Similarly, all other dead cells stay dead.
From these basic building blocks primitive persistent organisms are born. Oscillators appear to rotate, blink, and pulse. Gliders float slowly across the screen. A world takes on a life of its own.

Aside from their usefulness as a simulation framework to study self-organization and emergent phenomena, the patterns in Conway’s Game of Life just look cool and almost hypnotic.
In this tutorial, I’ll walk you through the steps required to implement the rules of the Game of Life in a Material within Lens Studio to create a neat filter.
Setting up the grid world
The Game of Life takes place on a 2D grid. While the individual pixels on your screen can function as this grid, they are probably too small to see any interesting patterns and the RGB colorspace has far more than the two dead or alive states we need. Our first task, then, is to take input from the camera and convert it to our black and white grid world.
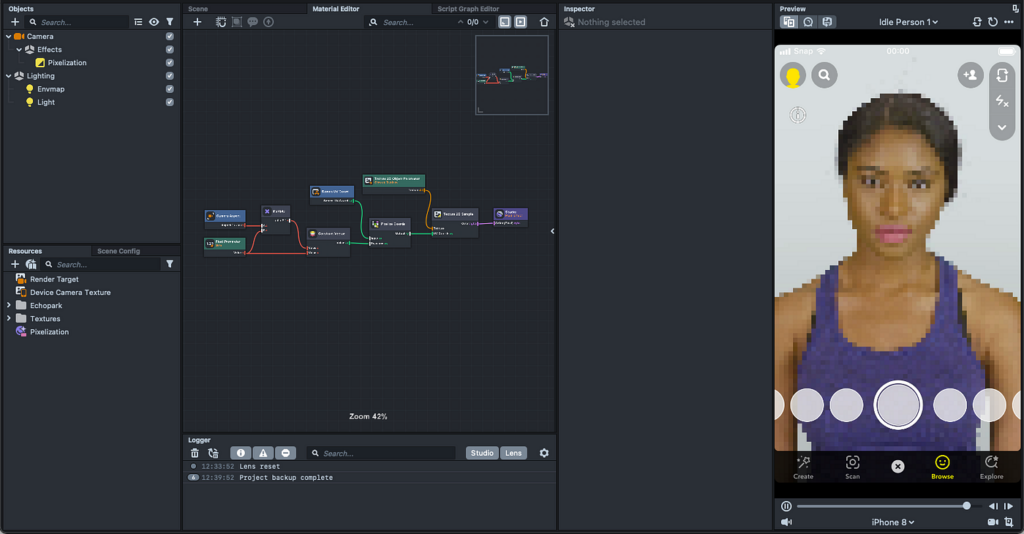
From a brand new Lens Studio project, add a Pixelization Pose Effect to the existing Camera. Post Effects are a type of Shader in Lens Studio that control how each pixel is drawn. They are meant exclusively for 2D content. The Pixelization filter built into Lens Studio does the first part of our job for us: it takes the screen and divides it up into a grid. When you add this Post Effect to the camera, a Pixelization material is automatically added to your asset repository. Let’s take a minute to understand how it works as we’ll build upon it for our Game of Life implementation.
Materials are objects in Lens Studio that describe how to draw 2D or 3D assets. Before you dive in here, I highly recommend familiarizing yourself with the basic concepts of Materials via the official Lens Studio Documentation.
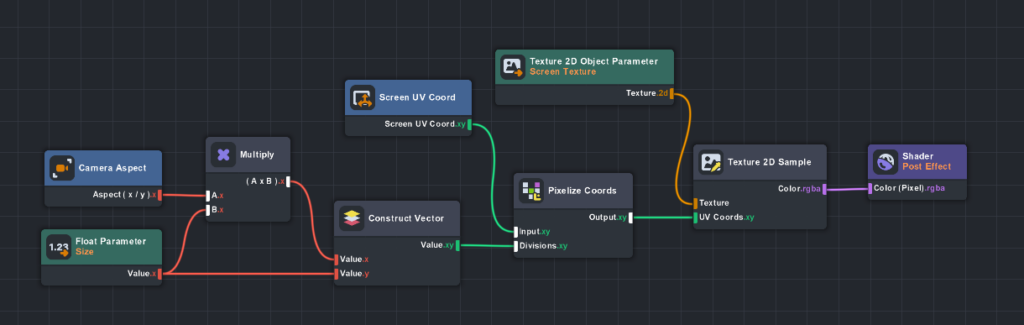
A Material graph allows you to define complex pipelines of mathematical operations that ultimately control how each pixel is rendered on the screen. Every Material graph terminates with a Shader node. The Shader node connects all of your Material logic to the pixels and vertices of your object. Material graphs can also take inputs via Parameter nodes. For example, the Texture 2D Object Parameter node in the Pixelation Material above allows us to feed in frames from the camera and pixelate them. The Float Parameter input node above allows a user to manipulate the size of the pixelation in the resulting image.
Looking at the graph above, we can trace the logic of the Material. The user inputs a pixelation size parameter. The Camera Aspect ratio is used to compute scaling factors needed to create a square grid from on top of the camera frame. The Screen UV Coord node provides an enumeration of every raw pixel coordinate on the screen. These raw pixels, along with the desired scale, are then fed into a Pixelize Coords node which chunks them into the grid. Then a Texture 2D Sample node samples from the input texture (the frame from the camera) at only those pixelized locations and passes them to the Shader for display.
In Conway’s Game of Life, however, grid cells can only have two states: alive (1) or dead (0). We can achieve this by adding a few nodes to the Material graph above.
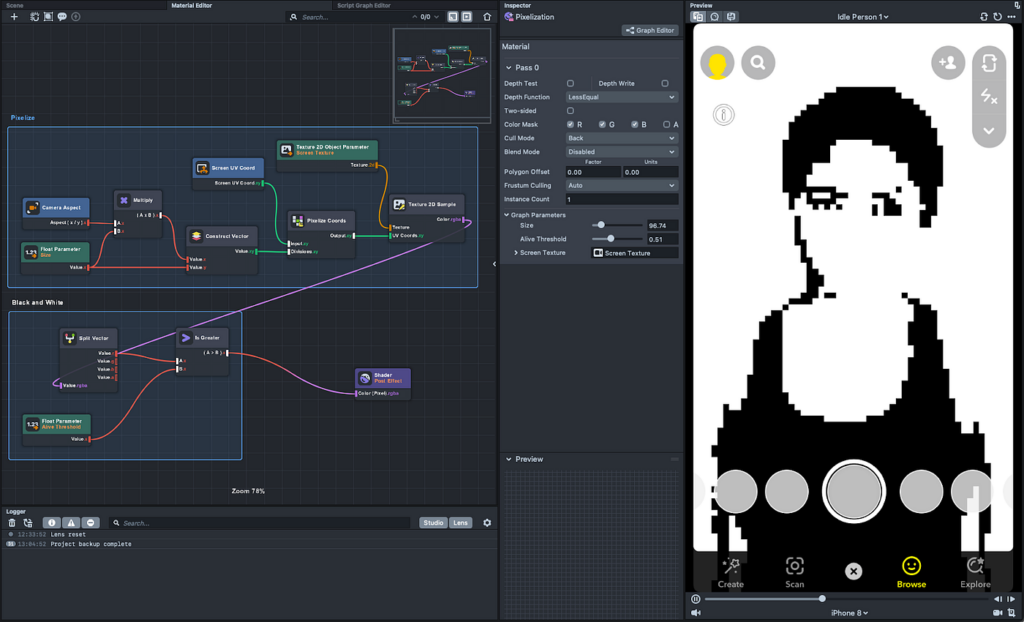
Here, I’ve added another set of nodes to convert the the output image to black and white and added comment groups to make the logic easier to follow. A new Material Float Parameter called “Alive Threshold” creates an input parameter that users set. The output from our pixelization is split into its color channels and if the red channel is greater than the Alive Threshold, it is set to white, otherwise it is set to black.
Writing the rules of life
Now that we have our grid world, let’s implement the rules of the game. As a reminder, there are only three:
- Any live cell with two or three live neighbors survives.
- Any dead cell with three live neighbors becomes a live cell.
- All other live cells die in the next generation. Similarly, all other dead cells stay dead.
In theory, this is simple — just count the number of living and dead among each cell’s neighbors and add a few if statements. However, the shaders within Lens Studio are designed to operate on each pixel independently so accessing neighbor states is not straightforward. Luckily, I stumbled across this neat trick in a blog post by Ryan Davey.
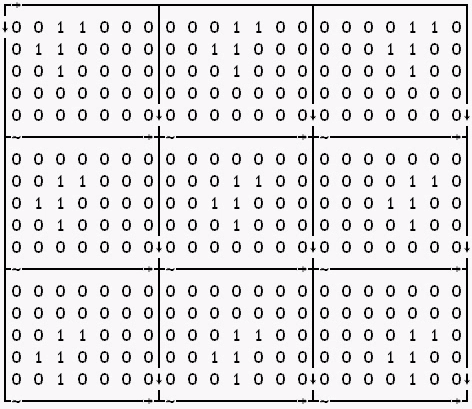
You can compute the neighbor counts by summing each “one rotation” of the grid. In other words, you can take a grid, create eight copies, offset each copy one step to a neighbor cell (e.g. [x +1, y + 1], [x — 1, y — 1], etc.) and then sum everything up. This is something we can do in Lens Studio.
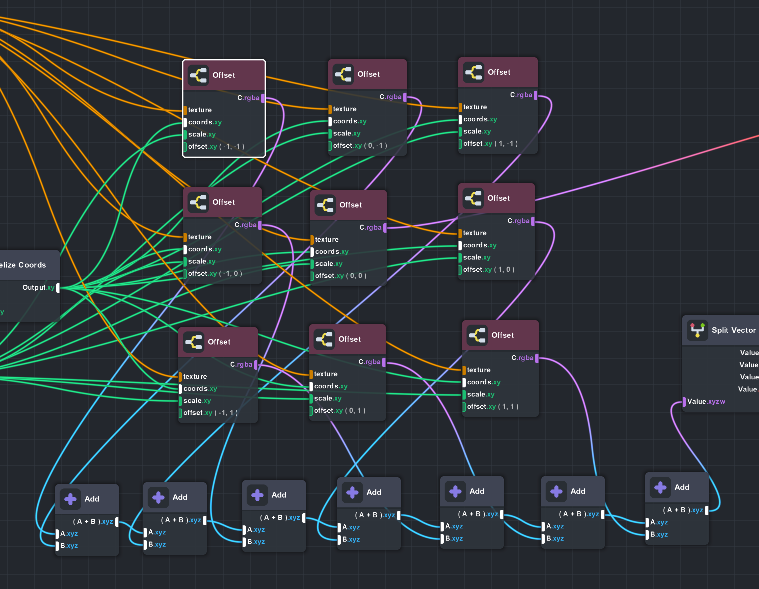
This tangled mess of wires is where we are going to end up. It is the Lens Studio equivalent to the matrix rations pictured above. If it looks overwhelming, don’t worry, we’ll break it down piece by piece.
The first thing to notice is the use of the “Offset” nodes. This is a custom “sub-graph” I created in Lens Studio. Subgraphs are groups of Material nodes you can reuse multiple times within a project and even export for re-use in multiple lenses. They are perfect for our current use case, which involves repeating the same logic nine times (once for each grid cell and eight times for each neighbor).
Opening the sub-graph, we see the individual component nodes:
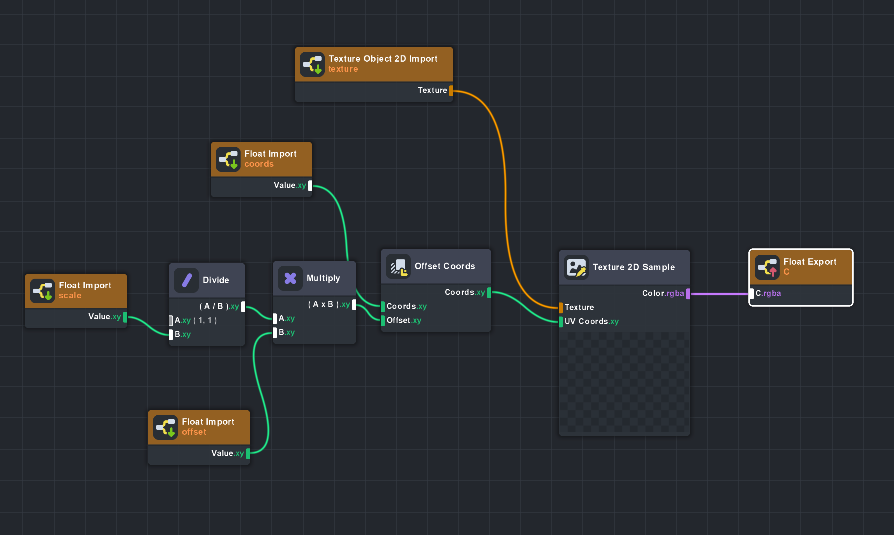
In other words, this subgraph samples from a given texture at coordinates offset by a desired amount. It answers the question “what is the value of the neighbor one pixel up and one pixel to the left of me.”
It takes the following inputs:
- A texture object — The grid world in our case.
- A set of coordinates — The original, unshifted grid.
- An offset value for both the x and y dimension [-1, 0, 1].
- A scale — Used to make sure everything lines up properly.
One slight complication to the subgraph above is the “scale” input. Remember that we want to know the value of the neighboring grid cell, but the grid world has a different resolution than the screen. Because the coordinates are provided in pixels, not grid units, we need to know the scale so we can compute how many pixels are in one grid cell. This will allow us to sample properly. The same is a value we previously computed in our pixelization logic so we can pass that in as an input.
If we look again at the tangled mess of wires above, we’ll see that the offset node is used with each combination of [x, y], where x, y are in [-1, 0, 1], computing the value of every neighbor in all directions. The Add nodes below simply sum all of them up.
With the neighbor counts for each cell, our last job is to implement the three rules that determine a cell’s new state. I’ll leave it as an exercise to the reader to verify that the logic below matches the three rules.
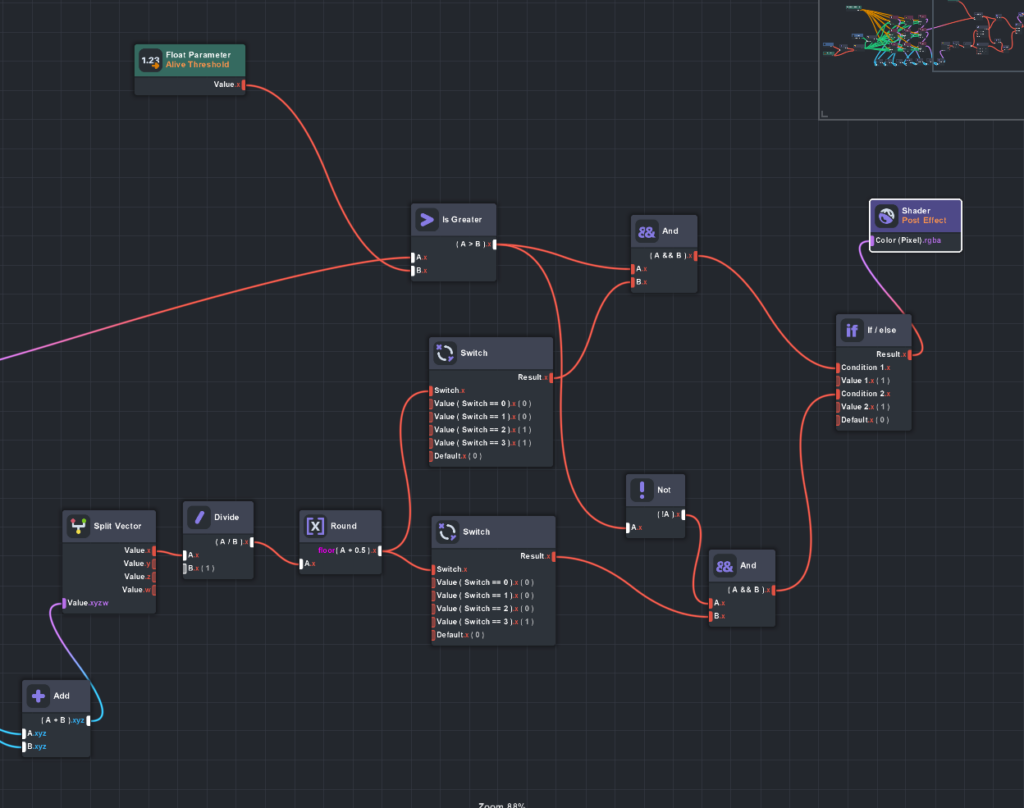
The final output of the cell is then passed to the Post Effect Shader node.
Feedback loops
In the previous sections we set up a camera, added a Pixelization Post Effect, then extended the Pixelization Material to implement the rules of Conway’s Game of Life. Let’s take some time now to clean up the project a bit. Below, I’ve renamed the Pixelization material and post effect effect to “Game of Life.” In the preview, we see that the effect is being applied, but it seems to just be a black and white filter on the camera. Where are the patterns, oscillators, and gliders?

Most Snapchat Lenses are designed to work on each frame independently. In the Game of Life, though, the current frame depends on the previous one. We need to create this feedback loop in Lens Studio. It’s a bit counterintuitive, but the answer is multiple cameras. Here is where we’ll end up:
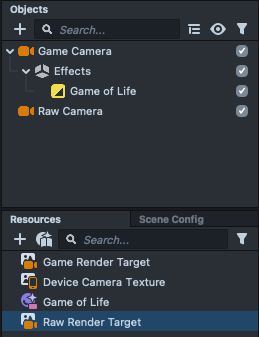
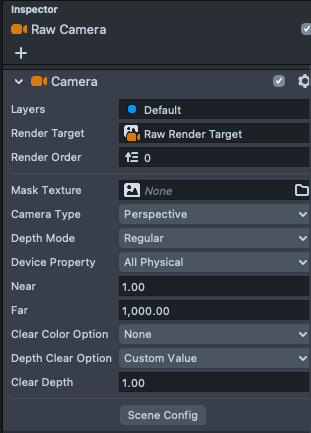
A “raw” camera will take frames from the device camera and render them to a Raw Render Target. A Game Camera will initially look at the Raw Render Target, but will then be pointed at its own render target (the Game Render Target), creating a feedback loop where the input to the material is the state of the game at the previous frame.
To make the Raw Camera, create a new camera and a new Render Target for it to point at.
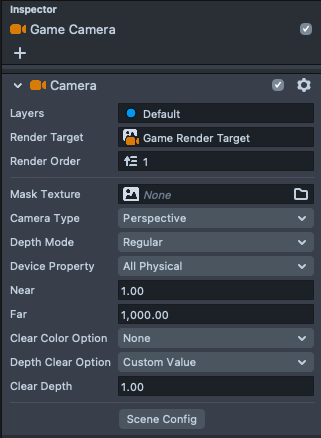
Next, rename the existing camera and render target Game Camera and Game Render Target, respectively. Make sure the Game Camera’s render target is set to the Game Render Target.
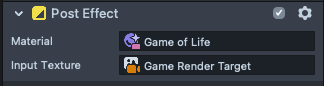
The Input Texture for your Game of Life Post Effect should still be Game Render Target as we want the Material to see what the Game camera sees each frame.
Still, though, nothing seems to be happening. The final, crucial step is to change the Clear Color on the Game Render Target from Background to None. The Clear Color is the texture with which the render target is initialized at the beginning of each render cycle. “Background” is the default and is essentially the feed from the camera, which defeats the whole purpose of the feedback loop we are trying to create. Setting this to None will ensure the previous state of the game is visible to the camera when a new render cycle begins.
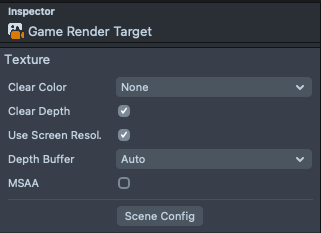
As soon as you set this Clear Color to None, you should see the game of life being played on the preview movie.
Resetting the game with a tap
As it stands, the game immediately starts as soon as the Lens is loaded, and there is no way to reset it after it gets going. For a finishing touch, we’ll allow the user to start and reset the game by tapping on the screen. To do this, we’ll need to toggle the initial state of the Game Camera’s input texture. By default, the camera sees a blank texture, but we can update this by setting the Clear Color Option on the camera to Texture and updating the value of this texture via a script.
As of Lens Studio 3.3, this UI can be implemented in two ways: a script or a graph script (i.e. Visual Scripting). In keeping with the visual theme, let’s use the latter. Create a new Graph Script asset and add the following nodes:
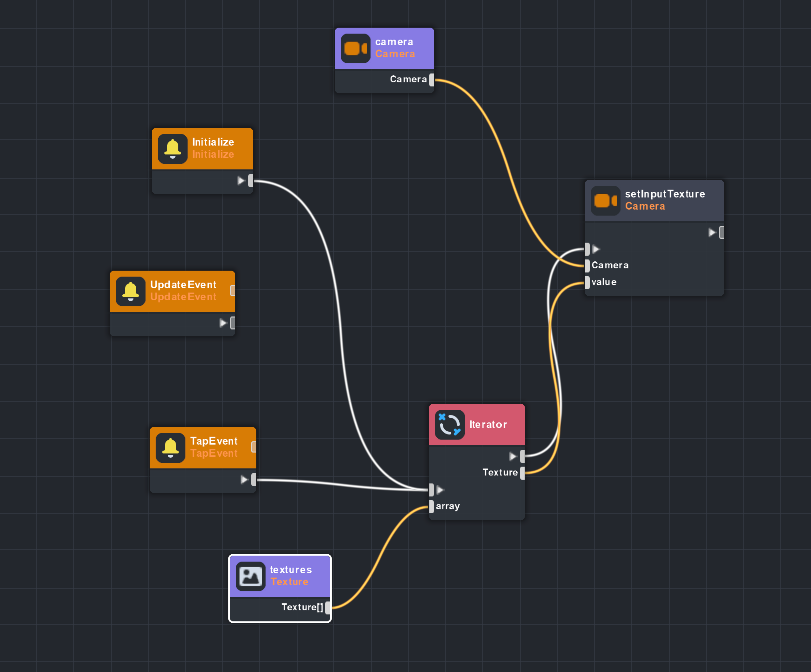
In words, this script listens for a Tap Event, and when one is found, it cycles to the texture that will be set as the Input Texture (clear color) for a given Camera.
Next, we’ll attach our script to the Game Camera (note the Clear Color Option on the camera has been set to Texture):
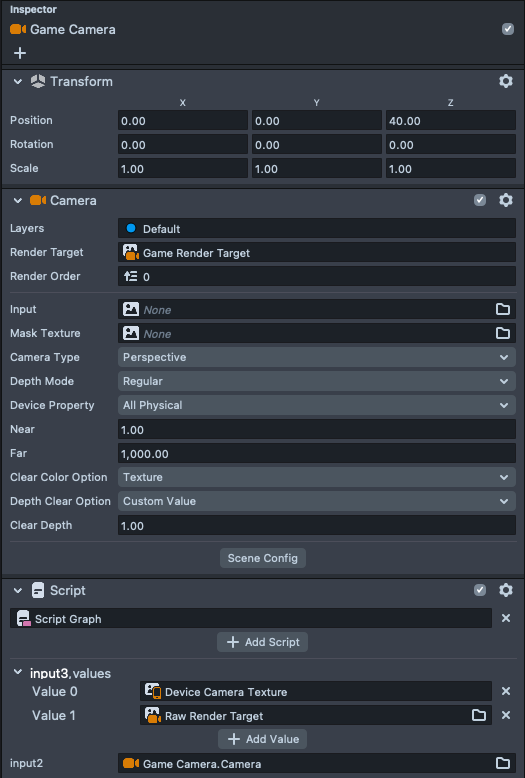
Now, when a user taps the screen, the input texture of the camera will be toggled between the raw frames from the camera and the render target of the raw camera, starting the game.
To see how this creates a feedback loop, let’s walk through a render pass. Initially, the Game Camera has an initial texture that is just a raw camera frame. Our Material Post Effect is applied to that, creating a black and white pixelated grid that will be the initial state of the Game of Life. When the screen is tapped, the Game Camera’s input texture is switched over to the Raw Render Target. It’s tempting to think the Raw Render Target is just the raw camera frame again. But remember, the Raw Render Target is an image of what the Raw Camera sees and the Raw Camera is seeing an image that already has our Game of Life Material applied. So the raw camera is actually seeing the next iteration of the Game of Life. It then writes that state to its render target. The Game Camera then sees that as a starting point, computes the next state, and the cycle continues.
It definitely took me a few hours to understand the flow of pixels in this loop, so don’t be shy about going over it a few times. Feedback loops can create very powerful lenses.
Conclusion
To summarize, in this tutorial we:
- Created a custom Material in Lens Studio that implements the rules of Conway’s Game of Life.
- Implemented a feedback loop with multiple cameras and render targets that allows us to evolve the state of the game.
- Gave users control over that feedback loop via a tap event.
You can use and share the completed Lens in SnapChat via this Snapcode

If you’re interested in digging deeper into the project, a Lens Studio template can be found here.
Comments 0 Responses