
In the last piece in this series on developing with Flutter, we looked at how we can implement text recognition using ML Kit, which belongs to the Firebase family.
In this sixth installment of the series, we’ll keep working with ML Kit, this time focusing on implementing image labeling. The application we build will be able to label the contents of an image and provide a confidence level.
Application and Use Cases
Using image labeling in Firebase’s ML Kit enables you to identify entities in an image without providing additional data. Among the items that can be recognized with the built-in, pre-trained API include activities, places, things, and people — just to mention a few.
Each entity found also comes with a confidence score. The device-based API supports 400+ labels. The cloud-based API supports 10,000+ labels. The choice of which API to use is based on price, number of labels, and the different capabilities of each. The on-device API is free but only supports 400+ labels. The cloud API is free for the first 1000 uses of this feature per month.
In terms of performance and functionality, the on-device flavor enables inference to happen locally, which can lead to faster speeds and ensures data security. Meanwhile, the cloud-based solution is more powerful and accurate and might be better for use-cases that don’t require real-time processing
In order to use the cloud-based API, ensure that you have set up billing and enabled the cloud vision API.
Should you choose to use the on-device API, remember to configure your application to automatically download the ML model to the device after the app is installed from the Play Store. To achieve that, add the following to your app’s AndroidManifest.xml:
Also, remember to include the on-device dependency in your Android/app/build.gradle:
Add Firebase to Flutter
Just like in the previous piece, the first step involves adding Firebase to your Flutter project. This is done by creating a Firebase project and registering your app. Follow the comprehensive guide below to set that up:
Install Required Packages
Now that your app’s communication with Firebase is set up, you have to install two packages. The first is image_picker and the second is firebase_ml_vision. We’ll use the image_picker to pick the images from the phone’s gallery or take a new picture.
firebase_ml_vision will provide the image labeling functionality.
Select Image
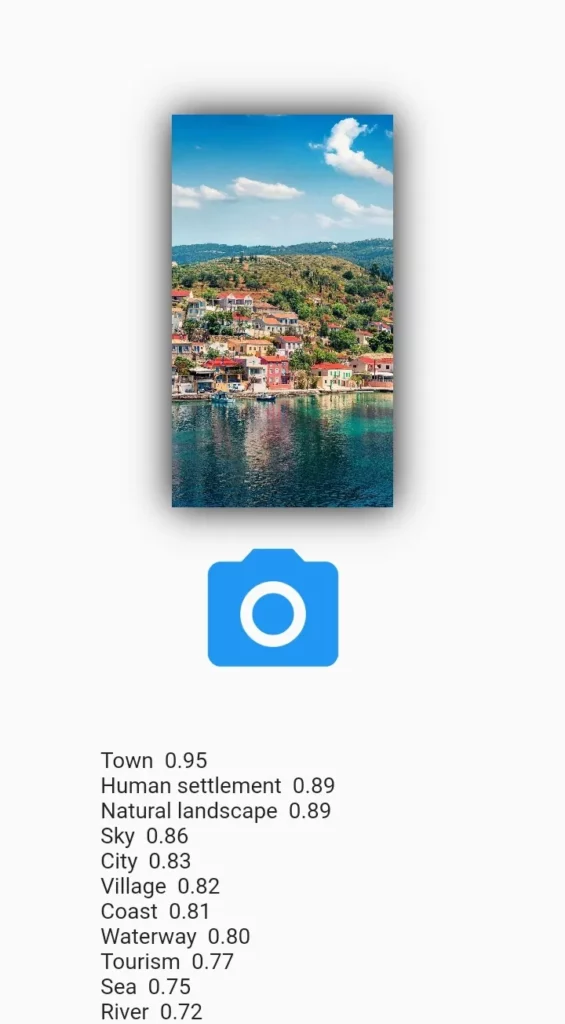
At this point, we can now select the image we’d like to get labels from. We can choose an image either from the gallery or camera. We check if the image has been loaded using imageLoaded. If the image has been loaded, we display it and its labels. text will contain all the image labels:
File pickedImage;
  var text = '';

  bool imageLoaded = false;

  Future pickImage() async {
    var awaitImage = await ImagePicker.pickImage(source: ImageSource.gallery);

    setState(() {
      pickedImage = awaitImage;
      imageLoaded = true;
    });
In order to use a camera image, change the source to ImageSource.camera.
Create a FirebaseVisionImage
In this step, we create a FirebaseVisionImage object from the selected image:
Create an Instance of a Detector
The next step is to create an instance of the detector that we’d like to use. Here, we’re using the cloud labeler:
To use the on-device API, adjust your code to:
Process the Image
We’re now ready to process the image using the detector. Since this will return a Future, we run the code in a function that returns a Future. We therefore await the processImage to provide the labels:
Extract the Text
When the process of image labeling is successful, you’ll get a FirebaseVisionImageLabel object. Each object contains the label’s text description, its Knowledge Graph entity ID (if available) and the confidence score of the match:
for (ImageLabel label in cloudLabels) {
final double confidence = label.confidence;
setState(() {
text = "$text $label.text   $confidence.toStringAsFixed(2) n";
});
}
cloudLabeler.close();
The entire function looks like this:
Future pickImage() async {
    var awaitImage = await ImagePicker.pickImage(source: ImageSource.gallery);

    setState(() {
      pickedImage = awaitImage;
      imageLoaded = true;
    });

    FirebaseVisionImage visionImage = FirebaseVisionImage.fromFile(pickedImage);

    final ImageLabeler cloudLabeler =
        FirebaseVision.instance.cloudImageLabeler();

    final List cloudLabels =
        await cloudLabeler.processImage(visionImage);

    for (ImageLabel label in cloudLabels) {
      final double confidence = label.confidence;
      setState(() {

        text = "$text $label.text   $confidence.toStringAsFixed(2) n";

        print(text);
      });
    }

    cloudLabeler.close();
  }
The source code can be found below.
Final Thoughts
You can clearly see how fast and easy it is to incorporate machine learning in your mobile apps using Firebase’s ML Kit. Before you can launch this application into production, ensure that you check with Firebase’s checklist to make sure you have the right configurations. Should you choose to use the cloud-based API, ensure that you have the right API access rights. This will ensure that your application doesn’t fail in production.
Comments 0 Responses