Most Android apps perform one or more background tasks, often including the ones that are long-running. Examples include making a network call, an I/O request, database read/write — you get the idea.
More often than not, upon completion of these background tasks, we need to take an action that’s visible to the user. These can include:
- A confirmation Toast msg — upon a successful DB call
- Taking the user to a new screen — upon a successful sign-in network call
- Showing an error msg popup —upon the failure of an I/O operation
…or anything, literally!
In this article, we’ll learn how to do manage background tasks efficiently with Kotlin Coroutines.
For newcomers to Android development, it’s important to note that it’s not that straightforward to code the above-mentioned scenarios. Why? Let’s understand some fundamentals for this.
In the Android universe, UI tasks are handled on a dedicated thread called the main thread — it’s primary duties include rendering UI, capturing User interactions (screen touches/swipes), and everything related to what you see on every screen.
Now, this main thread is not expected to execute long-running background tasks — such as a network request or a file system access operations followed by heavy reads/writes.
For your app to display to the user without any visible pauses, the main thread has to update the screen every 16ms (or more often), which is about 60 frames per second. If one forcefully tries to go against this and execute these long-running background tasks on the main thread, the result will be an app crash or application not responding error.
But why will this happen to me?
Let’s say we’re running a background task on the main thread. Since the main thread is busy doing this background task, it won’t be able to update the screen. The main thread will also not be able to take any input from the user, the app UI will be frozen, and then eventually the app will stop responding.
So how should one handle long-running background tasks?
If you’re not using a library for thread management, you’ll have to do that yourself. So basically, whenever you want to trigger a background operation, you’ll need to start a background thread from the main thread and then return back the control of execution to the main thread.
Once the background thread has received the results, it can be brought to the main thread using callbacks.
An example of the callback style is shown below:

This works, right? So what’s wrong with callback style background tasks?
To begin with, the code isn’t readable enough. Imagine you have to perform operation A -> on success operation B -> on success operation C.
This will make your code look horrible with all the nested callbacks (and less manageable, too).
There’s nothing wrong with the callback style per se—generally speaking, it works perfectly fine. Just that in some cases, we’d rather have something better that enables us to do complex operations without introducing more complications in the code.
Kotlin coroutines to the rescue!
How are Kotlin coroutines better?
Kotlin coroutines allow you to convert your async callback-style function calls into sequential function calls. It also comes with an efficient way of working with background threads, main threads, and dedicated I/O threads.
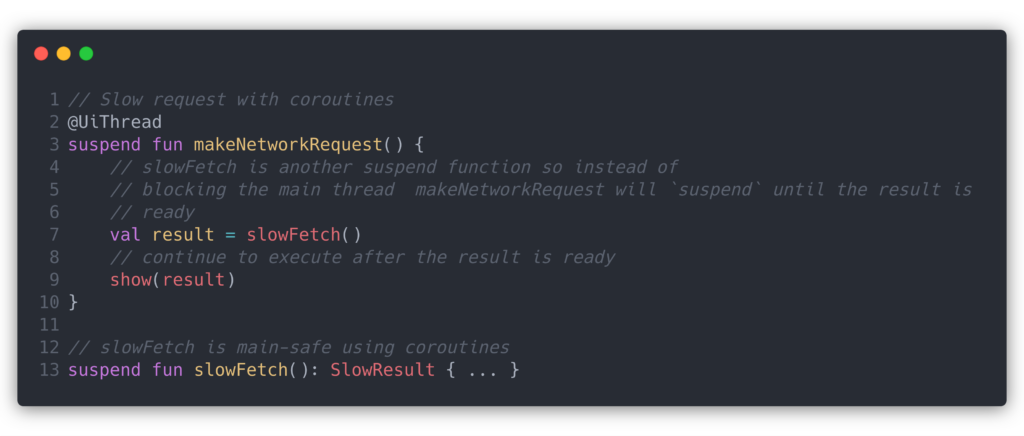
As an example, the code we saw earlier can be re-written using coroutines as follows:

- We converted the callback-style pattern into a sequential pattern. Sequential function calls to background tasks make your code much more readable. We achieved this with the help of suspending functions.
- As you can see, we have marked our makeNetworkRequest() function with the suspend keyword, just as we did with the slowFetch() function.
- When the main thread calls a method that’s suspending, the control of execution is returned back after invoking so that the UI remains responsive.
- When the slowFetch function call is made in the makeNetworkRequest() function, it waits for slowFetch to finish its execution and deliver the response to the result variable. Only then, the show(result) function is called.
- Suspending functions are also main safe, which means they cannot be invoked directly from the main thread. A suspending function can only be called from another suspending function or from a coroutine.
Wait…then how do I invoke a suspending function?
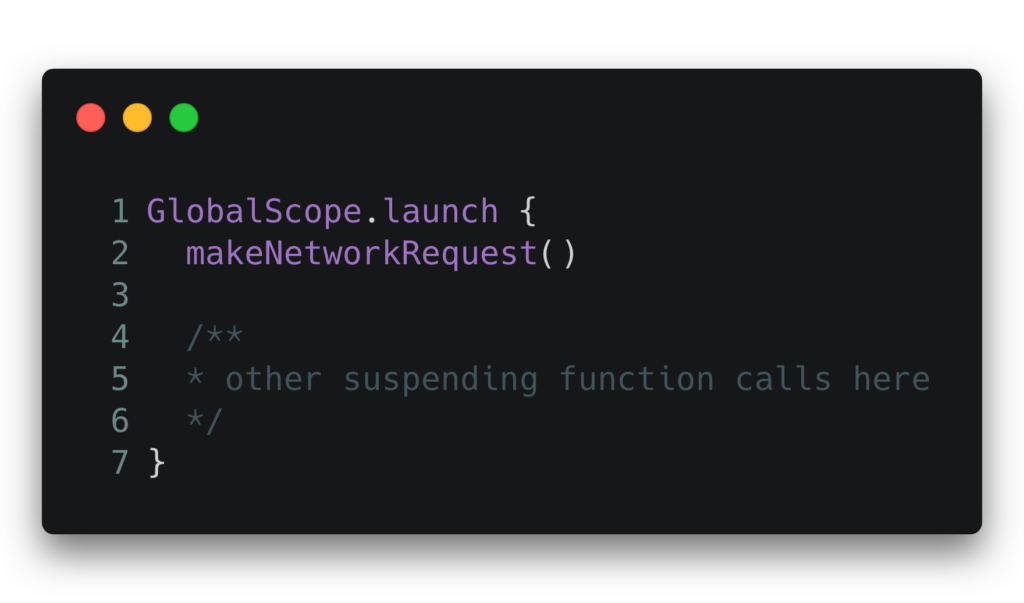
One way of invoking a coroutine is from GlobalScope along with a coroutine builder like launch or async. An example is shown below:

Seems easy, right?
But before we jump the gun and start using GlobalScope everywhere, let’s take a look at what the documentation has to say about this special scope.
Interesting, right? So how do we create an application-defined CoroutineScope?
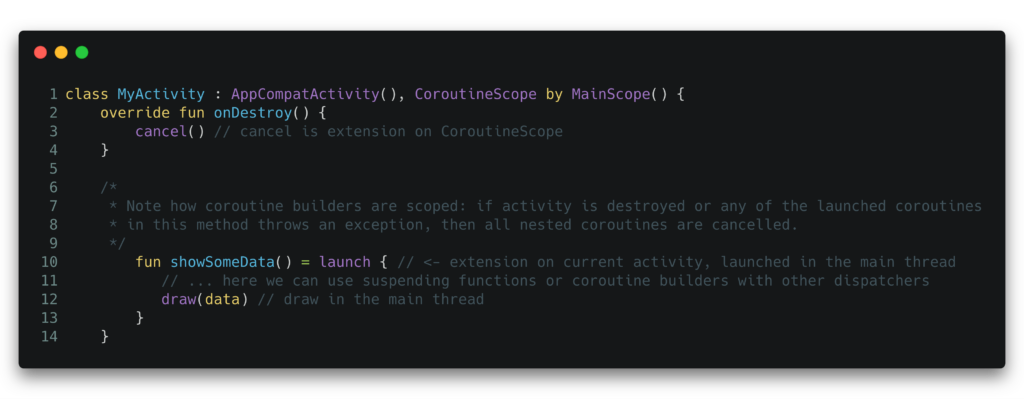
CoroutineScope should be implemented on entities with well-defined lifecycles that are responsible for launching children coroutines — for Android, a common component with Lifecycle is Activity. The easiest way to go about it is as shown below:

By now, we’ve learned:
- Android main thread and its responsibilities
- Background tasks and how we go about managing them in Android
- A basic overview of callback-style functions
- Intro to coroutines and suspending functions
- How to invoke a suspending function
Now we’ve come to the final important piece of this Coroutine story - coroutine dispatchers.
Coroutine Dispatchers
Coroutine dispatchers determine what thread or threads the corresponding coroutine uses for its execution. Coroutine dispatchers can confine coroutine execution to a specific thread, dispatch it to a thread pool, or let it run unconfined.
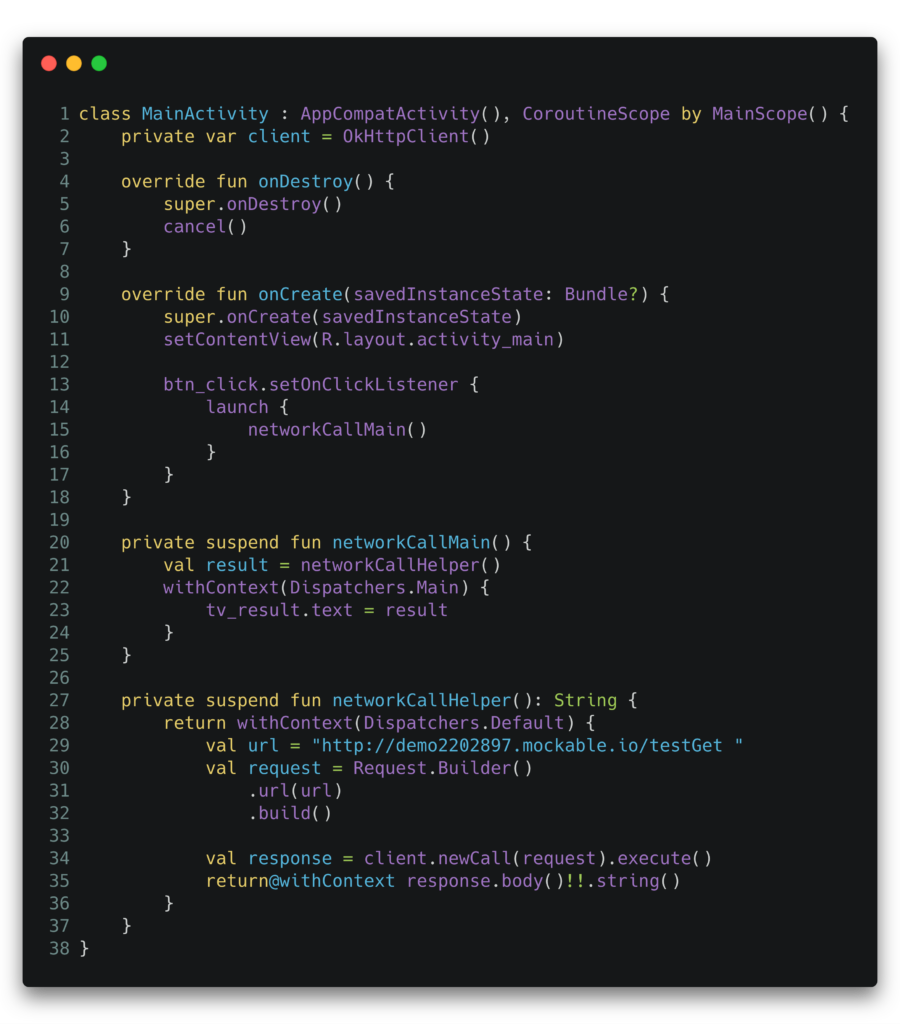
Coming back to our original use case of making a background call and updating the UI running on the main thread—coroutine dispatchers are the go-to solution for achieving this. Let’s see a complete example:

Points to notice in the above example are withContext and Dispatchers.
Notice how we used Dispatchers to specify which thread the following code should run on. In the case of the networkCallMain function, we waited for the result to arrive from the networkCallHelper function, which then triggered a withContext function.
What we did here, to explain in simple terms, is shift the execution of a block to the main thread by using Dispatchers.Main. There are other Dispatchers available at our disposal, with one-line descriptions given below:
- Dispatchers.Main: as we saw earlier, it’s used to dispatch execution to the main thread, mostly to hand over a UI-related task.
- Dispatchers.Default: If no dispatcher is specified, then the execution defaults to this one. It uses a common pool of shared background threads. This is an appropriate choice for compute-intensive coroutines that consume CPU resources. [Ideal for most cases]
- Dispatchers.IO: uses a shared pool of on-demand created threads and is designed for offloading I/O-intensive blocking operations (like File I/O and blocking socket I/O).
- Dispatchers.Unconfined: A coroutine dispatcher that isn’t confined to any specific thread. It executes an initial continuation of the coroutine in the current call-frame and lets the coroutine resume in whatever thread that’s used by the corresponding suspending function, without mandating any specific threading policy. Unconfined dispatchers should not be normally used in the code.
So that’s how you deal with coroutines, Dispatchers and suspending functions. Initially, it may seem a bit complex to understand, but it really isn’t that difficult!
A sample Android project is available here. GO ahead and try some hands-on work with Kotlin coroutines.
Show some ❤ Shower some 👏🏻 and also share this article if you liked it 😉

Comments 0 Responses