
Random Forests are an ensemble learning method that are used to perform regression and classification. Most ML developers have used Random Forests in their projects as they provide better accuracy than Decision Trees.
A Decision Tree is a decision support tool that uses a tree-like model of decisions and their possible consequences including chance event outcomes, resource costs, and utility. It is one way to display an algorithm that only contains conditional control statements.
Random Forest is a fancy name for multiple Decision Trees used collectively to predict a label (in the case of classification).
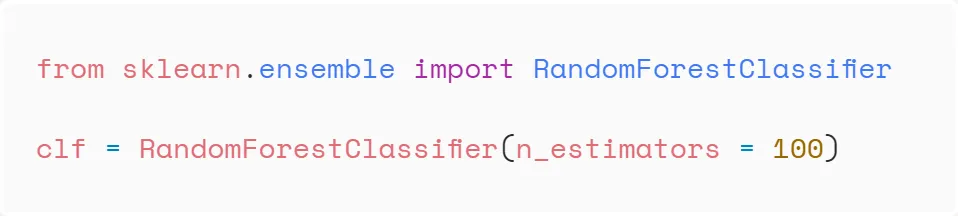
You might be aware of its implementation in Python, via scikit-learn:
The idea behind Random Forests is actually pretty intuitive. For a particular problem, we can take the opinions of various people around us to gather more knowledge. The decision taken by most people will be taken by us, too. Hence by considering many viewpoints, we make sure that our decisions have no bias in them.
Random Forests use multiple Decision Trees, thereby decreasing the bias as well as the variance of the model. You may read Understanding the Bias-Variance Tradeoff to learn more.
The code for this project is available on the GitHub repo (where you’ll see Decision Trees as well).
Without wasting time, let’s get our hands on those forests!
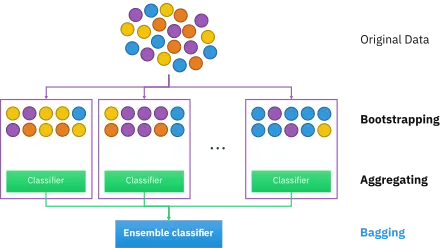
Entering The Forest (An Overview)
Before entering into the forest, I mean Random Forests. First, it’s nice to take a look at the overview of the algorithm.
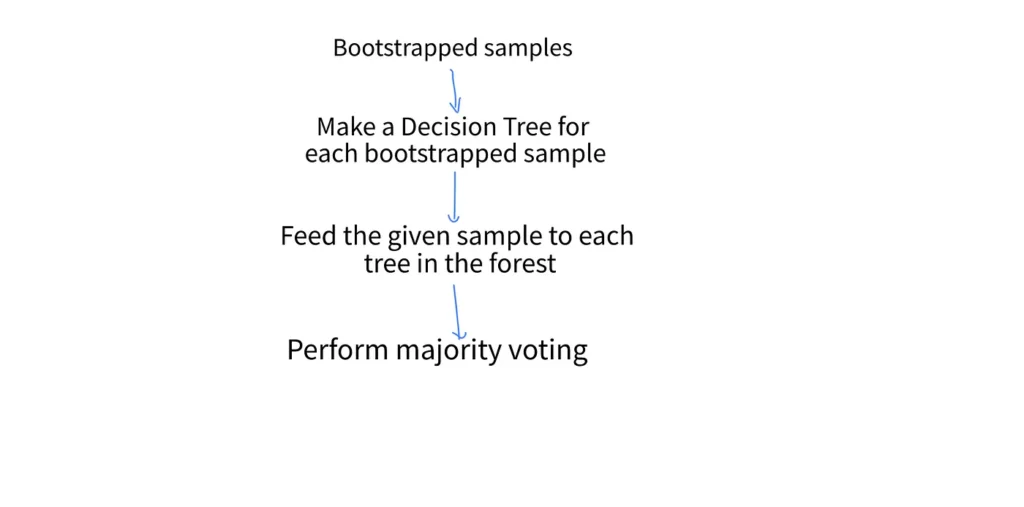
- The first step is to create bootstrapped samples from the training datasets. We will require these mini-datasets for each of the Decision Trees in our Random Forest.
- We create a Decision Tree with each of these bootstrapped samples so that we have a set of Decision Trees ready to generate a prediction.
- Given a sample, we generate predictions from all Decision Trees in the set and take the mode of all predicted labels (majority voting). The most repeated label will be the output.
If you haven’t worked with Decision Trees before, I suggest you read a previous story of mine, in which we implemented Decision Trees in Kotlin,
Here, we won’t get into detail on how Decision Trees work under the hood and we’ll directly access the DecisionTree class.
Bootstrap Aggregating (Bagging)

Bagging is a technique used to improve the efficiency of ML models. It can be applied to other algorithms as well, but we’ll limit ourselves to Decision Trees only. As we know that Random Forests are an ensemble of Decision Trees, we need to provide some data to these trees, so as to generate a prediction.
With Bagging, we are creating subsets of our training dataset and feeding them to our trees. For each subset, we take N samples from our training dataset with replacement. Here, “with replacement” means that each subset could have identical samples (duplicates).
Suppose you have a bag of different flowers. You are asked to note down the color of the five flowers that are picked with replacement. So, you take a flower (say it was a rose) and you note down its color. You keep the flower in the bag and then pick another flower and note down its color. In the end, you may find that some colors are repeated, as you chose them with replacement.
We can understand this with an example, taken from Wikipedia.
Imagine that we have a dataset of five samples like the one below:
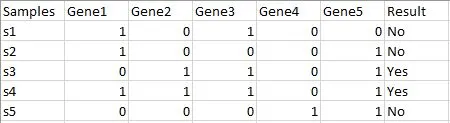
After picking five samples randomly from the above dataset with replacement, a bootstrapped sample will be formed, like the one below.
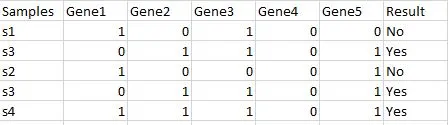
Observe the sample s3 has been taken two times. Here, we say that the size of a bootstrapped sample is five, as we chose five samples from the training dataset with replacement.
To implement this method in Kotlin, we create a new class RandomForest, like the one below:
// Class which creates a Random Forest with N Decision Trees ( N = NUM_TREES, see below ).
class RandomForest( private var data : DataFrame ) {
// Number of trees in the forest.
private val NUM_TREES = 5
// Choose these many samples "with replacement" from the training dataset.
private val BOOTSTRAPPED_DATASET_SIZE = 10
// The forest represented as an array of DecisionTree objects.
private var forest : ArrayList = ArrayList()
init {
// Create the bootstrapped datasets
val datasets = createBootstrappedDatasets()
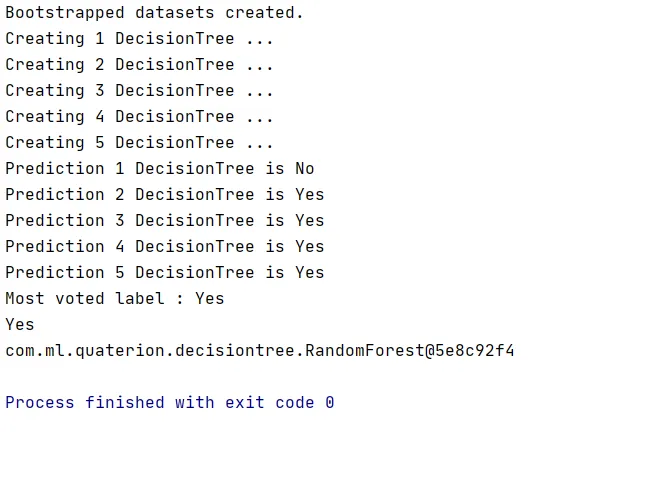
println( "Bootstrapped datasets created." )
... We’ll now go through the implementation of the createBootstrappedDatasets() method, which can be observed in the above snippet.
// Create bootstrapped datasets given training dataset ( which is given to the constructor of
// this class ).
private fun createBootstrappedDatasets() : Array {
    // ArrayList to store the bootstrapped datasets ( which are DataFrame objects )
    val dataFrames = ArrayList()
    for ( i in 0 until NUM_TREES ) {
        // Generate N random indices in the range [ 0 , num_samples_in_train_ds ).
        // Here N = BOOTSTRAPPED_DATASET_SIZE
        // Samples at these indices will constitute a bootstrapped dataset.
        val randomIndices = IntArray( BOOTSTRAPPED_DATASET_SIZE ){ Random.nextInt( data.getNumRows() ) }
        // Get all the entries ( samples ) present at the given indices and store them in dataFrames.
        dataFrames.add( data.getEntries( randomIndices ) )
    }
    // Return the datasets
    return dataFrames.toTypedArray()
} - First, we create an ArrayList that can store the bootstrapped samples (datasets) as DataFrame objects.
- Our next job is to generate BOOTSTRAPPED_DATASET_SIZE indices in the range [ 0 , NUM_SAMPLES_IN_TRAIN_DS ). Samples at these indices (in the training dataset) will form a bootstrapped sample.
- We pass the randomIndices to the data.getEntries() method which will fetch the samples at these indices in the form of a DataFrame.
The data.getEntries() method is in the DataFrame class, which looks like this:
// Return samples ( in form of DataFrame object ) given their indices.
fun getEntries( indices : IntArray ) : DataFrame {
    val dataFrame = DataFrame()
    data.map { column ->
        // `column` represent a Map -> ( String , ArrayList )
        // column.key -> Name of the column as in the training datasets.
        // column.value -> ArrayList containing the column's data.
        val columnData = ArrayList()
        val values = column.value
        // Add the feature values corresponding to each index in `indices`.
        for ( index in indices ) {
            columnData.add( values[ index ] )
        }
        println( "column data ${columnData.toTypedArray().contentToString()}  , ${indices.size}")
        // Append the column to the data frame.
        dataFrame.addColumn( columnData , column.key )
    }
    return dataFrame
} - We iterate column-wise through data and get the feature values present at indices and store them in columnData.
- We append columnData to dataFrame passing the same column name as in data.
Creating the Forest
Once we have our bootstrapped samples ready, we can create a Decision Tree for each of them. These Decision Trees will make our Random Forest. We use the createForest() method to perform this operation. Note that the createForest() method is called in init{}, i.e when the class will be constructed.
...

// The forest represented as an array of DecisionTree objects.
private var forest : ArrayList = ArrayList()

init {

   ...

    // Initialize the forest
    createForest( datasets )
}

...

// Create a forest given the bootstrapped datasets. Each tree will have one bootstrapped dataset.
private fun createForest( dataFrames : Array ) {
    for ( i in 0 until NUM_TREES ) {
        // Initialize a DecisionTree with ith bootstrapped dataset. Add to the forest.
        println( "Creating ${i+1} DecisionTree ..." )
        forest.add( DecisionTree( dataFrames[ i ] ) )
    }
} - The forest variable which is Array
will represent our forest as a collection of Decision Trees. We’ll populate this array in the createForest() method. - In the createForest() method, we first initialize a DecisionTree object with the bootstrapped sample (which is dataFrames[ i ]) and add it to our forest.
The variable NUM_TREES in the above snippet is the number of trees present in our forest, as well as the number of bootstrapped datasets, as one dataset goes into one tree.
Making Predictions
We’ve created our Random Forest with bootstrapped datasets, but how do we generate predictions? Given a sample, how do we infer its class?
We perform Majority Voting. It simply means that we’ll pick the label which was predicted by the maximum number of trees in our forest. This label will be the output of our Random Forest algorithm.
// Predict a class for the given sample using the Random Forest.
fun predict( x : HashMap ) : String {
    // Create an empty array to store class labels.
    val treeOutputs = Array( NUM_TREES ) { "" }
    for ( i in 0 until NUM_TREES ) {
        // Store the output of each DecisionTree in our forest.
        treeOutputs[ i ] = forest[i].predict( x )
        println( "Prediction ${i+1} DecisionTree is ${treeOutputs[i]}")
    }
    // Get the majority label, which is our final prediction for the given sample.
    val mostVotedLabel = treeOutputs.groupingBy{ it }.eachCount().maxBy{ entry -> entry.value }!!.key
    println( "Most voted label : $mostVotedLabel" )
    return mostVotedLabel
}
As I said earlier, Random Forests are used both for classification as well as regression. In the case of regression (which is not our case), we take the average of all values predicted by individual Decision Trees.
- With each Decision Tree in our Random Forest, accessed via forest[i], we generate a prediction by calling forest[i].predict() and store its output in treeOutputs.
- Next, we perform the majority voting in line no. 11 and return that label.
Hurrah! We’ve just created a Random Forest in Kotlin! When you run the code, you’ll see this output:
The End
I hope that implementing Random Forests from scratch was interesting for you. For any queries/suggestions, feel free to express them in the comments below.
Thank You!
Comments 0 Responses