Apple gave its Vision framework a major boost during WWDC 2019 by adding a lot of advancements. From expanding the number of classes (the term taxonomy is used for this) of its image classification requests to improvements in its face technology and text recognition requests, Apple is bringing in some really interesting improvements in computer vision for iOS.
One of the major additions from WWDC 2019 was the introduction of image similarity requests in the Vision framework. Image similarity is not the same as image classification, and we shall see how and why shortly. But first, let’s have a look at some applications where image similarity is useful:
- Signature Verification — Useful in determining if the signature of a person matches the signatures, thereby making your apps smarter when detecting forgery in real-time on the device.
- Duplicate Image Finder — Sifting through tons of images, whether in your dataset or a Photos library. With this new Vision request, it gets easier to filter out the duplicate images by creating an automated task.
- Grouping or Finding Similar Images — Just like text similarity uses the semantic meanings for labeling, image similarity is handy when it comes to grouping or finding images that present similar contexts such as sceneries, places, people, shapes, etc.
- Face Verification — Image similarity is extremely important in cases such as visual identification.
Now that we’ve got a good idea of the various use cases where determining image similarity is handy, let’s dig deeper into it while building a SwiftUI-based iOS application to implement this feature.
Our Goal
- Understanding how image classification is different from image similarity.
- Knowing how image similarity works in Apple’s Vision framework.
- Building an application that computes how similar images are to a reference image and ranks them. We’ll be using the SwiftUI framework to build our iOS application.
Vision Image Similarity
Image similarity and classification are not the same, as class labels do not signify similarity. An image classification model typically returns generated labels as an output, whereas the image similarity request is responsible for computing the similarity between the two images.
Classification requests fall under supervised learning since they follow a set of instructions from inputs to return the output target results. Image similarity, on the other hand, is unsupervised since the input doesn’t have a set of instructions and relies on feature extraction to find relevant similarities across images.
There are quite a number of techniques to compute image similarity, and comparing image pixel values is the most trivial and ineffective one. The same image in a different lighting/shade would give different pixels and would be determined as different from the source image despite being very similar in content. The following illustration from the WWDC videos depicts this:

Vision Feature Prints
Luckily, the Vision framework consists of a classification network that’s trained to determine the feature descriptors of the image in its uppermost model layer. This saves us from creating our own models for extracting features from images, as Vision already provides feature prints in its API. A FeaturePrint is a vector descriptor of the image.
The following code showcases how to determine the feature prints from a Vision request and compute the Euclidean distance between the images. The distance determines how close/far away the images are on the Euclidean map. The smaller the distance, the more similar the images are.
In the above code, the VNGenerateImageFeaturePrintRequest returns a VNFeaturePrintObservation, which is used to compute a floating-point distance from the source image.
Moving on, in the next section, we’ll be developing an iOS application that uses the feature prints of images to sort them by similarity.
Implementation
To start off, we’ll set up our SwiftUI view which holds a source image (reference image) and a List of images. The idea is to run VNGenerateImageFeaturePrintRequest over each of the images and compute their distance with the feature print of the source image. Subsequently, we’ll sort the SwiftUI List to display the most similar images at the top.
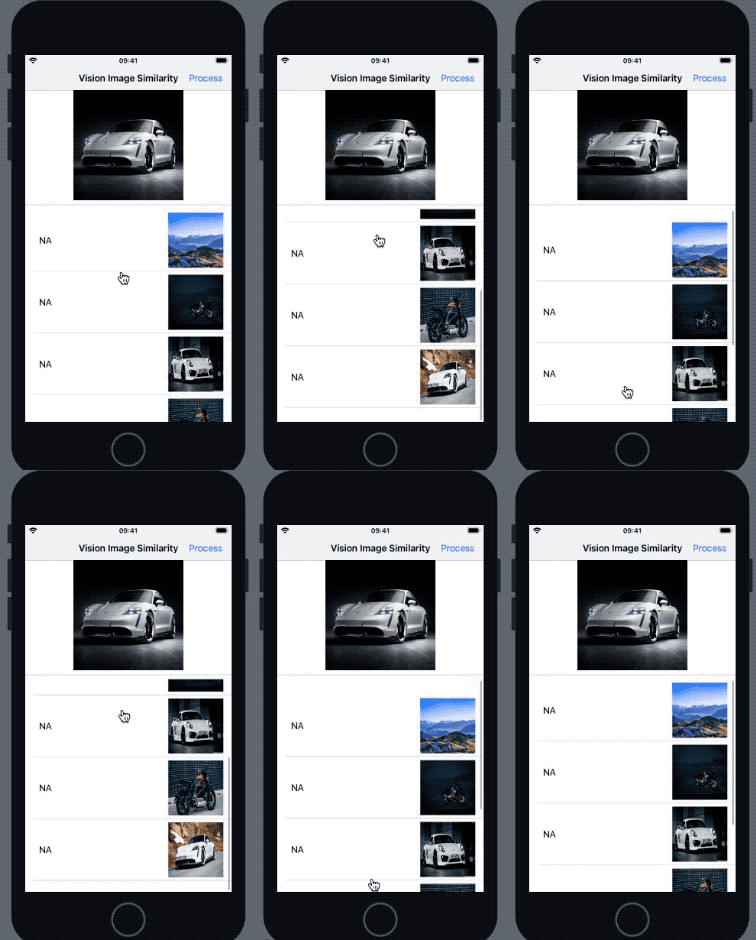
Here’s a glimpse of the initial state of our UI:

So we’ve kept an image of a car as the source image, and a few random images (including the ones of the same car model in different poses) in the SwiftUI List. We’ll soon see how accurately Vision’s image similarity works when computing the feature prints of the images. But first, let’s set up our List and its model.
Creating a Model for the SwiftUI List
Our SwiftUI List will hold the image and the computed distance against the source image in a struct as shown below:
Conforming to the Identifable protocol is important for the elements in the List to have a unique identifier.
Building Our SwiftUI View
Next, we’ll setup the SwiftUI view to hold the modelData and the source image as shown below:
import SwiftUI
import Vision

struct ContentView: View {


    var sourceImage = "source_car"

    @State var modelData = [
                            ModelData(id: 0, imageName: "scene"),
                            ModelData(id: 1, imageName: "bike_1"),
                            ModelData(id: 2, imageName: "car_2"),
                            ModelData(id: 3, imageName: "bike_2"),
                            ModelData(id: 4, imageName: "car_1")]


var body: some View {

        NavigationView{
            VStack{

            Image(sourceImage)
                .resizable()
                .frame(width: 200.0, height: 200.0)
                .scaledToFit()
                Divider()

            List{
                ForEach(modelData, id: .id){
                    model in
                    HStack{
                        Text(model.distance)
                            .padding(10)
                        Spacer()
                        Image(model.imageName)
                            .resizable()
                            .frame(width: 100.0, height: 100.0)
                            .scaledToFit()
                    }
                }
            }

            }.navigationBarItems(
            trailing: Button(action: processImages, label: { Text("Process") }))
                .navigationBarTitle(Text("Vision Image Similarity"), displayMode: .inline)
        }
    }

}
Here our modelData is defined as a State variable. Any changes to the modelData or its properties would update the view again. The NavigationBarItem triggers the Vision request when pressed. Let’s see how that works.
Running the Vision Request
The following code computes the distance between each image of the modelData and the sourceImage and transforms the array with the map function followed by sorting by the distance:
func processImages()
    {

        guard self.modelData.count > 0 else{
            return
        }

        var observation : VNFeaturePrintObservation?
        var sourceObservation : VNFeaturePrintObservation?

        sourceObservation = featureprintObservationForImage(image: UIImage(named: sourceImage)!)

        var tempData = modelData

        tempData = modelData.enumerated().map { (i,m) in
            var model = m
            if let uiimage = UIImage(named: model.imageName){
                observation = featureprintObservationForImage(image: uiimage)

                do{
                    var distance = Float(0)
                    if let sourceObservation = sourceObservation{
                        try observation?.computeDistance(&distance, to: sourceObservation)
                        model.distance = "(distance)"
                    }
                }catch{
                    print("errror occurred..")
                }

            }

            return model
        }

        modelData = tempData.sorted(by: {Float($0.distance)! < Float($1.distance)!})
    }
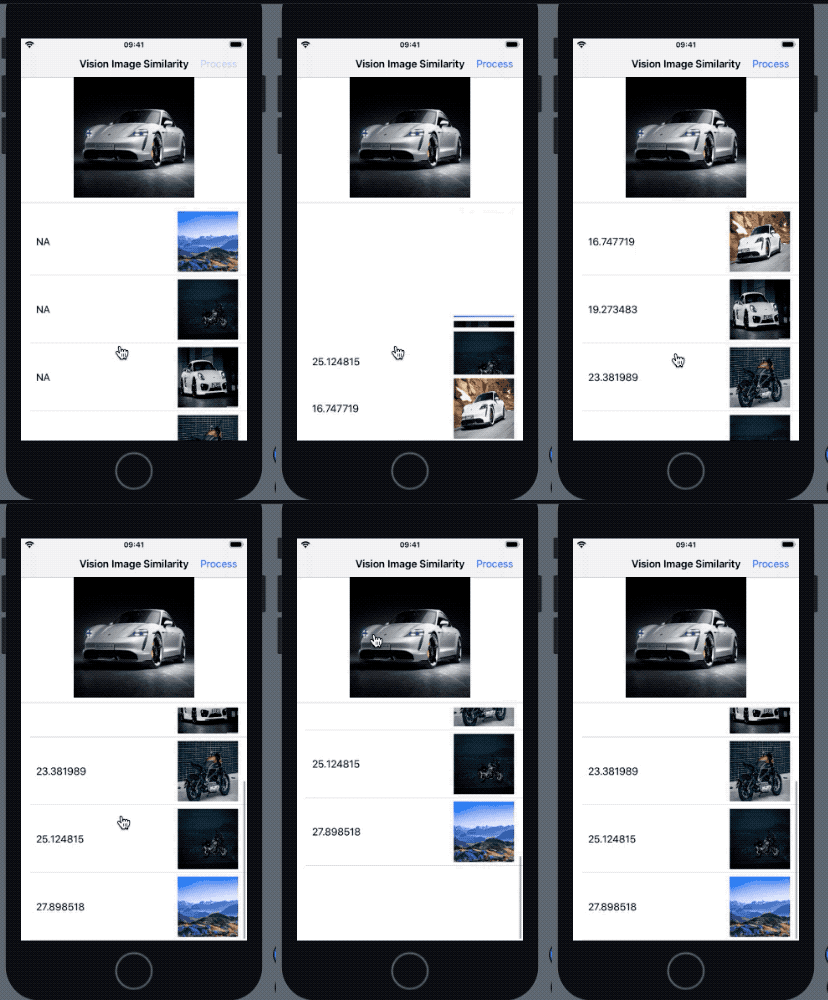
As a result, we get the following result in our application when the above request is run:

In the outcome above, the most similar image was the one with most similar pose to the reference image. The Vision feature print comparison takes saliency into consideration as well (hence the bike that was more prominent got a higher rank).
For scenarios where the image for computing the similarity is the same as the source image, the distance returned is 0.0. Additionally, if the Vision request can’t extract feature prints, it throws an error.
Conclusion
In this tutorial we explored how Apple’s Vision framework makes it easier for iOS developers by abstracting complex computer vision algorithms with an easy to use API.
By extracting feature prints of images, we can analyze the similarity between images. Moving forward, you can try computing images with multiple reference images for use cases such as figuring if an image is blurry or not, dark/bright, etc. It’ll be interesting to see how accurately the Vision request works on these kinds of cases. The full source code for this article is available in this GitHub Repository.
That’s it for this one. I hope you enjoyed reading.

Comments 0 Responses