At WWDC 2020, Apple introduced a bunch of great new updates to SwiftUI to make it even easier for developers to write apps for Apple platforms. In this tutorial, you’ll learn how to use those new features to make your app work on both iOS and macOS. By the end of this tutorial you will have created a fully functional HackerNews reader.
You can download the source code on my GitHub.
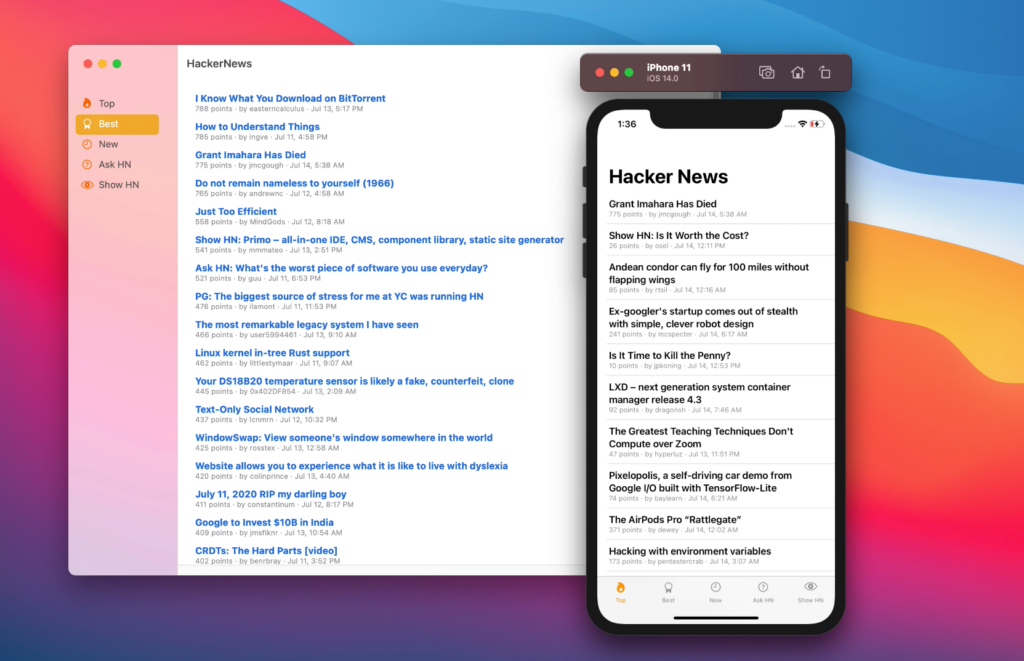
Setting up a new Xcode project
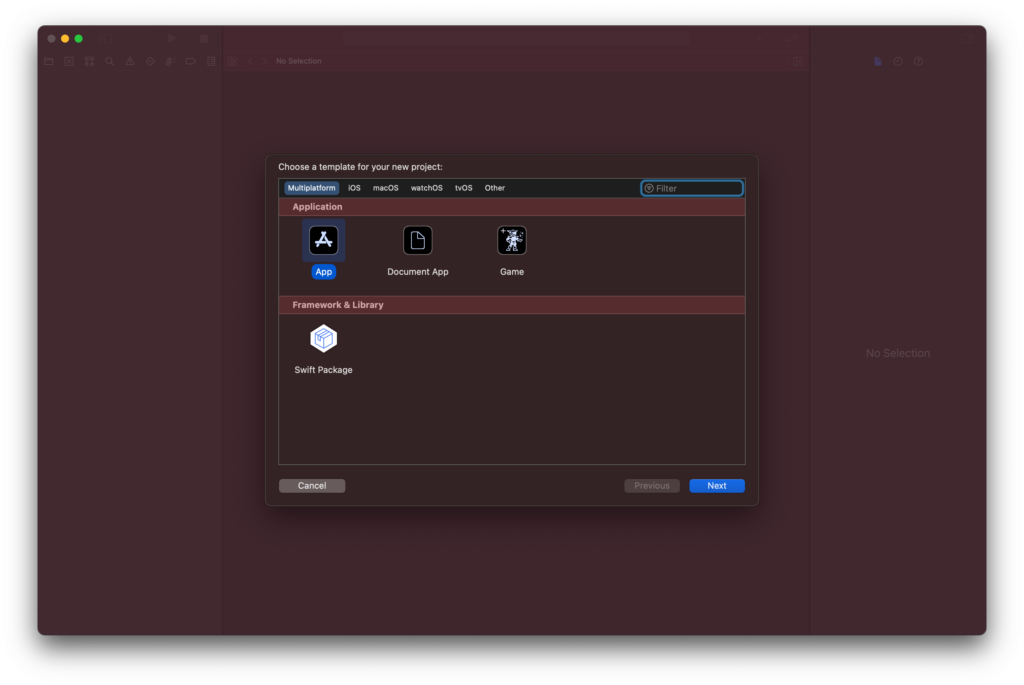
Open Xcode 12 or newer and hit ⌘⇧N to create a new project. Navigate to the new “Multiplatform” section, select App and press Next. Then save your project as usual.
Starter files
You can download the starter files for this project from GitHub. These files define interfaces to work with the HackerNews API and lay the groundwork for the MVVM design pattern, which you will use throughout the app. The next section explains the API and MVVM in more detail.
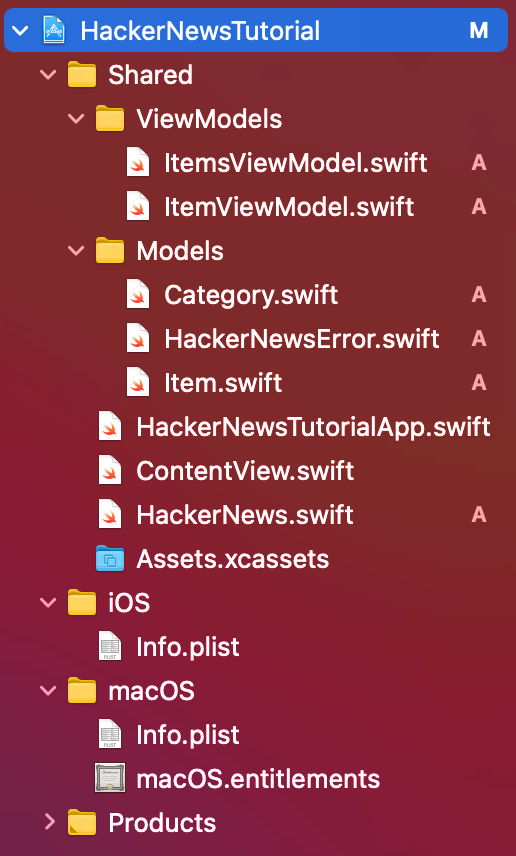
From the file navigator, create groups named Models and ViewModels in the Shared section. This section contains all code used by both the iOS and macOS apps. Drag the starter files from Finder into the correct group in Xcode. Don’t forget to check “Copy items if needed” and select both platform targets. You can place HackerNews.swift directly in the Shared section. After you’re done, your file navigator should look as follows:
Allowing network connections on macOS
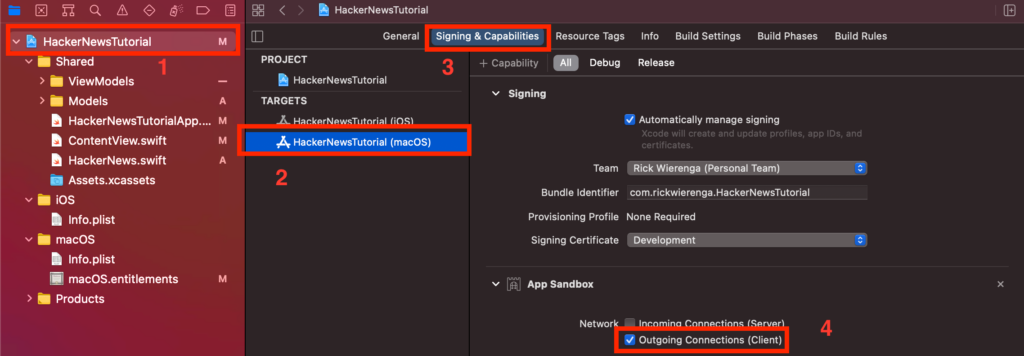
On macOS, you need to explicitly allow network usage. Select the project file, navigate to the macOS target, select the Signing & Capabilities tab, then check Outgoing Connections (Client).
Building for iOS and macOS
While the code is mostly shared, building for iOS and macOS still requires different targets. See the video below on how to switch between iOS and macOS.
The HackerNews API
The HackerNews class you imported from the Starter files uses Combine, Apple’s new reactive programming framework. If you’ve never used Combine before, I recommend this detailed guide by Donny Wals.
MVVM: A quick overview
Reactive programming and SwiftUI require the MVVM design pattern. It’s really just a guide on where to put your code, but it’s important you have a general understanding of how it works before moving on, as this app relies heavily on it.

The view models
The starter code provides two view models: one to load a single HN story (ItemViewModel) and one to load a list of HN story ids (ItemsViewModel).
ItemsViewModel loads an array of ItemViewModels, configured only with the item ID, so it can be loaded later on. By loading items lazily, we only make HTTP requests when we need to, thereby ensuring the app is as fast as possible. Both view models are “Observable,” so SwiftUI views can be updated instantly when a view model changes.
Designing the views
We’ll get started by writing the shared views.
ItemView
The primary component of this app is the ItemView, which displays a single item. Start by creating a new Views group in the Shared group. Then create ItemView.swift. This view will be shared by all platforms, so we only have to write it once!
An item may have multiple states:
- Loading
- Error
- Loaded successfully
We can use the ViewBuilder API to display different views inside this component, based on the ItemViewModel’s state:
import SwiftUI

struct ItemView: View {
  @ObservedObject var viewModel: ItemViewModel

  @ViewBuilder
  var body: some View {
    if viewModel.loading {
      // Loading view
    } else if let error = viewModel.error {
      // Error view
    } else if let item = viewModel.item {
      // Loaded view
    }
  }
}

The loading state uses the new SwiftUI ProgressView. Whenever this view appears, we want to start loading the item. The first few items will be loaded immediately after the app loads (they are visible) and the other items will be pushed down, ready to be loaded when the user scrolls down.
Because all views are reactive, we only have to call reload() on the ViewModel, and SwiftUI will automatically switch the view to a loaded or error state when the loading completes!
Replace // Loading view with
ProgressView()
  .onAppear(perform: { viewModel.reload() })
If an error occurs, we display the error message provided by the ViewModels error property. As you can see in the image above, the label and icon don’t align properly, but that should be fixed in a future beta.
Replace // Error view with
Label(error.description, systemImage: "exclamationmark.triangle")
The loaded state is a clickable cell that opens a new browser window with the item’s URL. This can be achieved with the new Link view. The rest of the view is some simple SwiftUI code:
Link(destination: item.url) {
  VStack(alignment: .leading) {
    Text(item.title)
      .font(.headline)
      .lineLimit(3)
    HStack {
      Text("(item.score) points · by (item.author) · (item.formattedDate)")
        .font(.caption)
        .foregroundColor(.gray)
    }
  }
}
.padding(.vertical, 4)
You can test the view by adding the following line to ContentView.swift. This loads a static story for now, but we’ll change that in the next section.
ItemView(viewModel: ItemViewModel(id: 8863))ItemsListView
The ItemsListView is very similar to the item view. Note how the ViewBuilder API is used again to conditionally display different views. The view is loaded when the progress view appears. This is not yet necessary, but it will be when we add support for multiple ItemsListViews in the next section.
If there are no errors after the view model finishes loading, we display a list of the ItemViews we just built. Each ItemView gets its own view model to communicate with the API. The list provides the ID for each item.
import SwiftUI

struct ItemsListView: View {
  @ObservedObject var viewModel: ItemsViewModel

  @ViewBuilder
  var body: some View {
    if viewModel.loading {
      ProgressView()
        .onAppear(perform: { viewModel.reload() })
        .frame(maxWidth: .infinity, maxHeight: .infinity)
    } else if let error = viewModel.error {
      Label(error.description, systemImage: "exclamationmark.triangle")
    } else {
      List(viewModel.items) { item in
        ItemView(viewModel: ItemViewModel(id: item.id))
      }
    }
  }
}
In HackerNewsApp.swift, you can replace ContentView() with the following to display the items:
ItemsListView(viewModel: ItemsViewModel(category: .top))You can now delete ContentView.swift.
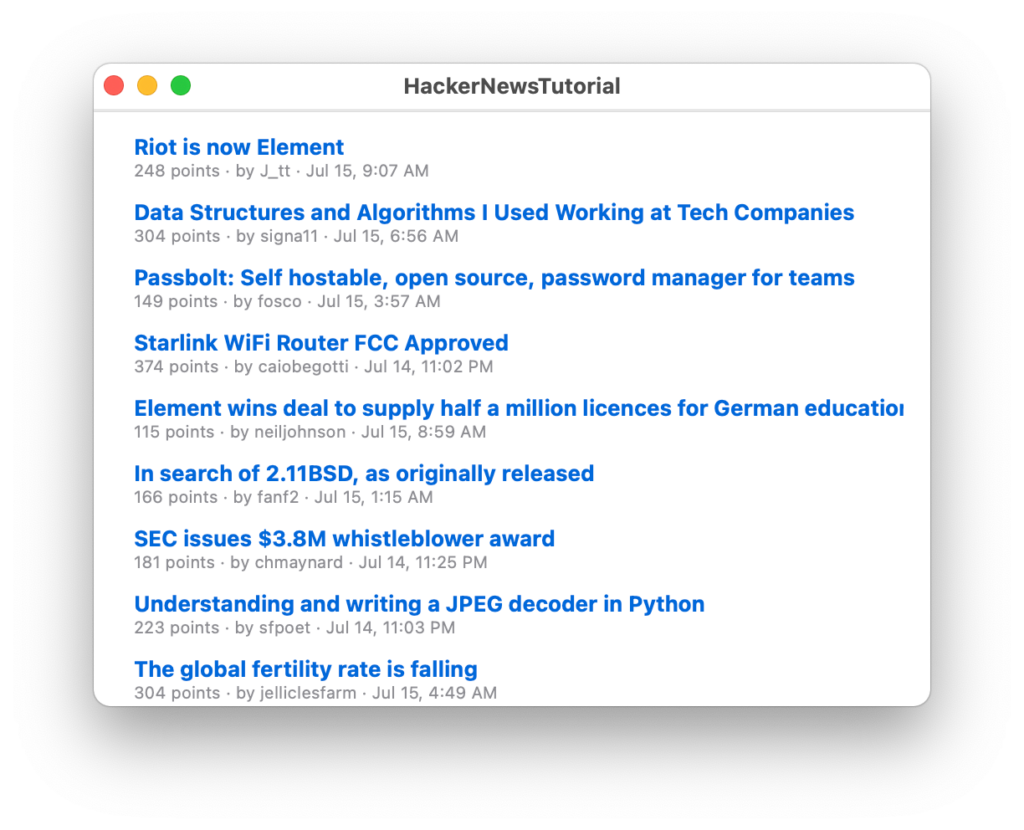
In the next section, we’ll let the user choose a category to display.
Adding a sidebar on macOS
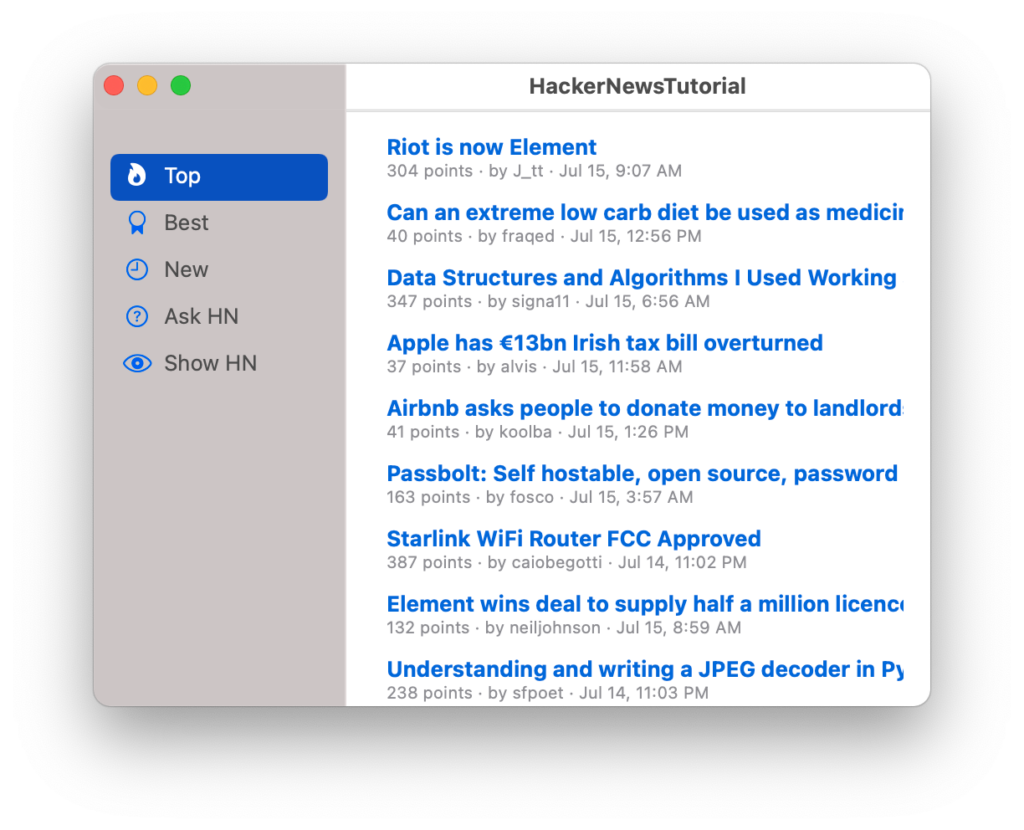
Everything we’ve done so far is shared by iOS and macOS. Now we’ll write a sidebar—a macOS-specific component. It will provide a navigation link to each category. If the user clicks a category, it’ll open in the detail view.
Start by creating a new file Sidebar.swift in the macOS folder. Make sure you only select macOS as the target.
SwiftUI provides the listStyle modifier to change a list’s appearance. You can view all available list styles here. For this list, we use SidebarListStyle(), of course. Each item in the list is a navigation link to an ItemsListView, configured with an ItemsViewModel.
import SwiftUI

struct Sidebar: View {
  var body: some View {
    List(Category.allCases) { category in
      NavigationLink(destination: ItemsListView(viewModel: ItemsViewModel(category: category))) {
        Label(category.name, systemImage: category.icon)
      }
    }
    .listStyle(SidebarListStyle())
    .frame(minWidth: 150, idealWidth: 150, maxWidth: 200, maxHeight: .infinity)
    .padding(.top, 16)
  }
}
To use the Sidebar, we need to wrap the entire app in a NavigationView. We’ll do this in the top-level App component (HackerNewsApp.swift):
@main
struct HackerNewsTutorialApp: App {
  var body: some Scene {
    WindowGroup {
      NavigationView {
        // views...
      }
    }
  }
}
However, we only want to display the navigation bar on macOS, of course. To do that, we use a Conditional Compilation Block. This is similar to the standard Swift if statement, but instead of being evaluated at runtime, the compiler will look at the selected target and cut out any code that doesn’t meet the conditions. This means that some macOS-specific code won’t be included in the iOS binary, and vice-versa. See the linked documentation for more details.
Replace // views… with the following conditional compilation block:
#if os(macOS)
Sidebar()
ItemsListView(viewModel: ItemsViewModel(category: .top))
#else
ItemsListView(viewModel: ItemsViewModel(category: .top))
#endif
Line 3 of the snippet above is the default navigation view-view, which will be loaded if the user hasn’t selected another view from the sidebar. You can change .top to any other category, and it will be the default. The sidebar component will replace this view upon selection of another view.
On macOS, the app will have a sidebar, while the iOS version will be the same as before. We’ll add a tab bar on iOS next.
Adding a tab bar on iOS
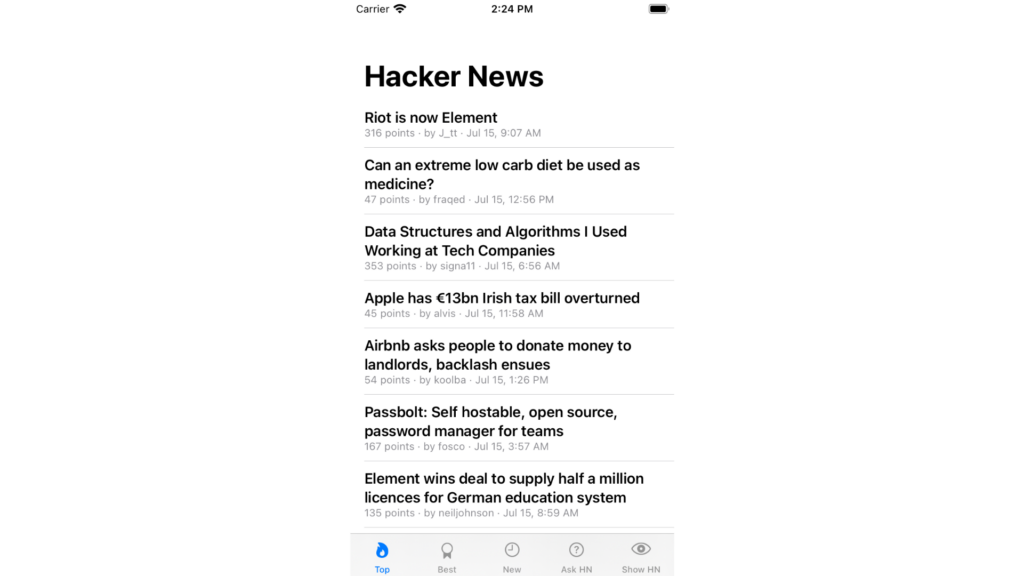
On iOS, we want to use a tab bar, available through SwiftUI’s TabView component. TabView wraps each item itself, without the need for NavigationLink.
Go to File > New > File and save TabBar.swift in the iOS group, with iOS as the only target.
We loop over the categories again, this time using ForEach instead of a list. Using the tabItem modifier, we can add an image and text to each tab.
import SwiftUI

struct TabBar: View {
  var body: some View {
    TabView {
      ForEach(Category.allCases) { category in
        ItemsListView(viewModel: ItemsViewModel(category: category))
          .tabItem {
            Image(systemName: category.icon)
            Text(category.name)
          }
      }
    }
  }
}
Next, we replace the item list view in the root App component with the tab bar. We don’t need to specify any default view whatsoever, because TabView takes care of that. Replace the else block with the following:
#else
TabBar()
  .navigationTitle("Hacker News")
#endif
The iOS app now has a tab bar!
Polishing
Our app is now functional, but it’s not yet finished. I’ll demonstrate a few things you can do to improve the app, but I would also encourage you to continue exploring more options on your own.
Accent color
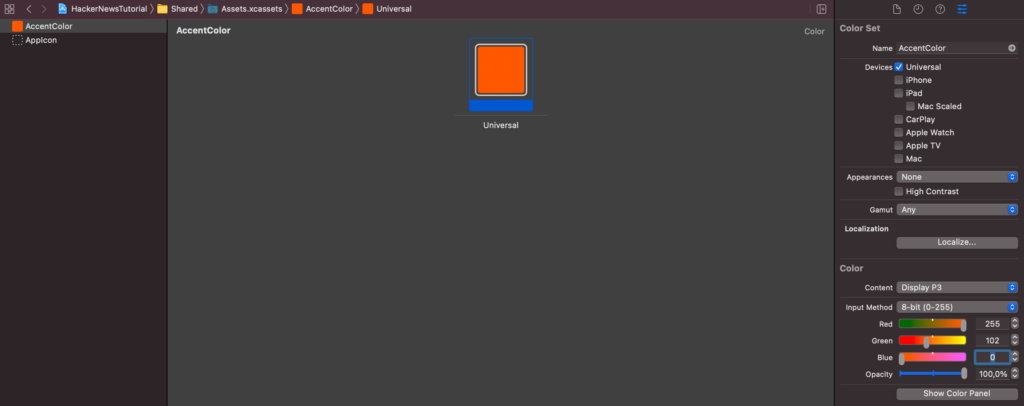
A quick way to modify the look of your app is by using a custom accent color. SwiftUI will use this color wherever possible.
In the Shared group, open Assets.xcassets and change the accent color to Display P3 > 8 bit > (225, 102, 0) to give your app the familiar HN tint—or pick a color of your choice.
Window size on macOS
Users have the ability to change the window size on macOS to something unusable. It’s better if an app sets a default minimum size to avoid this. We have already specified the size of the sidebar, and we’ll use the same frame modifier again on the items list view.
However, we only wish to do this on macOS. To use modifiers conditionally, it’s best to move the view from body to another property, such as view (choose any arbitrary name) and use a conditional compilation block to apply different modifiers in the body.
Start by copying the body of the ItemsListView to view:
@ViewBuilder
private var view: some View {
  if viewModel.loading {
    ProgressView()
      .onAppear(perform: { viewModel.reload() })
      .frame(maxWidth: .infinity, maxHeight: .infinity)
  } else if let error = viewModel.error {
    Label(error.description, systemImage: "exclamationmark.triangle")
  } else {
    List(viewModel.items) { item in
      ItemView(viewModel: ItemViewModel(id: item.id))
    }
  }
}
Then replace body with the view property and platform-specific modifiers:
var body: some View {
  #if os(macOS)
  return view
    .frame(minWidth: 400, minHeight: 600)
  #else
  return view
  #endif
}
Reload button
The front page of HackerNews changes often and quickly, so our app needs to account for that. We’ll add a reload button to the toolbar on macOS, and the navigation bar on iOS. (At the time of writing, the iOS toolbar does not work correctly. It should with future betas.)
We’ll use the toolbar modifier along with the ToolbarItem component to add the reload button to each platform. On macOS, we’ll also add the keyboardShortcut modifier to allow the user to reload the list with a keyboard shortcut (⌘⇧R). Update the body with the following:
#if os(macOS)
return view
  .frame(minWidth: 400, minHeight: 600)
  .toolbar {
    ToolbarItem(placement: .automatic) {
      Button(action: { viewModel.reload() }) {
        Image(systemName: "arrow.clockwise")
      }
      .keyboardShortcut("R", modifiers: .command)
    }
  }
#else
return view
  .toolbar {
    ToolbarItem(placement: .navigationBarTrailing) {
      Button(action: { viewModel.reload() }) {
        Image(systemName: "arrow.clockwise")
      }
    }
  }
#endif
Hiding the sidebar
It would be nice if the user could show and hide the sidebar on macOS. To allow that, we’ll add another toolbar item to the item list view on macOS.
SwiftUI does not have native support for hiding/showing the sidebar yet, so we need to fallback to the old AppKit way of doing it:
NSApp.keyWindow?.firstResponder?.tryToPerform(#selector(NSSplitViewController.toggleSidebar(_:)), with: nil)Below the macOS reload button, add the following:
ToolbarItem(placement: .automatic) {
 Button(action: {
   NSApp.keyWindow?.firstResponder?.tryToPerform(#selector(NSSplitViewController.toggleSidebar(_:)), with: nil)
 }) {
   Image(systemName: "sidebar.left")
 }
 .keyboardShortcut("S", modifiers: .command)
}
Build and run to view the final app:
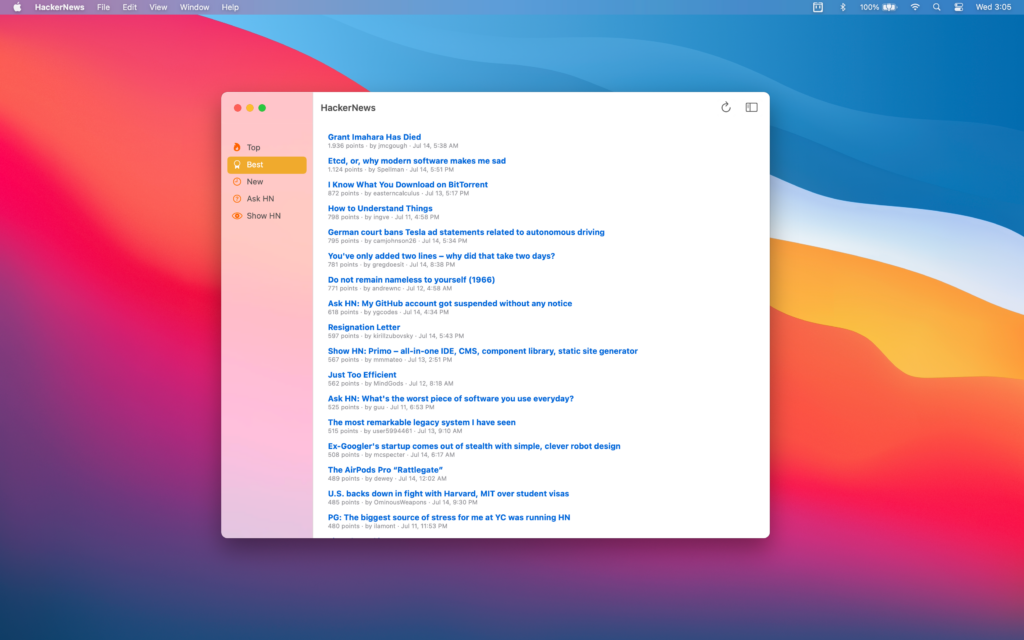
You can download the completed apps here.
What’s next?
In this tutorial, you learned how to write apps for macOS and iOS in a single codebase. But don’t stop here! Apple introduced many other new SwiftUI features that you can use to improve this app—or use for an app of your own.
If you have any questions or comments, feel free to reach out on Twitter or email me directly at rick_wierenga [at] icloud [dot] com.

Comments 0 Responses