Welcome back to the second part of our recommender engine tutorial series. In the first part, you learned how to train a recommender model using a variant of collaborative filtering and neural network embeddings.
In this part, you’re going to create a simple book web application that displays a set of books and also recommends new books to any selected user. Below is the end-goal of this tutorial:
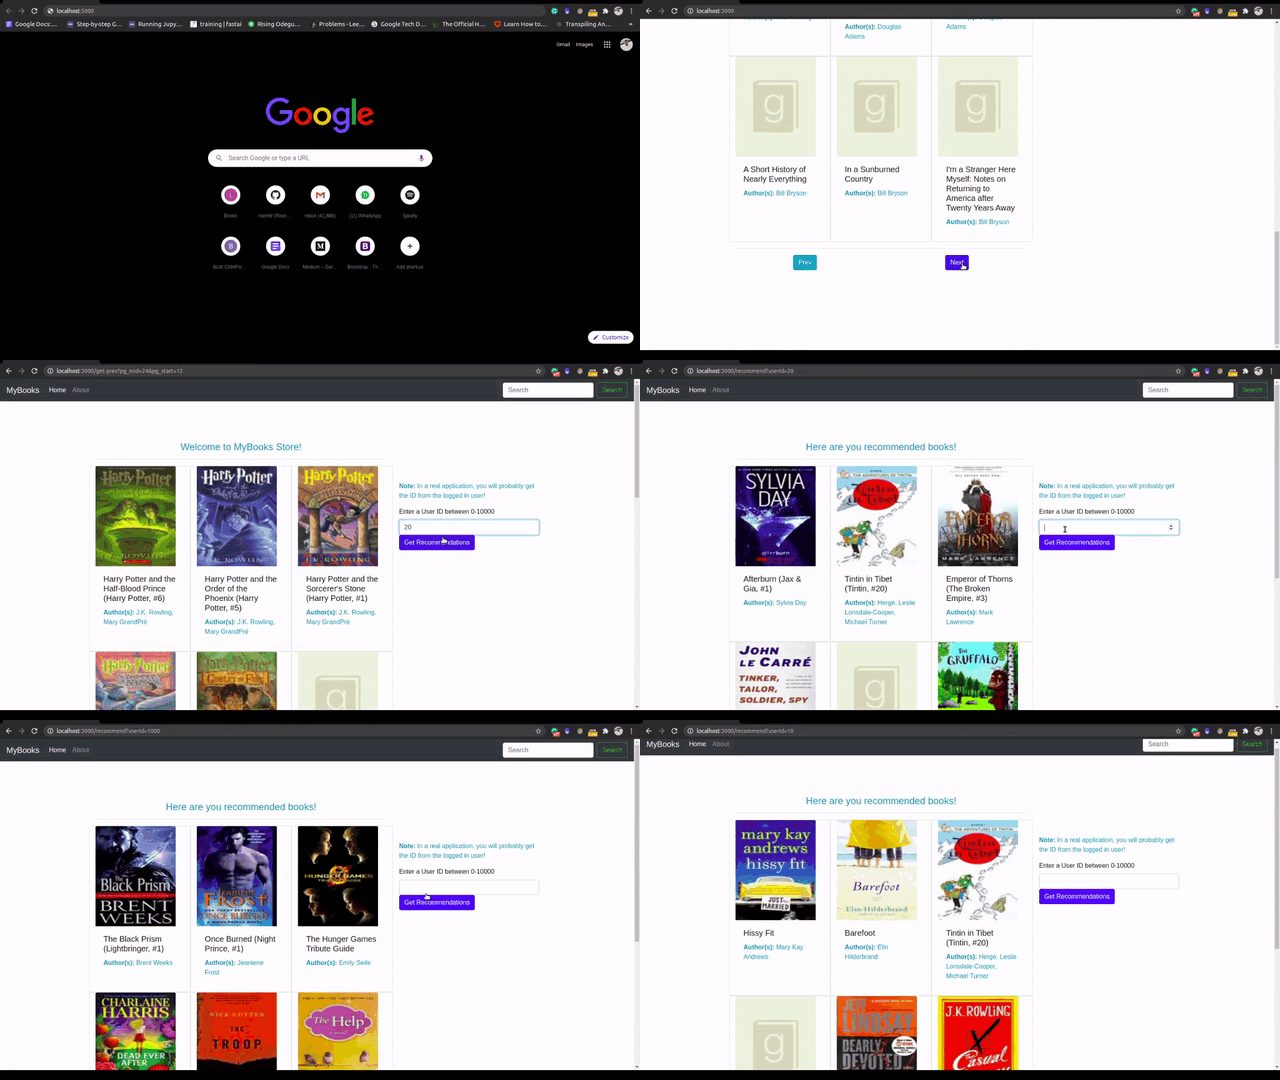
Table of Contents
- Introducing the App Architecture
- Initializing the App and Creating Code Directories
- Converting the Saved Model to JavaScript Format
- Creating the Entry Point and Routes
- Loading the Saved Model and Making Recommendations
- Creating the UI and Displaying Recommendations
- Testing the Application
- Conclusion
Introducing the App Architecture
Our web app is going to be pretty simple. We’ll create a basic Node app project using express-generator. If you don’t have Node.js installed on your system, you should first install it before moving to the next step.
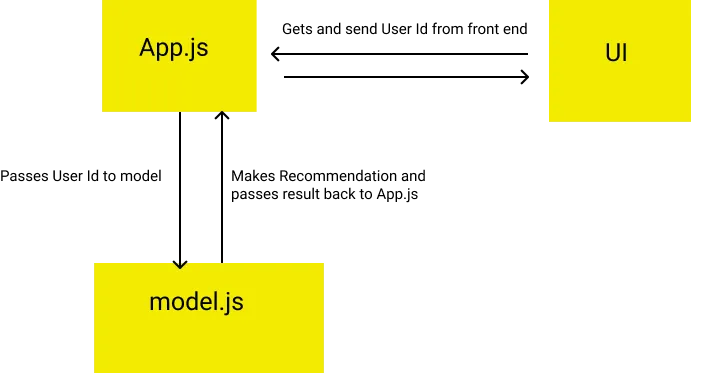
Our app architecture will be comprised of three main parts:
- app.js: This will be the main entry point of our application. It will contain code to initialize the app, create routes that will map to the UI, call the model to make recommendations, and also start the server.
- model.js: The model.js file, as the name suggests, will handle model loading and making recommendations. We’ll be using TensorFlow.js for loading our model, so this file will import the library and also process the input data from app.js to the format accepted by the model.
- UI: The UI will contain HTML and CSS code for the app frontend. It will display the available books on a page by page basis (12 books per page), as well as contain buttons for going to the next or previous page. It will also contain an interface for inputting user IDs when making recommendations.
Initializing the App and Creating Code Directories
To easily create our directories and server, we will use the express-generator library, which will allow us to quickly create an application skeleton.
In your preferred app folder, open a terminal/command prompt to install the library:
Once installed, you can use it by running the command below:
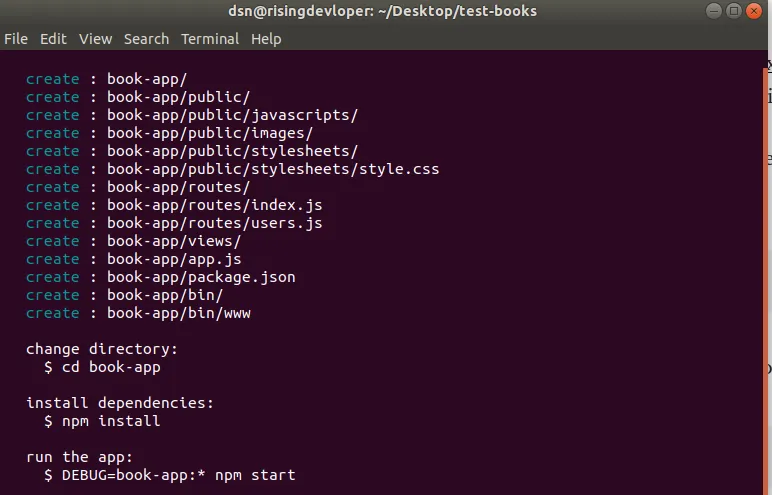
Next, open the created folder in your code editor. I use VScode, so I can simply type code . in the terminal to open the directory.
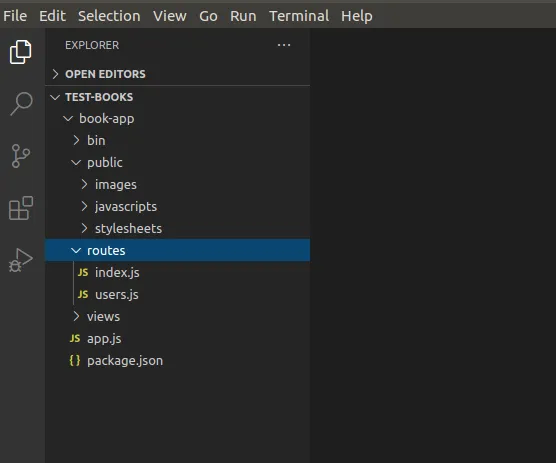
There are lots of files and folders created by express by default—we won’t be using most of them. So we can get rid of the public folder, as our UI will be served from the views folder. You can also get rid of the routes folder, as our application is relatively simple, and we really don’t need routes.
When you’re done removing these files, you should be left with a directory structure similar to the one below:
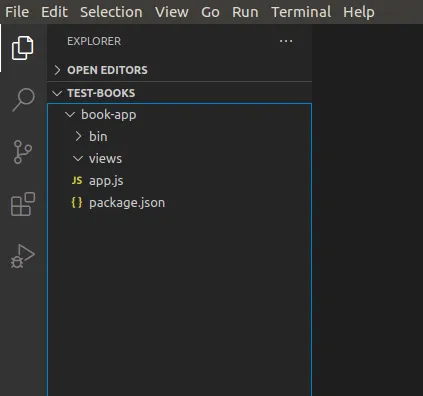
Next, create the following files/scripts:
- In the home folder, create a script model.js.
- In the views folder, create another folder called layouts, and inside the layouts folder, create a file called layouts.hbs.
- In the views folder again, create the main UI page index.hbs. Note the extension is .hbs and not .html. This is because we’re using a view engine called handlebars. This helps us render objects sent from the backend in the frontend.
- In the home folder, create a new folder called model. This will hold our converted model.
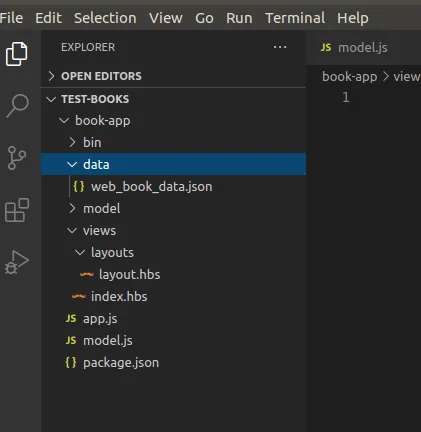
- And finally, in the home folder as well, create another folder called data. Remember the book data we exported and saved in the first part of this tutorial? We’ll copy it here. This will help us load and display books to the user before and after a recommendation.
Now before you move to the next section, copy the book data file (web_book_data.json) you saved in the previous tutorial in the data folder.
When you’re done creating these files and folders, you should have a directory structure similar to the one below:
Converting the Saved Model to JavaScript Format
Converting the saved model into JavaScript format is pretty straight forward. We just need to install and work with the TensorFlow.js converter.
To install it, I’d advise creating a new Python environment. I wrote about how to convert any TensorFlow model to Javascript format here. You can read it for better understanding before proceeding.
In a new terminal, run the command:
After successful installation, still in your terminal, navigate to where you have your saved Keras model and run the command below:
The tensorflowjs_wizard starts a simple interactive prompt that helps you find and convert your model.
The first command asks for the Keras model folder. If you used the same name as I did in the first tutorial, then your model folder name is model. You can specify this in the prompt:

On clicking enter, the next command asks you what type of model you’re converting. The model name with a * is the auto-detected one. You can click enter to proceed, as it already chose the right one.

In the next prompt, click Enter to choose No compression. And finally, it asks for a folder name to save the converted model to. You can type in converted-model/ and click enter to start the conversion.
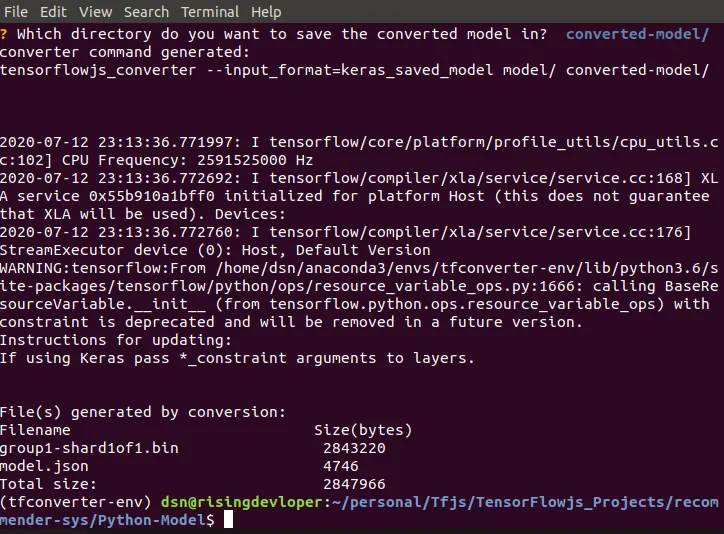
When it’s done converting, navigate to the folder you specified (converted-model). You will find the model files below:
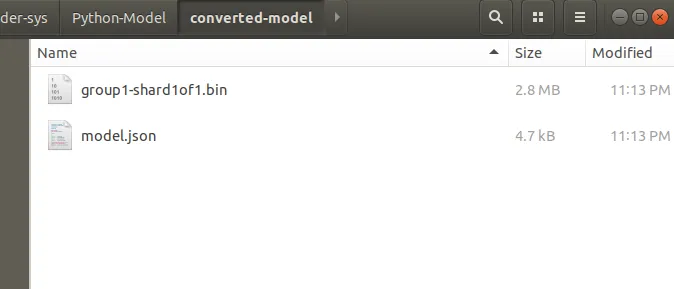
Now that you’ve converted the model, copy these two files (group1-shared1of1.bin, model.json), and paste them into the model folder of your application. Your app directory should look like the one below:
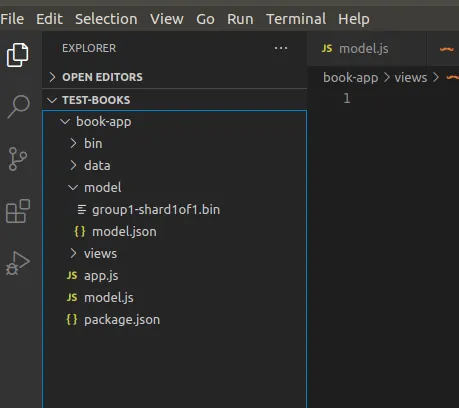
Next, we’ll create our routes.
Creating the Entry Point and Routes
As aforementioned, the app.js file is the entry point of our application. If you open the file in your code editor, you’ll find some default code. This code was generated by express-generator. We’ll remove some the less useful code for our purposes, and also add some of our own.
Remove all existing code in the app.js file and paste the code below:
const express = require("express");
const bodyParser = require("body-parser");
const expressHbs = require("express-handlebars");
const books = require("./data/web_book_data.json")
const model = require("./model")

const app = express();
app.set("views", "./views");
app.set("view engine", "hbs");

//Body parser middleware
app.use(
    bodyParser.urlencoded({
        extended: false
    })
);
app.use(bodyParser.json());


app.engine('.hbs', expressHbs({
    defaultLayout: 'layout',
    extname: '.hbs'
}));


app.get("/", (req, res) => {
    res.render("index")
});


module.exports = app;
In the first five lines (1–5), we import some important libraries we’ll be using.
- express handles all low-level app routing and server creation
- body_parser ensures we can easily parse and read form data from the frontend
- express-handlebars is a variant of handlebars and is used for rendering views
We also load the book data, which is in JSON format, using the Node.js require function. Note that in a production application, you’ll be reading a file like this from a database. And finally, we require the model module. This gives us access to the model functions.
All other functions before app.get are configuration settings, and if you’re familiar with express, and you should already be aware of them.
- In line 20, we create our first route. This route renders the first UI page (index) of our application.
Navigate to the index.hbs file and add a simple Hello World before we test our application.
Also, we’ll have to install some of the modules we’ll need for our application. To install these and other modules we’ll be using, open your package.json file and add the following modules to your dependencies:
With your terminal opened in your app directory, run the command:
This installs all the modules specified in the dependencies section of package.json
Installation might take some time, especially the TensorFlow.js package. Once the installation is done, before you start the app, navigate to the layouts folder and in the layouts.hbs file, add the text below:
The layout.hbs file is the base of our application, and every other file inherits from it. If we had sections like headers and footers that are the same for all pages across our application, we can easily add them in the layouts.hbs file, and they will appear in all files.
The command {{{body}}} instructs express to render any page in the specified position. You can read more about layouts here.
Now, you can start your app to test it. In your terminal, run the following command:
This starts a server on port 3000—you can open your browser and point it to the address below:
This should render the text “Hello World” in the browser.
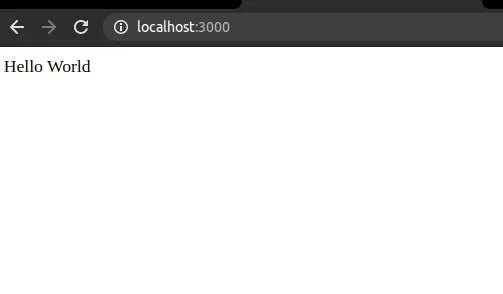
Next, we’re going to add more functionality to the code. Change the home route code to:
What we’re basically doing here is passing a slice (12) of the books we loaded to the index route. We’re passing two additional variables, pg_start and pg_end. These variables are initialized to 0 and 12, respectively. They’ll be used to keep track of the user’s current page.
Next, we’ll create another two routes: get-next and get-prev. These routes will control the page viewed by a user. Specifically, when the user clicks a next or prev button, it will call one of these routes with the specific page start and end numbers, and we’ll make another slice of the book data and return it back to the user.
Copy and paste the code below under the home route:
app.get("/get-next", (req, res) => {
    let pg_start = Number(req.query.pg_end)
    let pg_end = Number(pg_start) + 12
    res.render("index", {
        books: books.slice(pg_start, pg_end),
        pg_start: pg_start,
        pg_end: pg_end
    })
});


app.get("/get-prev", (req, res) => {
    let pg_end = Number(req.query.pg_start)
    let pg_start = Number(pg_end) - 12

    if (pg_start <= 0) {
        res.render("index", { books: books.slice(0, 12), pg_start: 0, pg_end: 12 })

    } else {
        res.render("index", {
            books: books.slice(pg_start, pg_end),
            pg_start: pg_start,
            pg_end: pg_end
        })

    }
});
In the get-next route, first, we get the pg_start and pg_end numbers from the query object. These numbers will be sent from a form object in the UI. Notice that the new pg_start becomes the old pg_end, while we add 12 to the old pg_start ,and that becomes the new pg_end. So basically, we’re shifting our book slice by 12.
In the get-prev route, we do the opposite. That is, the old pg_start becomes the new pg_end, while we subtract 12 from the old pg_end and assign it to pg_start. Then, we do a few test checks—that is, we confirm whether or not the user is on the first page when clicking prev. This ensures that we do not try to slice negatively from the books.
Next, we will create a recommend route. This route will accept a user ID and call the model from the model module (which we’ve yet to write) to make a recommendation.
Copy and paste the code below, just under your get-prev route:
app.get("/recommend", (req, res) => {
    let userId = req.query.userId
    if (Number(userId) > 53424 || Number(userId) < 0) {
        res.send("User Id cannot be greater than 53,424 or less than 0!")
    } else {
        recs = model.recommend(userId)
            .then((recs) => {
                res.render("index", { recommendations: recs, forUser: true })
            })
    }

})
In the recommend route, we first get the userId from the request object, then we perform a basic test to ensure the ID is not above 53424 (the number of unique users in the dataset), and not less than zero.
In the else part of the if statement, we call the recommend function from the model module we imported. This function takes the userId as an argument, and returns a promise object with the recommendations. As soon as the promise resolves, we pass the recommendation to the index route to display. The extra argument forUser allows us to differentiate between when we’re making a recommendation and when we’re not.
Now that we’re done with the entry point, we’ll move to the next section, where we load the model and make actual recommendations.
Loading the Saved Model and Making Recommendations
In the model.js script, we’ll load the saved model using TensorFlow.js, and use it to make recommendations for a specified user.
Copy and paste the code below in the model.js script:
const tf = require('@tensorflow/tfjs-node')
const books = require("./data/web_book_data.json")


async function loadModel() {
    console.log('Loading Model...')
    model = await tf.loadLayersModel("file:///home/dsn/personal/Tfjs/TensorFlowjs_Projects/recommender-sys/recommender-books/model/model.json", false);
    console.log('Model Loaded Successfull')
    // model.summary()
}

const book_arr = tf.range(0, books.length)
const book_len = books.length


exports.recommend = async function recommend(userId) {
    let user = tf.fill([book_len], Number(userId))
    let book_in_js_array = book_arr.arraySync()
    await loadModel()
    console.log(`Recommending for User: ${userId}`)
    pred_tensor = await model.predict([book_arr, user]).reshape([10000])
    pred = pred_tensor.arraySync()

    let recommendations = []
    for (let i = 0; i < 6; i++) {
        max = pred_tensor.argMax().arraySync()
        recommendations.push(books[max]) //Push book with highest prediction probability
        pred.splice(max, 1)    //drop from array
        pred_tensor = tf.tensor(pred) //create a new tensor
    }

    return recommendations


}
In the first two lines, we import TensorFlow.js and also load the book JSON data.
Next, in line 8, we create an asynchronous function to load the model from the folder model. The model is loaded with the tf.loadLayersModel function. Notice we pass the full file path, prefixed with (file://), to the model. The (file://) is important, as it instructs TensorFlow to look for the model in the local system.
Next, in line 13 we create an array of all book_ids in the book dataset. Remember the book_id feature we added in the book JSON data—this is an integer of numbers running from 1, to the max number of books. The tf.range function helps us easily create a continuous set of numbers from the specified range. We also save the length of the book object.
In the recommend function (lines 17–33), we perform the following:
- First, we create the user array just like we did in the Python version of this code when predicting. This is because our model expects two arrays (user and books).
- Then, in line 20, we await model loading. This is done asynchronously so that we don’t end up trying to predict when the model has not been loaded.
- After loading the model, in line 22, we make predictions by calling the .predict function and passing in the book and user arrays. We also reshape the result to a 1D array.
- In line 23, we retrieve the JavaScript array from the model prediction. Note that the prediction function always returns a tensor, so to work with this in JS, we can use arraySync to convert the tensor into an array.
- In the next code block (25–30), we’re basically performing NumPy’s argMax function. While NumPy’s argMax function can return multiple values, TensorFlow.js’s version of argMax can only return a single value at a time. To solve this, we run a for loop for the number of recommendations we need, get the argMax from the predictions, retrieve and save the corresponding book in the recommendations array, and then drop the current argMax from the array.
And that’s it, we’ve successfully replicated the recommendation function, just like the one we did in Python in part 1. Next, we’ll design the UI and display our books and recommendations.
Creating the UI and Displaying Recommendations
Now comes the beautiful part of our application. In this section, we’ll create a simple UI using mainly Bootstrap. Navigate to the views folder and paste the code below in the index.hbs file:
<!DOCTYPE html>
<html lang="en">

<head>
    <meta charset="UTF-8">
    <meta name="viewport" content="width=device-width, initial-scale=1.0">
    <!-- Bootstrap CSS -->
    <link rel="stylesheet" href="https://stackpath.bootstrapcdn.com/bootstrap/4.5.0/css/bootstrap.min.css"
        integrity="sha384-9aIt2nRpC12Uk9gS9baDl411NQApFmC26EwAOH8WgZl5MYYxFfc+NcPb1dKGj7Sk" crossorigin="anonymous">

    <title>Books</title>
</head>

<body>

    <nav class="navbar navbar-expand-lg navbar-dark bg-dark" style="margin-bottom: 100px;">
        <a class="navbar-brand" href="#">MyBooks</a>
        <button class="navbar-toggler" type="button" data-toggle="collapse" data-target="#navbarSupportedContent"
            aria-controls="navbarSupportedContent" aria-expanded="false" aria-label="Toggle navigation">
            <span class="navbar-toggler-icon"></span>
        </button>

        <div class="collapse navbar-collapse" id="navbarSupportedContent">
            <ul class="navbar-nav mr-auto">
                <li class="nav-item active">
                    <a class="nav-link" href="#">Home <span class="sr-only">(current)</span></a>
                </li>
                <li class="nav-item">
                    <a class="nav-link" href="#">About</a>
                </li>
            </ul>
            <form class="form-inline my-2 my-lg-0">
                <input class="form-control mr-sm-2" type="search" placeholder="Search" aria-label="Search">
                <button class="btn btn-outline-success my-2 my-sm-0" type="submit">Search</button>
            </form>
        </div>
    </nav>

    <div class="container">
        <div class="row">
            <div class="col-md-8">
                <div class="row">
                    {{#if forUser}}
                    <div class="col-md-12">
                        <h4 class="text-info text-center">Here are you recommended books!</h4>
                        <hr>
                    </div>
                    {{#each recommendations}}
                    <div class="col-md-4 card">
                        <img src="{{this.image_url}}" class="card-img-top text-center" alt=""
                            style="width: 200px; height: 250px;">
                        <div class="card-body">
                            <h5 class="card-title">{{this.title}}</h5>
                            <P class="text-info"><span><b>Author(s): </b></span>{{this.authors}}</p>
                        </div>
                    </div>
                    {{/each}}
                    {{else}}
                    <div class="col-md-12">
                        <h4 class="text-info text-center">Welcome to MyBooks Store!</h4>
                        <hr>
                    </div>
                    {{#each books}}
                    <div class="col-md-4 card">
                        <img src="{{this.image_url}}" class="card-img-top text-center" alt=""
                            style="width: 200px; height: 250px;">
                        <div class="card-body">
                            <h5 class="card-title">{{this.title}}</h5>
                            <P class="text-info"><span><b>Author(s): </b></span>{{this.authors}}</p>
                        </div>
                    </div>
                    {{/each}}
                    {{/if}}

                </div>
                <hr>
                <div class="row text-center" style="margin-bottom: 200px; ">
                    <div class="col-md-6">
                        <form action="/get-prev" method="GET">
                            <input name="pg_end" type="hidden" value="{{pg_end}}" />
                            <input name="pg_start" type="hidden" value="{{pg_start}}" />
                            <button class="btn btn-info" type="submit">Prev</button>

                        </form>
                    </div>
                    <div class="col-md-6">
                        <form action="/get-next" method="GET">
                            <input name="pg_end" type="hidden" value="{{pg_end}}" />
                            <input name="pg_start" type="hidden" value="{{pg_start}}" />
                            <button class="btn btn-primary" type="submit">Next</button>

                        </form>
                    </div>
                </div>

            </div>
            <div class="col-md-4" style="margin-top: 100px;">
                <p class="text-info"><b>Note:</b> In a real application, you will probably get the ID from the logged in
                    user!</p>
                <form class="form" action="/recommend" method="GET">
                    <div class="form-group">
                        <label for="userId">Enter a User ID between 0-10000</label>
                        <input class="form-control" type="number" name="userId" />
                        <button class="btn btn-primary" type="submit">Get Recommendations</button>
                    </div>
                </form>
            </div>
        </div>
    </div>
</body>

</html>
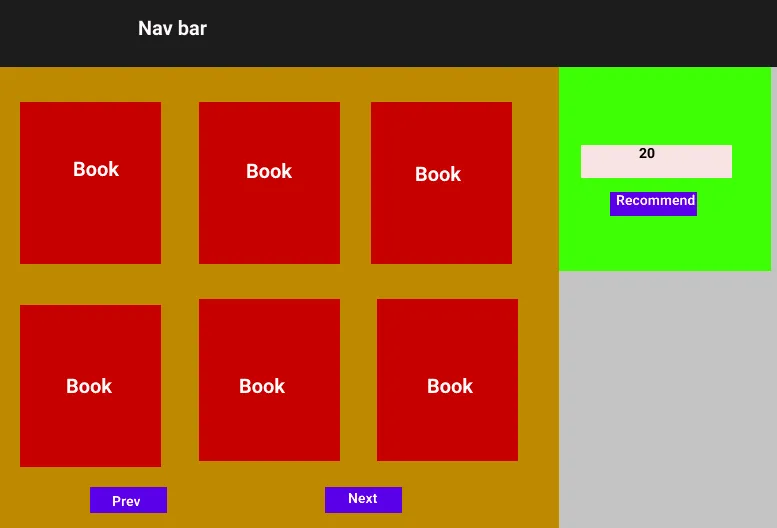
The app UI is simple—we’re using Bootstrap’s page columns and rows class. This lets us easily partition our page into rows and columns. Below is a wireframe of what we want to achieve:
- In line 8, we add the Bootstrap CDN to our HTML page.
- In the body section (line 16 to 37), we create navigation using Bootstrap’s navbar class. You can customize this to display your preferred app name and links.
- In the container div, we create a row with two columns. The first columns will contain the books alongside the next and prev buttons. This will span 8 columns. The second column which will span 4 columns and will hold the input tag and also the recommend button.
- In the first column (line 43), we check if the variable forUser was passed alongside the rendered page. If it was passed, then we know we’re making recommendations, and as such, we loop through the recommendations array and for each recommended book and create a simple book card. This card will display the book image, title, and author.

- If we aren’t displaying recommendations, then we’re displaying a books from the book dataset to the user. In that case, we can loop over the book slice (12 books) passed from the backend. This is what we’re doing in lines 63 to 72.
- Next, in lines 77 to 94, we create two forms with the next and prev buttons. These forms will keep track of the current page start and end, and on click will call the get-next or get-prev routes.
- And finally, in lines 97 to 107, we create an input field and a button that accepts the userId and makes recommendations.
Whew! That was a bit of a marathon, right? But now we’re now ready to test our application.
Testing the Application
In this final section, we’ll run our application and test it. In your terminal/command prompt, run this command:
This should display some information similar to what you see below:

This means our app is up and running. Go to your browser and type in the address:
This should open your application page, as shown below:
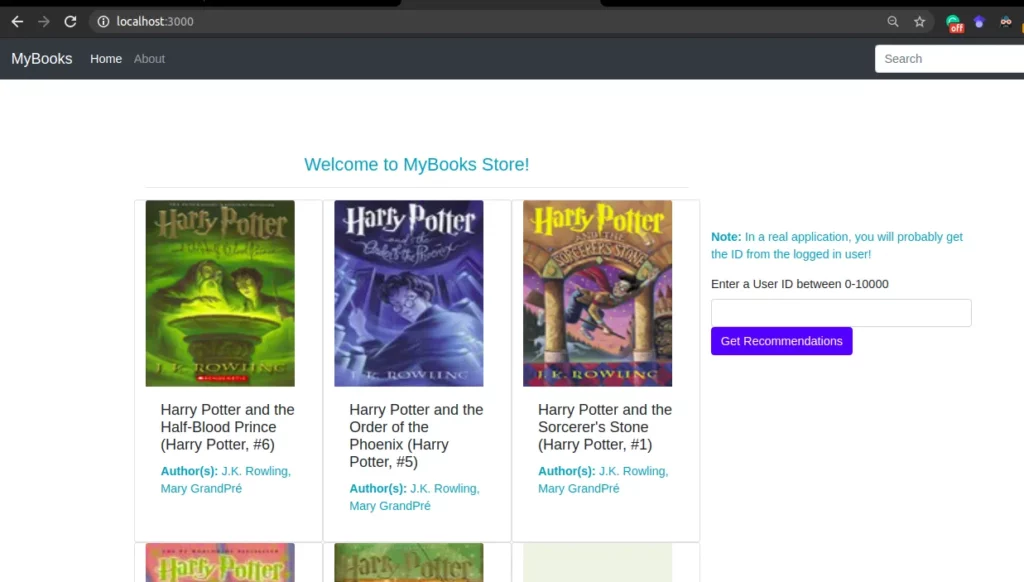
If you see the page above, then your application is running properly. You can now interact with the pages. The next and prev button should display different books upon clicking them. For instance, this is the second page you see upon clicking next:
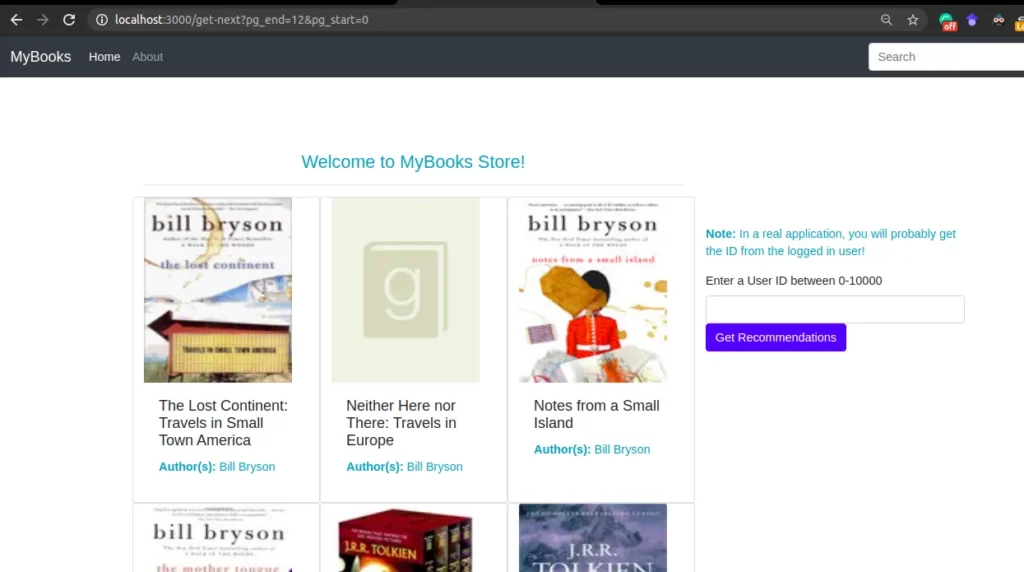
To make recommendations, enter a number in the userId input field and click recommend. This should make a recommendation for that specific user.
For instance, below are the recommended books for user 20:

And that’s it! You have successfully trained a recommender model in Python, converted it to JavaScript format, and embedded it in a web app. There are lots of other things you can do to improve this app, but I’ll leave that to you to experiment with.
In part 3, and final part of this tutorial series, you’ll learn how to deploy your application using Google’s Firebase, an efficient platform for managing scalable mobile and web applications.

Connect with me on Twitter.
Connect with me on LinkedIn.

Comments 0 Responses