
Vertex animation is the keyframed animation of individual vertices of a mesh. It is very beneficial for very complicated motion like that of cloth, hair, or water. It uses a flex controller bone to move the model through a series of flexes — one for each frame.
Vertex animation is included in almost all video or computer-based games. To animate the character, one just needs to vary the sampled line based on the current time.
Vertex animation or PLA (Point Level Animation) enables you to animate the autonomous vertices of an object. In order to create some complex or simulated animations, vertex animation proves to be quite user-friendly.
This article mainly focuses on vertex animation with specific export guides for 3D tools. Detailed instructions for importing vertex animation into Lens Studio are also briefly discussed in this article.
A few important things to keep in mind while using vertex animation:
- Complex vertex animation may cause some performance issues on lower-end devices.
- Please be attentive to your lens frame rate.
- Vertex animations have a bulk file size as it is storing keyframes for each vertex.
- Be cautious of your Lens size on disk.
- Kindly refer to the Performance and Optimization guide while working with vertex animation.
Below you will find the Export Guides for three 3D tools: Maya, Cinema 4D, and Autodesk 3ds Max.
Maya Export Guide
Firstly, we need to select a set of objects that we want to export from Maya as vertex animation. In order to create a set of objects in Maya, select only the objects that have a geometry cache and then select the following from Maya’s Menu bar:
- Create
- Sets
- Quick Select Set
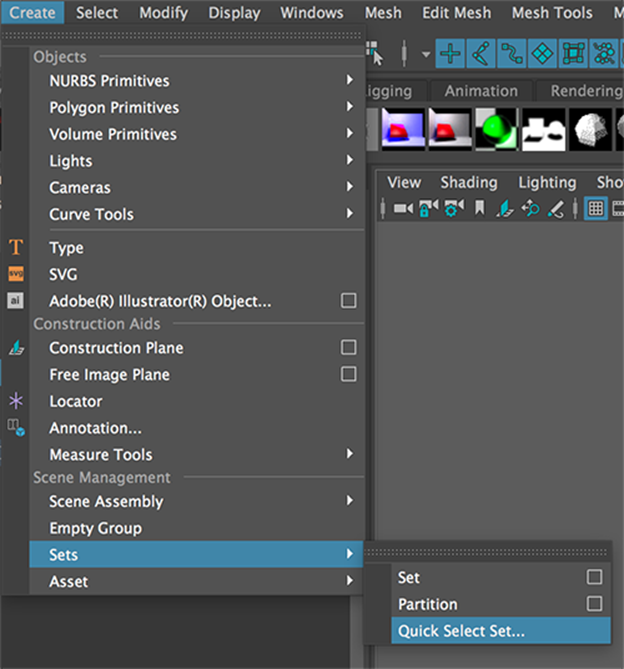
Create Quick Select Set Window will be opened. Here, you can set any name for your objects set. Then, click on the OK button.

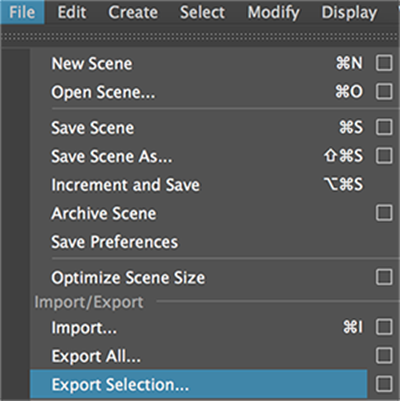
Now you can export the Vertex Animation from Maya’s Menu bar by selecting the objects to export in Maya’s Outliner window, then, Selecting the File, and finally, clicking on Export Selection.
An Export Selection option Window will open:
In this window, expand the Animation feature option. Then we have to check the Animation checkbox.
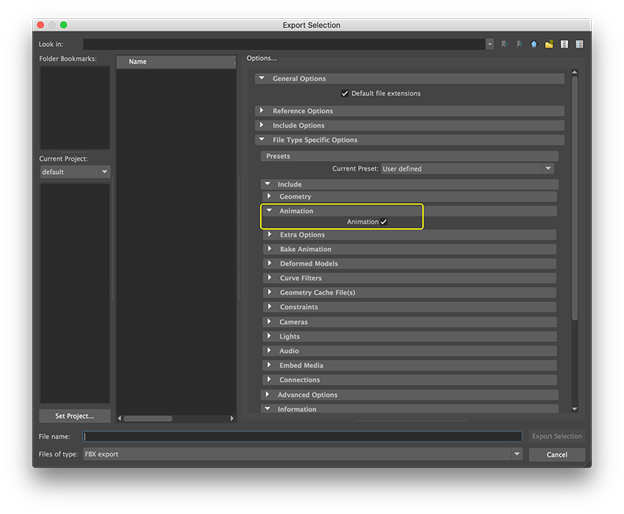
Now expand the Geometry Cache File(s) option and click on the Geometry Cache File(s) checkbox.
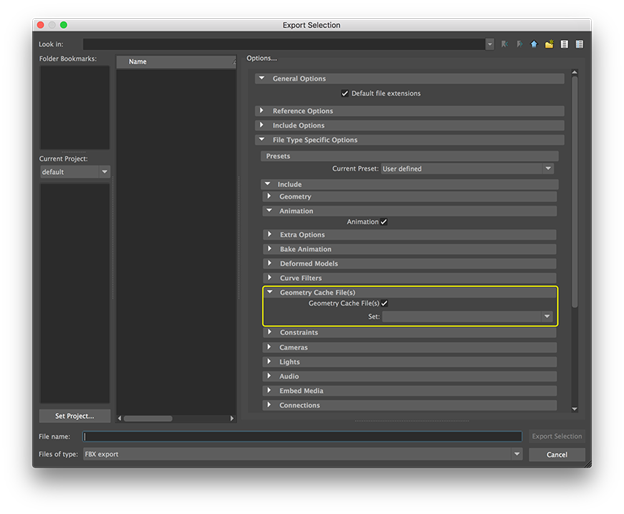
Now select the Set that we created before in the Set drop-down menu.
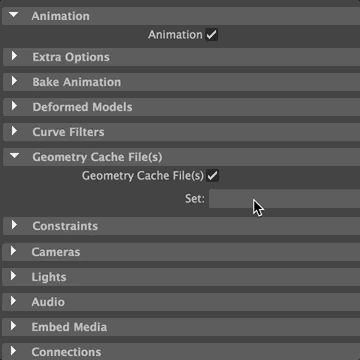
Now it’s ready to export. Give your file a name then click the Export Selection button.
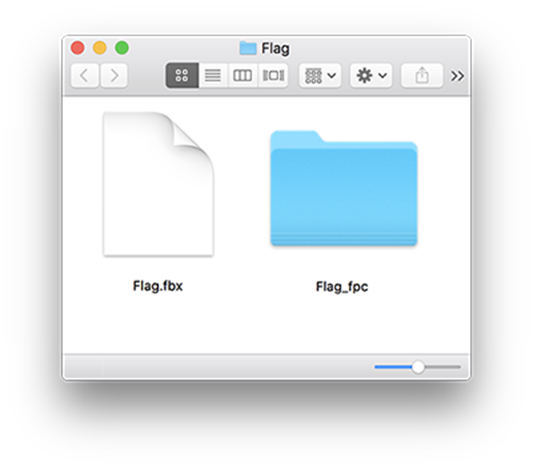
You can now find an exported FBX file with a folder in the same path that contains data for Vertex Animation.
Cinema 4D Export Guide
To export your own 3D object animation, we need to make sure that the animation is cached as keyframes and not using Cinema 4D’s effects. Now follow the below steps:
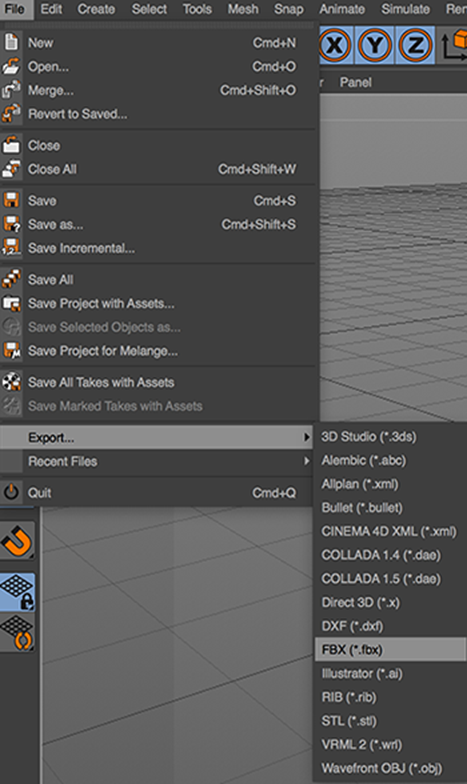
- Go to File -> Export… -> FBX (*.fbx) of Cinema 4D’s menu bar.
- Select the location where you want to save your FBX.
- Click on the Save button.
An FBX Export Settings window will be opened. In the FBX Export Settings, move to the Animation section and make sure that the Tracks and PLA to Vertex Cache are checked.
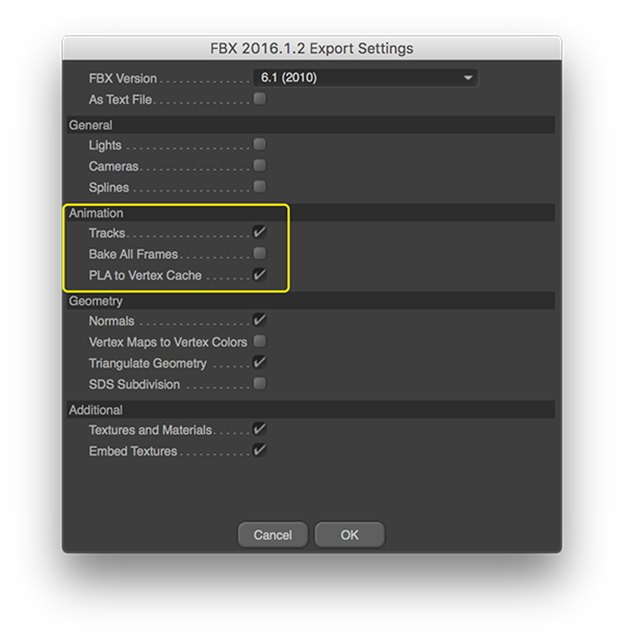
At last, in the FBX Export Settings window, click on the OK button.
Now you now can find an exported FBX file in the same path that contains the data for Vertex Animation.
Autodesk 3ds Max Export Guide
To export from Autodesk 3ds Max, you need to create create a set of object(s) that you want to export as vertex animation. Now, to create a set in 3ds Max, select the object(s), then click Create Selection Set from 3ds Max’s menu bar. Finally, give the set a name as shown below.
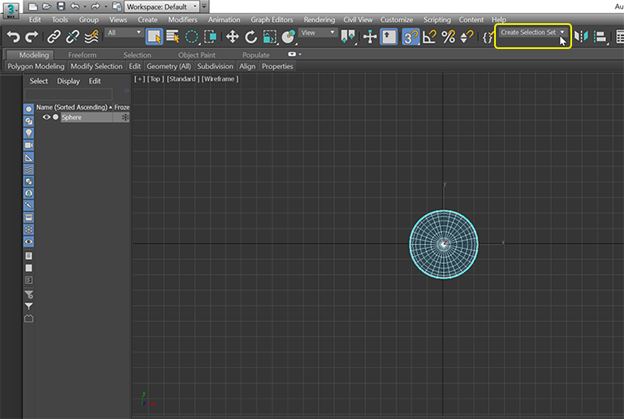
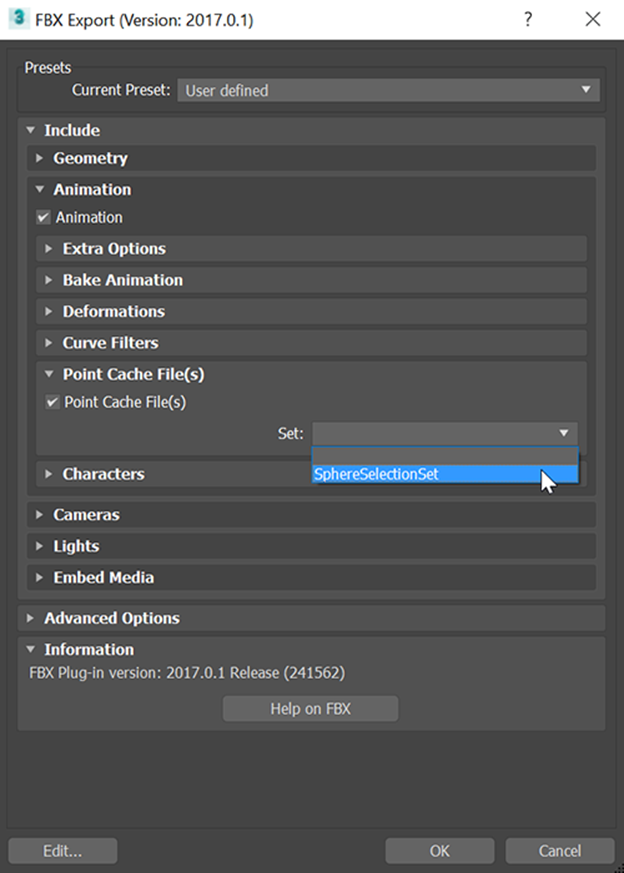
Now you can see a set called SphereSelectionSet.

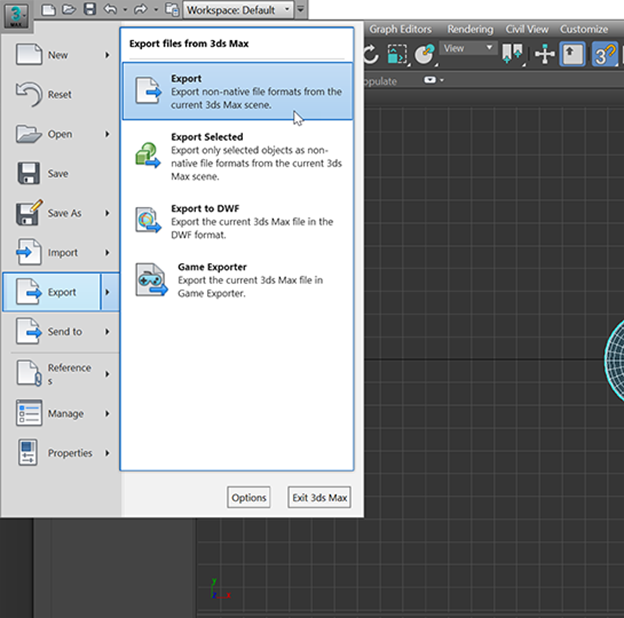
Finally, to export the Vertex Animation, click on the 3ds Max icon in the top left corner and select the Export option as shown below.
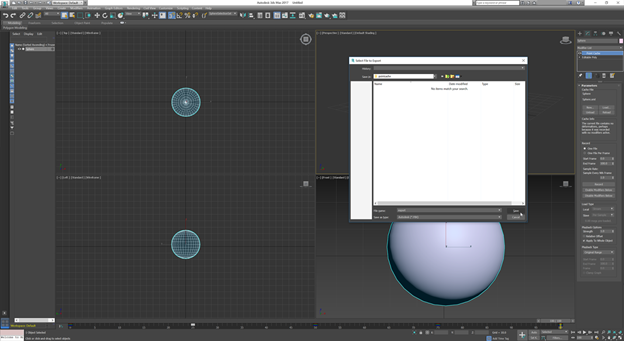
Select a path where you want to save your FBX file and then in the Save as type drop-down menu, select Autodesk(*.FBX). Then, click the Save button.
The FBX Export window will be opened.
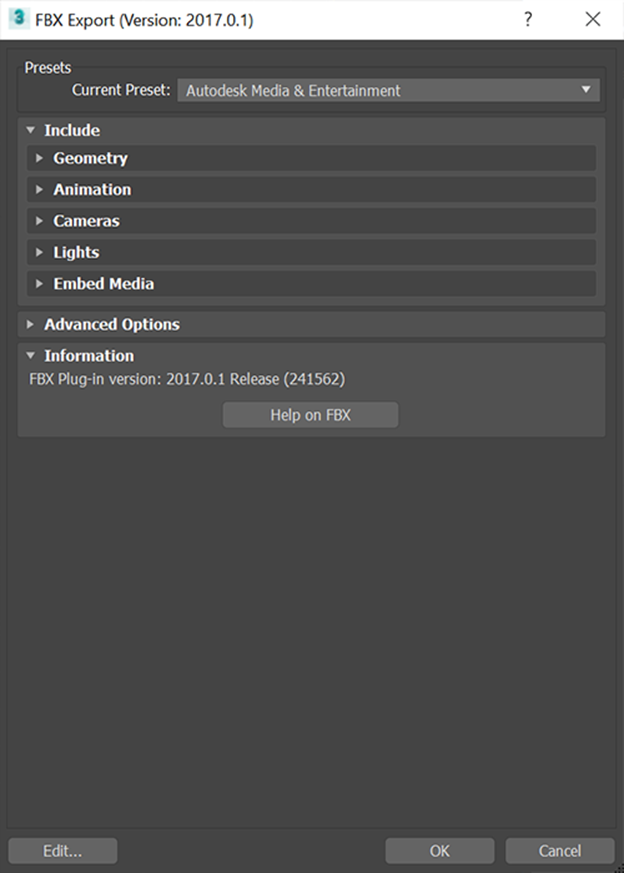
In the FBX Export window, click on the small triangle to the left of Animation to show the animation options and tick the Animation checkbox.

Now click on the small triangle to the left of Point Cache File(s) to show the options and, finally, tick the Point Cache File(s) checkbox.
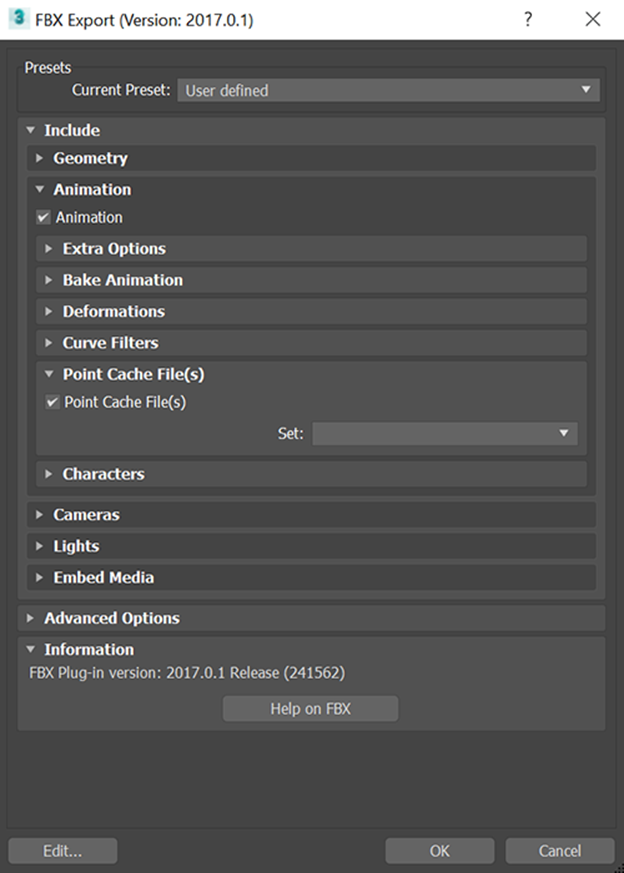
Select the set that you created before in the Set drop-down menu.
Now you’re ready to export. Click on OK button to export.
You can find an exported FBX file with a folder in the same path that contains data for Vertex Animation.
Vertex Animation Import Guide
Now let’s start with the importing process of Vertex Animation. To import your Vertex Animation make sure that you have both the FBX file we created and a folder with the XML and MC (MCX for Maya) inside.
This folder must be stored at the same level as your FBX. You can now drag and drop your FBX file directly into the Lens Studio Objects panel. By doing so, an FBX Import Options window will open.
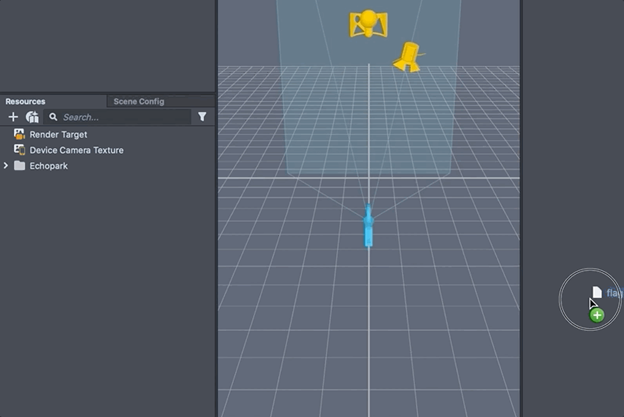
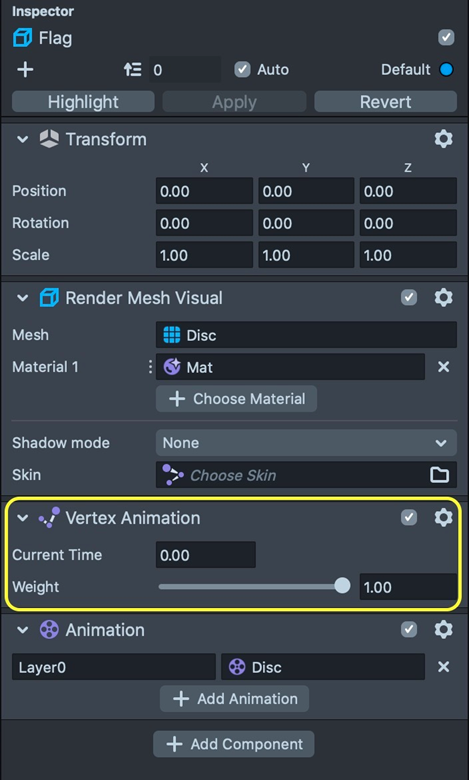
Once your FBX is imported into Lens Studio, you can see it placed in your Objects panel as a new object added to the scene.
Finally, to check if your object(s) has a Vertex Animation, select the object. Then, in the Inspector panel, make sure there is a Vertex Animation component.
If you want to learn how to play the animation, please visit the Playing 3D Animation guide.
Conclusion
Well, that’s all for this article. We have discussed the step-by-step guide to make vertex animation in Lens Studio.
The Vertex Animation Technique is well optimized for when you need a huge quantity of animated objects in the scene and you don’t need animations blending: you can wait for an animation to finish before starting another.
Comments 0 Responses