PyTorch is one of the most sought-after deep learning frameworks. It has its own advantages over the other widely used frameworks like TensorFlow (here’s a great comparison of these two frameworks). Facebook recently released PyTorch 1.3 and plugged the missing piece of the pie in their framework—which is, mobile support for Android and iOS.
Up until now, the two most used mobile machine learning frameworks were Apple’s Core ML and Google’s TensorFlow Lite. So PyTorch’s entry into the mobile domain should be an interesting one. It’ll get a tough challenge from Core ML, but considering the cross-platform support, PyTorch will likely carve out its own space.
PyTorch has already created its own niche thanks to its pythonic ways of building models and its easier learning curve. Moreover, it allows developers to build dynamic computational graphs and makes model debugging even easier, thanks to the Python debugging tools that are readily available.
What’s New In PyTorch 1.3
- PyTorch Mobile— From Python to providing mobile support across both platforms, this experimental feature is exciting for mobile developers.
- Named Tensors — By adding associative names for tensor dimensions, PyTorch aims to help developers write readable and maintainable code.
- Quantization Support — Space is always a blocker on mobile devices. By using FBGEMM and QNNPACK, PyTorch strives to support quantization, for x86 and ARM CPUs.
Plan Of Action
Running a PyTorch model on iOS Devices requires ticking the following checkboxes:
- Converting the model to TorchScript format (.pt) using a Python script.
- Integrating the PyTorch C++ pod framework to our Xcode project.
- Using Objective C++ as the bridge header file to run PyTorch inferences from the Swift codebase.
In the next few sections, we’ll be running image classification on images captured from the camera or selected from the photos library using a PyTorch model on iOS Devices.
For Android developers looking to implement PyTorch, just hop on over to this link for a look at working with image classification on that platform.
Setup
To start off, you need a Mac, Xcode 11, and a device with iOS 12 or above as a deployment target.
You need to install torchvision from pip using the command line, as shown below:
Converting Our Model
We need to use the TorchScript format in order to convert a model to PyTorch Mobile. Any CNN or ResNet model can be ported to PyTorch Mobile. Since I love my iPhone, I’ll be using a MobileNetV2 model that’s highly optimized and provides great accuracy.
import torch
from torchvision.models import mobilenet_v2

model = mobilenet_v2(pretrained=True)

model.eval()
input_tensor = torch.rand(1,3,224,224)

script_model = torch.jit.trace(model,input_tensor)
script_model.save("mobilenet-v2.pt")
Running python convert_pytorch_model.py will generate your “mobilenet-v2.pt” model. It’s ready to ship into Xcode!
Building Our PyTorch Mobile iOS Application
In this section, we’ll be creating our iOS Application that runs the PyTorch model on images taken from the camera or photos library and displays the label with the highest confidence on the screen.
Installing Dependencies
Create a new Xcode Project. A Single View iOS Application template would do the job. Once that’s done, install the following pod dependency in your Podfile (you need to do a pod init in your project directory to create a Podfile):
Doing this pod install creates a xcworkspace file in your project. Close all current Xcode sessions and relaunch using that file.
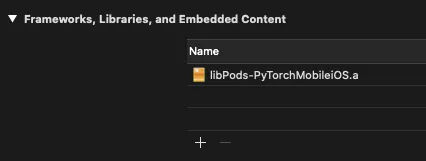
Now you should be able to add the framework from the Project Navigator -> General Tab, as shown below:

Adding Labels For Our PyTorch Mobile Model
Our labels file is a text file with 1000s of words. You can view the contents of the file from the link below:
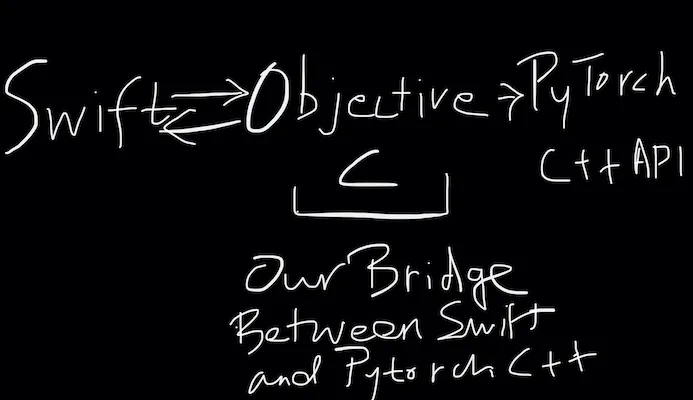
In the next sections, we’ll be using both Objective-C and Swift in our codebase. Objective-C is required to communicate with C++. Here’s an illustration of how the codes interact with each other:

Objective-C Code
Currently, PyTorch Mobile is a C++ library. Hence, it cannot directly communicate with Swift. So we need to use Objective-C to communicate with the C++ code.
Swift and Objective-C languages can communicate with each other using a bridging header file.
Creating an Objective-C Bridging Header File
A bridging header file basically exposes Objective-C header files to Swift.
In order to generate a bridging header file, simply drag and drop or create a new Objective-C header file in your project. Xcode automatically prompts you to create a bridging header file. The file name format is <ProjectName>-Bridging-Header.h
We’ve added #import “TorchModule.h” in our bridging header file. The code for the TorchModule.h file is given below:
#import <Foundation/Foundation.h>

NS_ASSUME_NONNULL_BEGIN

@interface TorchModule : NSObject

- (nullable instancetype)initWithFileAtPath:(NSString*)filePath
    NS_SWIFT_NAME(init(fileAtPath:))NS_DESIGNATED_INITIALIZER;
+ (instancetype)new NS_UNAVAILABLE;
- (instancetype)init NS_UNAVAILABLE;
- (NSInteger)predictImage:(void*)imageBuffer forLabels:(NSInteger)labelCount
    NS_SWIFT_NAME(predict(image:labelCount:));

@end

NS_ASSUME_NONNULL_END
In the above code, NS_SWIFT_NAME and NS_UNAVAILABLE are macros.
- NS_SWIFT_NAME allows us to provide full Swift names for their Objective-C counterparts. So now, we can execute the Objective-C methods using the Swift functions assigned in the macros.
- NS_UNAVAILABLE macro basically tells the compiler not to export that class, function or instance to Swift.
Such macros improve the Swift <> Objective-C interoperability tremendously.
Loading Our Model And Running Inference in Objective-C++
#import "TorchModule.h"
#import <LibTorch/LibTorch.h>

@implementation TorchModule {
 @protected
  torch::jit::script::Module _impl;
}

- (nullable instancetype)initWithFileAtPath:(NSString*)filePath {
  self = [super init];
  if (self) {
    try {
      auto qengines = at::globalContext().supportedQEngines();
      if (std::find(qengines.begin(), qengines.end(), at::QEngine::QNNPACK) != qengines.end()) {
        at::globalContext().setQEngine(at::QEngine::QNNPACK);
      }
      _impl = torch::jit::load(filePath.UTF8String);
      _impl.eval();
    } catch (const std::exception& exception) {
      NSLog(@"%s", exception.what());
      return nil;
    }
  }
  return self;
}

- (NSInteger)predictImage:(void*)imageBuffer forLabels:(NSInteger)labelCount {
    int outputLabelIndex = -1;
    try {
    at::Tensor tensor = torch::from_blob(imageBuffer, {1, 3, 224, 224}, at::kFloat);
    torch::autograd::AutoGradMode guard(false);
    at::AutoNonVariableTypeMode non_var_type_mode(true);
    auto outputTensor = _impl.forward({tensor}).toTensor();
    float* floatBuffer = outputTensor.data_ptr<float>();
    if (!floatBuffer) {
      return outputLabelIndex;
    }

    float maxPredictedValue = 0.0f;
    for (int i = 1; i < labelCount; i++) {

        if(floatBuffer[i] > maxPredictedValue) {
            maxPredictedValue = floatBuffer[i];
            outputLabelIndex = i;
        }
    }
      return outputLabelIndex;
  } catch (const std::exception& exception) {
    NSLog(@"%s", exception.what());
  }
  return outputLabelIndex;
}

@end
The above Objective-C++ code is where we’re loading the model after quantization, and then we’ll run the inference on the image. The TorchModule instance is initialized from the Swift codebase that we’ll see shortly.
The initWithFileAtPath method is called from the Swift counterpart method. It passes the location of the model file.
The predictImage gets the CVPixelBuffer of the image and converts it into an input tensor of the required shape. We then iterate through the scores of each label and return the index having the highest score back to Swift as the predicted output.
Now that the Objective-C part is done, let’s jump back to the Swift code—the easier one!
Swift Code
Let’s first build the UI programmatically. But first, embed the ViewController inside a Navigation Controller.
Building the UI Programmatically
There’s nothing fancy in the UI here. We just need to set up a UIButton, UIImageView, and UILabel in our ViewController class.
var imageView: UIImageView?
var button: UIButton?
var predictionLabel : UILabel?

func buildUI()
    {

        imageView = UIImageView(frame: .zero)
        imageView?.image = UIImage(named: "placeholder")
        imageView?.contentMode = .scaleAspectFit
        imageView?.translatesAutoresizingMaskIntoConstraints = false
        self.view.addSubview(imageView!)

        let aspectRatio = NSLayoutConstraint(item: imageView!, attribute: .width, relatedBy: .equal, toItem: imageView!, attribute: .height, multiplier: 1.0, constant: 0)

        NSLayoutConstraint.activate([
            imageView!.topAnchor.constraint(equalTo: self.view.safeAreaLayoutGuide.topAnchor, constant: 20),
            imageView!.leadingAnchor.constraint(equalTo: self.view.safeAreaLayoutGuide.leadingAnchor, constant: 20),
            imageView!.trailingAnchor.constraint(equalTo: view.safeAreaLayoutGuide.trailingAnchor, constant: -20),
            aspectRatio
        ])

        button = UIButton(type: .system)
        button?.setTitle("Select Image", for: .normal)
        button?.translatesAutoresizingMaskIntoConstraints = false
        self.view.addSubview(button!)


        NSLayoutConstraint.activate([
            button!.bottomAnchor.constraint(equalTo: self.view.safeAreaLayoutGuide.bottomAnchor, constant: 0),
            button!.leftAnchor.constraint(equalTo: self.view.safeAreaLayoutGuide.leftAnchor, constant: 20),
            button!.rightAnchor.constraint(equalTo: view.safeAreaLayoutGuide.rightAnchor, constant: -20),
            button!.heightAnchor.constraint(equalToConstant: 50)

        ])

        predictionLabel = UILabel(frame: .zero)
        predictionLabel?.numberOfLines = 0
        predictionLabel?.textAlignment = .center
        predictionLabel?.text = "Prediction will be displayed here.."
        predictionLabel?.translatesAutoresizingMaskIntoConstraints = false
        self.view.addSubview(predictionLabel!)

        NSLayoutConstraint.activate([
            predictionLabel!.bottomAnchor.constraint(equalTo: self.button!.topAnchor, constant: -20),
            predictionLabel!.leftAnchor.constraint(equalTo: self.view.safeAreaLayoutGuide.leftAnchor, constant: 20),
            predictionLabel!.rightAnchor.constraint(equalTo: view.safeAreaLayoutGuide.rightAnchor, constant: -20),
            predictionLabel!.topAnchor.constraint(equalTo: self.imageView!.bottomAnchor, constant: 20),

        ])
    }
Configuring Button Action
Now, we need to set an action when the button is tapped. The idea is to show an ImagePicker that allows the user to pick images from the camera or gallery. For this, we’ll create a UIAlertController that has the actionSheet style.
@objc func showActionSheet(sender: UIButton)
    {
        let alert = UIAlertController(title: "Select Image", message: nil, preferredStyle: .actionSheet)
        alert.addAction(UIAlertAction(title: "Camera", style: .default, handler: { _ in
            self.launchCamera()
        }))

        alert.addAction(UIAlertAction(title: "Photos Library", style: .default, handler: { _ in
            self.showPhotosLibrary()
        }))

        alert.addAction(UIAlertAction.init(title: "Cancel", style: .cancel, handler: nil))
        switch UIDevice.current.userInterfaceIdiom {
        case .pad:
            alert.popoverPresentationController?.sourceView = sender
            alert.popoverPresentationController?.sourceRect = sender.bounds
            alert.popoverPresentationController?.permittedArrowDirections = .up
        default:
            break
        }

        self.present(alert, animated: true, completion: nil)
    }

    func launchCamera()
    {
        if UIImagePickerController.isSourceTypeAvailable(.camera){
            let imagePicker = UIImagePickerController()
            imagePicker.sourceType = .camera
            imagePicker.delegate = self
            self.present(imagePicker, animated: true, completion: nil)
        }
        else{
            let alert  = UIAlertController(title: "Warning", message: "There's no camera.", preferredStyle: .alert)
            alert.addAction(UIAlertAction(title: "Dismiss", style: .default, handler: nil))
            self.present(alert, animated: true, completion: nil)
        }
    }

    func showPhotosLibrary(){
        let imagePicker = UIImagePickerController()
        imagePicker.sourceType = .photoLibrary
        imagePicker.delegate = self
        self.present(imagePicker, animated: true, completion: nil)
    }
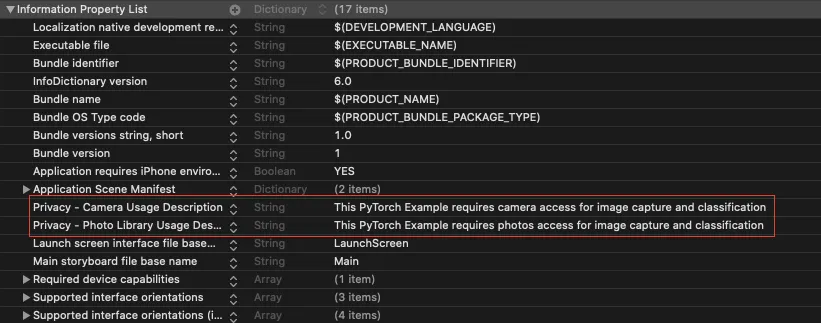
You need to add the Privacy Usage Descriptions in the info.plist for the Camera and Photos Library each, as shown below:

Now that we’ve set the UI for our application, it’s time to process the image to fit into the model input constraints and subsequently run the classifier. Let’s do that in the next section.
Preprocessing the Image
The following utility extension contains the code for resizing and normalizing the input image.
import UIKit

extension UIImage {
    func resized(to newSize: CGSize, scale: CGFloat = 1) -> UIImage {
        let format = UIGraphicsImageRendererFormat.default()
        format.scale = scale
        let renderer = UIGraphicsImageRenderer(size: newSize, format: format)
        let image = renderer.image { _ in
            draw(in: CGRect(origin: .zero, size: newSize))
        }
        return image
    }

    func normalized() -> [Float32]? {
        guard let cgImage = self.cgImage else {
            return nil
        }
        let w = cgImage.width
        let h = cgImage.height
        let bytesPerPixel = 4
        let bytesPerRow = bytesPerPixel * w
        let bitsPerComponent = 8
        var rawBytes: [UInt8] = [UInt8](repeating: 0, count: w * h * 4)
        rawBytes.withUnsafeMutableBytes { ptr in
            if let cgImage = self.cgImage,
                let context = CGContext(data: ptr.baseAddress,
                                        width: w,
                                        height: h,
                                        bitsPerComponent: bitsPerComponent,
                                        bytesPerRow: bytesPerRow,
                                        space: CGColorSpaceCreateDeviceRGB(),
                                        bitmapInfo: CGImageAlphaInfo.premultipliedLast.rawValue) {
                let rect = CGRect(x: 0, y: 0, width: w, height: h)
                context.draw(cgImage, in: rect)
            }
        }
        var normalizedBuffer: [Float32] = [Float32](repeating: 0, count: w * h * 3)
        for i in 0 ..< w * h {
            normalizedBuffer[i] = (Float32(rawBytes[i * 4 + 0]) / 255.0 - 0.485) / 0.229 // R
            normalizedBuffer[w * h + i] = (Float32(rawBytes[i * 4 + 1]) / 255.0 - 0.456) / 0.224 // G
            normalizedBuffer[w * h * 2 + i] = (Float32(rawBytes[i * 4 + 2]) / 255.0 - 0.406) / 0.225 // B
        }
        return normalizedBuffer
    }
}
The image is resized as per the model input size which is (224×244). The normalized function converts the resized image into a Float32 tensor. Now our input is ready to get inferred by the model.
Predicting Image
Now we just need to call the Objective-C prediction function with the processed input image from the Swift code, as shown below:
let inputSize = CGSize(width: 224, height: 224)

private lazy var module: TorchModule = {
    if let filePath = Bundle.main.path(forResource: "mobilenet-v2", ofType: "pt"),
        let module = TorchModule(fileAtPath: filePath) {
        return module
    } else {
        fatalError("Can't find the model file!")
    }
}()

private lazy var labels: [String] = {
    if let filePath = Bundle.main.path(forResource: "labels", ofType: "txt"),
        let labels = try? String(contentsOfFile: filePath) {
        return labels.components(separatedBy: .newlines)
    } else {
        fatalError("Can't find the text file!")
    }
}()

func imagePickerController(_ picker: UIImagePickerController, didFinishPickingMediaWithInfo info: [UIImagePickerController.InfoKey : Any]) {
    dismiss(animated: true) {
        if let image = info[UIImagePickerController.InfoKey.originalImage] as? UIImage {
            self.imageView?.image = image
            self.predictImage(image: image)

        }
    }
}

func predictImage(image: UIImage){
    let resizedImage = image.resized(to: inputSize)
    guard var pixelBuffer = resizedImage.normalized() else {
        return
    }

    let outputIndex = module.predict(image: UnsafeMutableRawPointer(&pixelBuffer), labelCount: labels.count)
    if outputIndex > 0{
        predictionLabel?.text = "Prediction is: (labels[outputIndex])"
    }
    else{
        predictionLabel?.text = "No Output"
    }
}
The predictImage function is where we resize and normalize the image and pass the tensor to the TorchModule Objective-C wrapper class we saw earlier.
In return, we display the predicted label on the screen, as shown in the illustration below:

What’s Next
Moving forward, GPU support for PyTorch Mobile would be a major boost.
Also, Swift wrapper APIs will be something developers would keenly wait for to avoid bridging header files in their codebases.
That’s it for this one. I hope you enjoyed.

Comments 0 Responses