Deep learning has seen tremendous progress over the past few years. This is largely due to the emergence of deep learning frameworks such as PyTorch and TensorFlow, which have greatly simplified even the most sophisticated research.
With smartphones having become the devices we use the most, the next wave of innovation is going to center on how we can leverage these rapid advances in deep learning to enhance our smartphone experiences. AI-powered mobile applications will become (and already are) smart enough to understand us and help us perform tasks via visual perception, language understanding, and voice recognition, even when not connected to the internet.
To accelerate the deployment of AI models on mobile devices, Facebook has just released PyTorch Mobile, which enables developers to deploy any PyTorch model to both Android and iOS. With PyTorch having become the most used deep learning framework for research, the mobile version will unlock a vast ecosystem of research and development that will ultimately enhance mobile experiences.
In this post, I’ll show how to take a PyTorch model trained on ImageNet and use it to build an Android application that can perform on-device image classification—taking a picture of any object and telling what it is.
Deploying A PyTorch model to Android requires the steps below:
- Convert your model to TorchScript format (Python)
- Add PyTorch Mobile as a Gradle dependency (Java)
- Load your saved model with PyTorch Mobile to perform predictions (Java)
Setup
PyTorch
Visit pytorch.org to install the latest version of PyTorch for your operating system. If you already have a previous version installed, please upgrade to version 1.3.0 (minimum).
Android Studio
Install a recent version of Android Studio.
Model Conversion
To use our PyTorch model on Android, we need to convert it into TorchScript format. Luckily, this is quite an easy process. Below, we’ve loaded a pre-trained MobileNetV2 model, converted it into TorchScript, and saved it for use in our app. We can use any CNN architecture here; however, MobileNetV2 is highly optimized for both high speed and high accuracy on mobile devices.
import torch
from torchvision.models import mobilenet_v2

model = mobilenet_v2(pretrained=True)

model.eval()
input_tensor = torch.rand(1,3,224,224)

script_model = torch.jit.trace(model,input_tensor)
script_model.save("mobilenet-v2.pt")
Run this code and it will save your converted model as mobilenet-v2.pt—you can name your saved model anyway you wish.
Building Our Mobile AI Application
Now that we have our model ready in a deployable format, fire up Android Studio, and create a new project named PytorchAndroid . While you can use any name, please stick to this naming for this tutorial to ensure code compatibility with my examples.
Step 1 : Add PyTorch Mobile to your Android project
With your project created in Android Studio, open the app’s build.gradle file and add PyTorch Mobile and TorchVision Mobile, as shown below:
apply plugin: 'com.android.application'

android {
    compileSdkVersion 28
    defaultConfig {
        applicationId "com.johnolafenwa.pytorchandroid"
        minSdkVersion 21
        targetSdkVersion 28
        versionCode 1
        versionName "1.0"
        testInstrumentationRunner "android.support.test.runner.AndroidJUnitRunner"
    }
    buildTypes {
        release {
            minifyEnabled false
            proguardFiles getDefaultProguardFile('proguard-android-optimize.txt'), 'proguard-rules.pro'
        }
    }
}

dependencies {
    implementation fileTree(dir: 'libs', include: ['*.jar'])
    implementation 'org.pytorch:pytorch_android:1.3.0'
    implementation 'org.pytorch:pytorch_android_torchvision:1.3.0'
    implementation 'com.android.support:appcompat-v7:28.0.0'
    implementation 'com.android.support.constraint:constraint-layout:1.1.3'
    implementation 'com.android.support:design:28.0.0'
    testImplementation 'junit:junit:4.12'
    androidTestImplementation 'com.android.support.test:runner:1.0.2'
    androidTestImplementation 'com.android.support.test.espresso:espresso-core:3.0.2'
}
Android Studio will prompt you to synchronize your project. Click Sync Now and the dependencies will be downloaded.
Step 2: Add the model to your assets folder
Create an asset folder for your app by right clicking on app and navigating to New -> Folder -> Assets Folder. Now, copy the mobilenet-v2.pt file into the assets folder.
Step 3: Add the ImageNet label
In your main app package, create a file named Constants.java and put the contents of the file linked below into it.
Note that I’m not previewing this file here, as a mapping of 1000 indexed names is too long.
Step 4: Add a Classifier class
In your main app package, create a file named Classifier.java and put the following in it.
package com.johnolafenwa.pytorchandroid;

import android.graphics.Bitmap;
import org.pytorch.Tensor;
import org.pytorch.Module;
import org.pytorch.IValue;
import org.pytorch.torchvision.TensorImageUtils;


public class Classifier {

    Module model;
    float[] mean = {0.485f, 0.456f, 0.406f};
    float[] std = {0.229f, 0.224f, 0.225f};

    public Classifier(String modelPath){

        model = Module.load(modelPath);

    }

    public void setMeanAndStd(float[] mean, float[] std){

        this.mean = mean;
        this.std = std;
    }

    public Tensor preprocess(Bitmap bitmap, int size){

        bitmap = Bitmap.createScaledBitmap(bitmap,size,size,false);
        return TensorImageUtils.bitmapToFloat32Tensor(bitmap,this.mean,this.std);

    }

    public int argMax(float[] inputs){

        int maxIndex = -1;
        float maxvalue = 0.0f;

        for (int i = 0; i < inputs.length; i++){

            if(inputs[i] > maxvalue) {

                maxIndex = i;
                maxvalue = inputs[i];
            }

        }


        return maxIndex;
    }

    public String predict(Bitmap bitmap){

        Tensor tensor = preprocess(bitmap,224);

        IValue inputs = IValue.from(tensor);
        Tensor outputs = model.forward(inputs).toTensor();
        float[] scores = outputs.getDataAsFloatArray();

        int classIndex = argMax(scores);

        return Constants.IMAGENET_CLASSES[classIndex];

    }

}
This class is the most important part of our project—everything else is standard android stuffs. Hence, we shall break it down a bit.
This class defines the module and float arrays for the mean and standard deviation pre-processing. The model is loaded in the constructor.
The preprocess function takes in an image bitmap, resizes it to the specified size, performs mean and std pre-processing, and returns a tensor that can be input into our model.
The argmax function simply takes in scores and returns the index with the maximum score.
The predict function takes in any image bitmap, processes it into a tensor, runs it through the model to obtain a prediction, finds the maximum class using argmax, and finally, using the constants we created in step 3, it obtains the corresponding class name and returns it.
Step 5: Add the Utils class
Create the file Utils.java file containing the code below. It retrieves the absolute path to an asset file. We shall need this to retrieve the path to our model, which we added to assets earlier.
package com.johnolafenwa.pytorchandroid;

import android.content.Context;
import android.util.Log;

import java.io.File;
import java.io.FileOutputStream;
import java.io.IOException;
import java.io.InputStream;
import java.io.OutputStream;

public class Utils {

    public static String assetFilePath(Context context, String assetName) {
        File file = new File(context.getFilesDir(), assetName);

        try (InputStream is = context.getAssets().open(assetName)) {
            try (OutputStream os = new FileOutputStream(file)) {
                byte[] buffer = new byte[4 * 1024];
                int read;
                while ((read = is.read(buffer)) != -1) {
                    os.write(buffer, 0, read);
                }
                os.flush();
            }
            return file.getAbsolutePath();
        } catch (IOException e) {
            Log.e("pytorchandroid", "Error process asset " + assetName + " to file path");
        }
        return null;
    }

}
Step 6: Add the Main Activity
Having created all our helpers and processors, add a new Basic Activity. Let the contents of the MainActivity.java file be as follows:
package com.johnolafenwa.pytorchandroid;

import android.content.Intent;
import android.graphics.Bitmap;
import android.os.Bundle;
import android.provider.MediaStore;
import android.support.v7.app.AppCompatActivity;
import android.support.v7.widget.Toolbar;
import android.util.Log;
import android.view.View;
import android.widget.Button;
import java.io.File;

public class MainActivity extends AppCompatActivity {

    int cameraRequestCode = 001;

    Classifier classifier;

    @Override
    protected void onCreate(Bundle savedInstanceState) {
        super.onCreate(savedInstanceState);
        setContentView(R.layout.activity_main);
        Toolbar toolbar = findViewById(R.id.toolbar);
        setSupportActionBar(toolbar);


        classifier = new Classifier(Utils.assetFilePath(this,"mobilenet-v2.pt"));

        Button capture = findViewById(R.id.capture);

        capture.setOnClickListener(new View.OnClickListener(){

            @Override
            public void onClick(View view){

                Intent cameraIntent = new Intent(MediaStore.ACTION_IMAGE_CAPTURE);

                startActivityForResult(cameraIntent,cameraRequestCode);

            }


        });

    }

    @Override
    protected void onActivityResult(int requestCode, int resultCode, Intent data){

        if(requestCode == cameraRequestCode && resultCode == RESULT_OK){

            Intent resultView = new Intent(this,Result.class);

            resultView.putExtra("imagedata",data.getExtras());

            Bitmap imageBitmap = (Bitmap) data.getExtras().get("data");

            String pred = classifier.predict(imageBitmap);
            resultView.putExtra("pred",pred);

            startActivity(resultView);

        }

    }

}
The activity_main.xml file should contain the following:
<?xml version="1.0" encoding="utf-8"?>
<android.support.design.widget.CoordinatorLayout xmlns:android="http://schemas.android.com/apk/res/android"
    xmlns:app="http://schemas.android.com/apk/res-auto"
    xmlns:tools="http://schemas.android.com/tools"
    android:layout_width="match_parent"
    android:layout_height="match_parent"
    tools:context=".MainActivity"
    >

    <android.support.design.widget.AppBarLayout
        android:layout_width="match_parent"
        android:layout_height="wrap_content"
        android:theme="@style/AppTheme.AppBarOverlay">

        <android.support.v7.widget.Toolbar
            android:id="@+id/toolbar"
            android:layout_width="match_parent"
            android:layout_height="?attr/actionBarSize"
            android:background="?attr/colorPrimary"
            app:popupTheme="@style/AppTheme.PopupOverlay" />

    </android.support.design.widget.AppBarLayout>

    <include layout="@layout/content_main" />

</android.support.design.widget.CoordinatorLayout>
And content_main.xml:
<?xml version="1.0" encoding="utf-8"?>
<android.support.constraint.ConstraintLayout xmlns:android="http://schemas.android.com/apk/res/android"
    xmlns:app="http://schemas.android.com/apk/res-auto"
    xmlns:tools="http://schemas.android.com/tools"
    android:layout_width="match_parent"
    android:layout_height="match_parent"
    app:layout_behavior="@string/appbar_scrolling_view_behavior"
    tools:context=".MainActivity"
    tools:showIn="@layout/activity_main"

    >

    <Button
        android:layout_width="wrap_content"
        android:layout_height="wrap_content"
        android:id="@+id/capture"
        android:text="Take A Picture"
        android:textColor="#ffffff"
        android:textSize="26dp"
        android:background="#83D5C4"
        android:padding="5dp"
        android:fontFamily="cursive"
        app:layout_constraintTop_toTopOf="parent"
        app:layout_constraintBottom_toBottomOf="parent"
        app:layout_constraintStart_toStartOf="parent"
        app:layout_constraintEnd_toEndOf="parent"
        />

</android.support.constraint.ConstraintLayout>
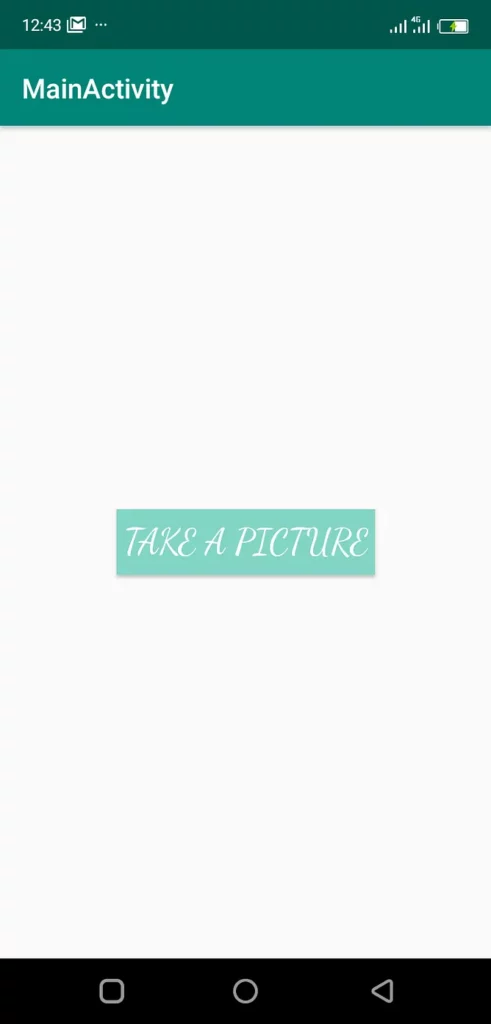
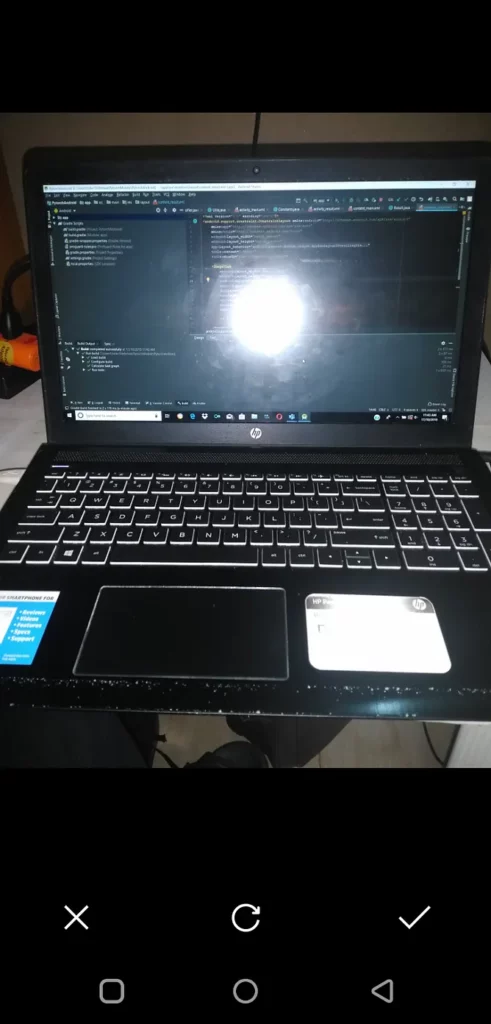
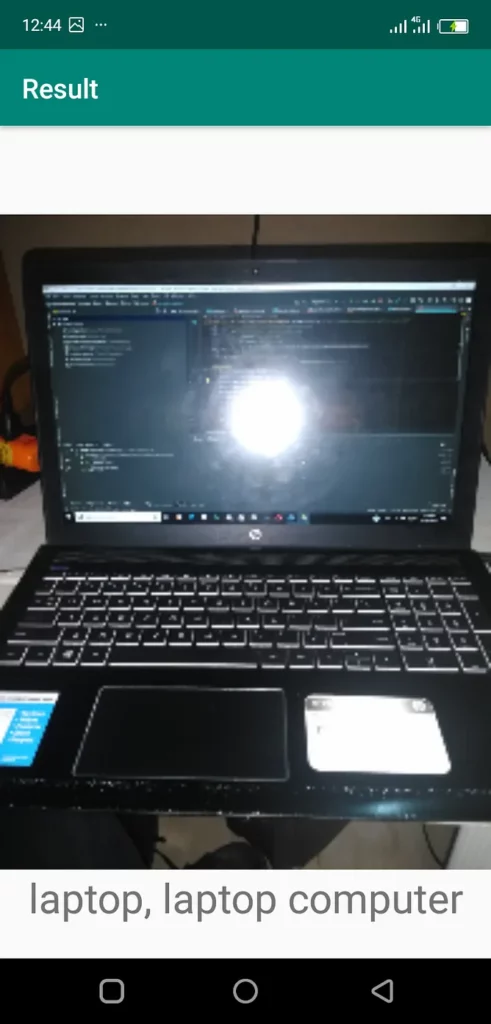
Our main activity above does one simple thing. On the click of the button, it launches an external camera app. Once an image is captured, a bitmap is obtained from the data returned, and the classifier is used to predict the class of the image. The results are then passed to another activity for display.
Step 7: Add the Result Activity
Create a new Basic Activity named Result and put the following in the Result.java file:
package com.johnolafenwa.pytorchandroid;

import android.graphics.Bitmap;
import android.os.Bundle;
import android.support.v7.app.AppCompatActivity;
import android.support.v7.widget.Toolbar;
import android.widget.ImageView;
import android.widget.TextView;

public class Result extends AppCompatActivity {

    @Override
    protected void onCreate(Bundle savedInstanceState) {
        super.onCreate(savedInstanceState);
        setContentView(R.layout.activity_result);
        Toolbar toolbar = findViewById(R.id.toolbar);
        setSupportActionBar(toolbar);

        Bitmap imageBitmap = (Bitmap) getIntent().getBundleExtra("imagedata").get("data");

        String pred = getIntent().getStringExtra("pred");

        ImageView imageView = findViewById(R.id.image);
        imageView.setImageBitmap(imageBitmap);

        TextView textView = findViewById(R.id.label);
        textView.setText(pred);

    }

}
Add this in the activity_result.xml:
<?xml version="1.0" encoding="utf-8"?>
<android.support.design.widget.CoordinatorLayout xmlns:android="http://schemas.android.com/apk/res/android"
    xmlns:app="http://schemas.android.com/apk/res-auto"
    xmlns:tools="http://schemas.android.com/tools"
    android:layout_width="match_parent"
    android:layout_height="match_parent"
    tools:context=".Result">

    <android.support.design.widget.AppBarLayout
        android:layout_width="match_parent"
        android:layout_height="wrap_content"
        android:theme="@style/AppTheme.AppBarOverlay">

        <android.support.v7.widget.Toolbar
            android:id="@+id/toolbar"
            android:layout_width="match_parent"
            android:layout_height="?attr/actionBarSize"
            android:background="?attr/colorPrimary"
            app:popupTheme="@style/AppTheme.PopupOverlay" />

    </android.support.design.widget.AppBarLayout>

    <include layout="@layout/content_result" />

</android.support.design.widget.CoordinatorLayout>
Add this in the content_result.xml:
<?xml version="1.0" encoding="utf-8"?>
<android.support.constraint.ConstraintLayout xmlns:android="http://schemas.android.com/apk/res/android"
    xmlns:app="http://schemas.android.com/apk/res-auto"
    xmlns:tools="http://schemas.android.com/tools"
    android:layout_width="match_parent"
    android:layout_height="match_parent"
    app:layout_behavior="@string/appbar_scrolling_view_behavior"
    tools:context=".Result"
    tools:showIn="@layout/activity_result">

    <ImageView
        android:layout_width="match_parent"
        android:layout_height="wrap_content"
        android:adjustViewBounds="true"
        android:src="@drawable/ic_launcher_background"
        app:layout_constraintEnd_toEndOf="parent"
        app:layout_constraintStart_toStartOf="parent"
        app:layout_constraintTop_toTopOf="parent"
        app:layout_constraintBottom_toBottomOf="parent"
        android:id="@+id/image"

        />

    <TextView
        android:layout_width="wrap_content"
        android:layout_height="wrap_content"
        android:text="Hello World"
        android:id="@+id/label"
        android:textSize="16pt"
        app:layout_constraintStart_toStartOf="@id/image"
        app:layout_constraintEnd_toEndOf="@id/image"
        app:layout_constraintTop_toBottomOf="@id/image"

        />

</android.support.constraint.ConstraintLayout>
And that’s it! That’s all the files we need.
Building the app
Now, having followed all the steps above, build and run the application on an actual Android phone.
Below are screenshots from my phone:


You should test the app with a variety of items and see the result.
Summary
In this post, we’ve successfully built an Android application that’s able to recognize 1000 categories of items using a model that was originally trained with PyTorch.
This is intended as a reference and a starting point for doing a lot of amazing things with AI on Android, powered by PyTorch Mobile.
The full code for this application is available on my GitHub profile. Visit the link below to access it. It is MIT licensed, and you’re welcome to use it as a starting point for building AI-powered mobile applications.
If you love this tutorial, give it some claps! You can reach to me anytime on Twitter @johnolafenwa
Editor’s Note: Heartbeat is a contributor-driven online publication and community dedicated to providing premier educational resources for data science, machine learning, and deep learning practitioners. We’re committed to supporting and inspiring developers and engineers from all walks of life.
Editorially independent, Heartbeat is sponsored and published by Comet, an MLOps platform that enables data scientists & ML teams to track, compare, explain, & optimize their experiments. We pay our contributors, and we don’t sell ads.
If you’d like to contribute, head on over to our call for contributors. You can also sign up to receive our weekly newsletters (Deep Learning Weekly and the Comet Newsletter), join us on Slack, and follow Comet on Twitter and LinkedIn for resources, events, and much more that will help you build better ML models, faster.

Comments 0 Responses