
In my previous article, we had a detailed discussion on the one-shot learning problem and how various algorithms tackled it in order to determine which approach was the most effective, and we settled on siamese networks. I’d encourage you to check it out:
But is this enough?Not quite! We need some hands-on-experience to actually learn how implement it. And what could be more relatable these days than facial recognition, which just happens to be a perfect use case for one-shot learning?
Humans learn new concepts with very little supervision. This principle behind one-shot learning is what we need to recreate in our model. Hence, we use a siamese network, which does not require extensive training samples for recognition tasks.
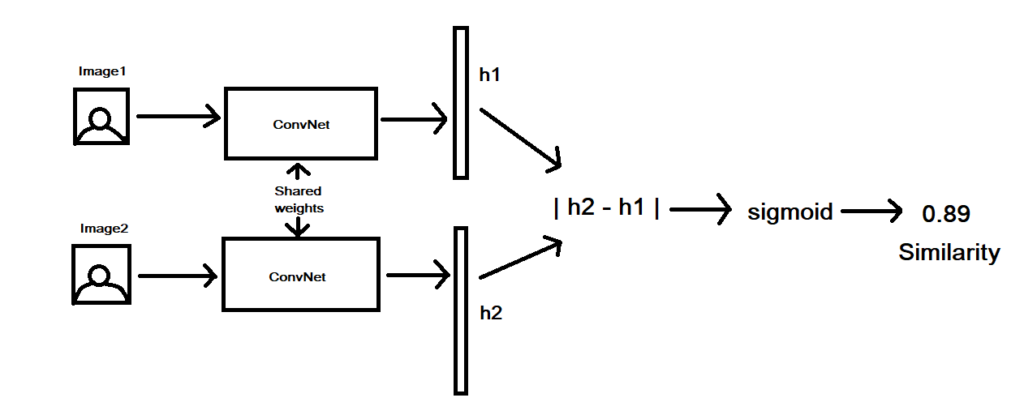
To provide a quick overview, siamese networks basically consist of two symmetrical neural networks both sharing the same weights and architectures.
They’re joined together at the end using an energy function, E which acts as a distance function whose objective is to learn whether two input images are similar or dissimilar. We’ll get a better understand of siamese networks by building a facial recognition model.
The complete code for this facial recognition model using a siamese network can be found at this link:
Once you’ve downloaded and extracted the zip, you can see /data folder consisting of sub-folders with the names of some famous people, as shown here:

Each celebrity’s folder has a few samples of a single person taken from various angles, as shown below:
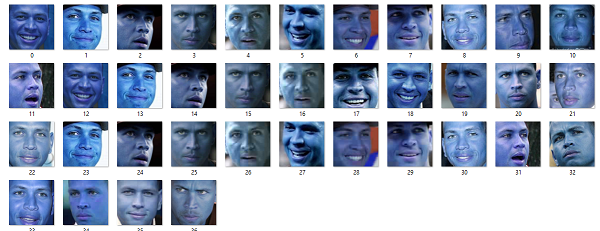
You can also form your own database by making sub-folders of family and friends. The only thing to keep in mind is to focus (i.e. crop) the images on the face, which can be done with OpenCV and a haar cascade classifier, which is a pre-trained model to detect faces and eyes in an image:
import cv2
import sys
#imagePath contains the image from which the face needs to be extracted
image = cv2.imread(imagePath)
gray = cv2.cvtColor(image, cv2.COLOR_BGR2GRAY)
#haarcascade_frontalface_default.xml needs to be downloaded
faceCascade = cv2.CascadeClassifier(cv2.data.haarcascades + "haarcascade_frontalface_default.xml")
faces = faceCascade.detectMultiScale(
    gray,
    scaleFactor=1.3,
    minNeighbors=3,
    minSize=(30, 30)
)
print("[INFO] Found {0} Faces.".format(len(faces)))
#saving every face detected
for (x, y, w, h) in faces:
    cv2.rectangle(image, (x, y), (x + w, y + h), (0, 255, 0), 2)
    roi_color = image[y:y + h, x:x + w]
    print("[INFO] Object found. Saving locally.")
    cv2.imwrite(str(w) + str(h) + '_faces.jpg', roi_color)

status = cv2.imwrite('faces_detected.jpg', image)
print("[INFO] Image faces_detected.jpg written to filesystem: ", status)
Lets make a roadmap to proceed further in our code:
Get image embeddings from a pre-trained FaceNet model
FaceNet is a model that, when given a picture of a face, will extract high-quality features from it and predict a 128-element vector representation of these features, called a face embedding. These face embeddings can then be used as the basis for training classifier systems on standard face recognition benchmark datasets.
from keras.models import load_model
# load the model
model = load_model('facenet_keras.h5')
# summarize input and output shape
print(model.inputs)
print(model.outputs)
# make prediction to get embedding
yhat = model.predict(samples)
# get embedding
embedding = get_embedding(model, face_pixels)

def get_embedding(model, face_pixels):
	# scale pixel values
	face_pixels = face_pixels.astype('float32')
	# standardize pixel values across channels (global)
	mean, std = face_pixels.mean(), face_pixels.std()
	face_pixels = (face_pixels - mean) / std
	# transform face into one sample
	samples = expand_dims(face_pixels, axis=0)
	# make prediction to get embedding
	yhat = model.predict(samples)
	return yhat[0]
By passing each image of the training dataset through the above snippet, the training dataset is then transformed into face embeddings, each comprised of a 128-element vector.
Mapping the person’s name to its embedding
The mapping of person’s name to its corresponding embedding is saved in a dictionary with the below code:
face_database = {}

for name in os.listdir('images'):
	for image in os.listdir(os.path.join('images',name)):
		identity = os.path.splitext(os.path.basename(image))[0]
		face_database[identity] = get_embedding(model,os.path.join('images',name,image))

print(face_database)
The mapping is done so that feeding the resultant feature vector of the testing image and getting the Euclidean distance from every image in the database becomes easy. This might sound a bit unclear, but hold on, the next step will clear things up.
Facial recognition using the siamese network
The image pair—one image embedding from the updated face database—is fed to network A, and another embedding of the test image is fed to network B.
Both the networks that return embedding vectors are symmetrical (as in our case, FaceNet). Two embeddings belonging to the same person should have a lower distance, while embeddings belonging to different person’s image should show a larger distance.
for(name, encoded_image_name) in face_database.items():
      #distance between two embedding vector
			dist = np.linalg.norm(encoding - encoded_image_name)
			if(dist < min_dist):
				min_dist = dist
				identity = name
 #min distance signifies similar embedding and hence predicted person
 print('Min dist: ',min_dist)
Once the minimum distance of the face embedding among all the embeddings in the database is calculated, the corresponding name mapped earlier is easily found. Some threshold needs to be set though so that only the confirmed cases will be predicted, and outputs in question will be treated as unknown to avoid false predictions.
threshold=0.2
if min_dist < threshold:
			cv2.putText(frame, "Face : " + identity[:-1], (x, y - 50), cv2.FONT_HERSHEY_PLAIN, 1.5, (0, 255, 0), 2)
			cv2.putText(frame, "Dist : " + str(min_dist), (x, y - 20), cv2.FONT_HERSHEY_PLAIN, 1.5, (0, 255, 0), 2)
		else:
			cv2.putText(frame, 'No matching faces', (x, y - 20), cv2.FONT_HERSHEY_PLAIN, 1.5, (0, 0, 255), 2)
Conclusion
In part 2 of our mini-series on one-shot learning, we worked through an implementing a facial recognition model in Python, using pre-trained FaceNet model and similarity distance measure between images.
Moving forward, there are several possibilities for improving our model:
- Poor quality cameras/images limit the model’s effectiveness. By combining our facial recognition model with image enhancement techniques to deblur/recover pixel intensity.
- Small size images make facial recognition more difficult. To help with this, we could upsample the input image to improve its resolution before passing it through the model.
For more detailed study on how FaceNet returns face embeddings, check out the following research paper:
Stay tuned!
Comments 0 Responses