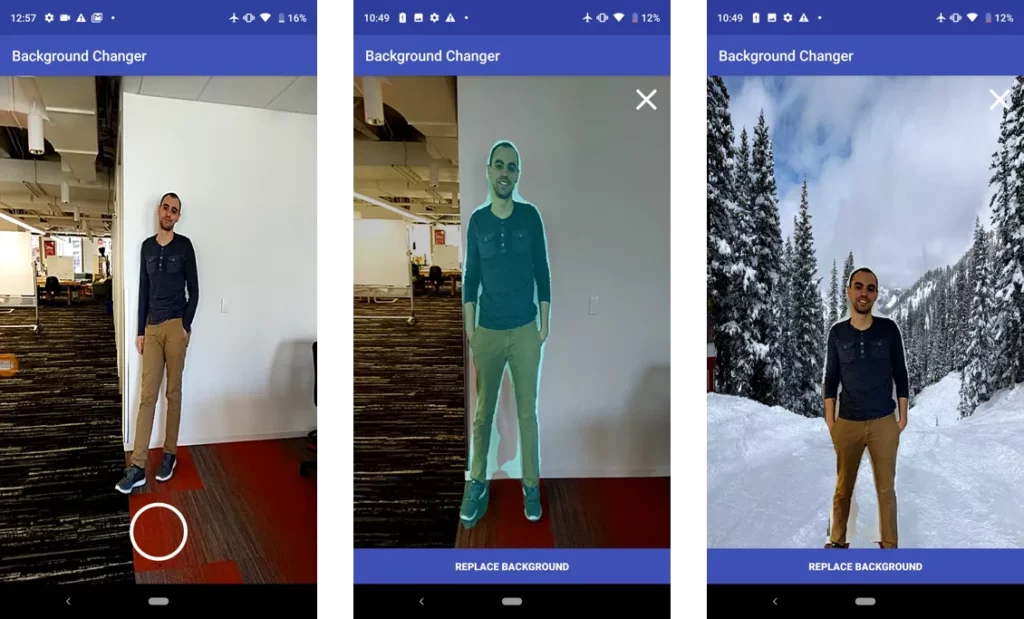
Back when I first started using Photoshop, I’d waste hours between classes cropping out pictures of my friends and pasting their faces onto celebrities and teachers. My go-to method was using the Magic Wand tool to select a person, and then creating a crude mask to cut and paste onto another background. This had varying degrees of success and usually resulted in having to manually outline and erase unwanted pixels from my selection.
With the help of machine learning, masking capabilities have come a long way. Semantic image segmentation is a widely-used computer vision technique that allows users to associate each pixel of an image with a class label. In short, it helps bring meaning to images.
Here are a couple of ways image segmentation is being used today:
- Medical imaging — Reading CAT scans to aid physicians
- Satellite Imagery — Understanding and locating forest, roads, crops, etc. in an image.
- Photo Editing—Using image segmentation on top of using color, tone, and depth to creating high quality masks for photo editing.
In this tutorial, we’ll use the Fritz SDK, a mobile machine learning library, in order to create an app to replace and modify the background of a photo. To dive in, we’ll go over how to create a mask of a person in the image, export the masked layer, and swap out the background.
First, let’s walk through how to use the on-device Vision API and get familiar with how to use Fritz AI. Under the hood, the Vision APIs use ML models to run predictions on an image.
There are 4 main components:
- FritzVisionPredictor — Manages model execution and processing.
- FritzVisionImage — Prepares an image for model prediction.
- FritzOnDeviceModel — Contains information to load the underlying model file.
- FritzVisionResult — A user-friendly object to access the result from the predictor.
The FritzVisionPredictor class handles all the complicated processing that comes with running on-device models — usually this refers to handling pre-processing (any manipulations required to format the input for the model) and post-processing (handling the raw output from the model to create a developer-friendly result).
Each predictor contains a predict method that takes a FritzVisionImage object as an argument and returns a FritzVisionResult with methods that make it easy to visualize and understand the model results.
Predictors are initialized with a FritzOnDeviceModel. For Image Segmentation, there are 4 models that you can use.
- People Segmentation Model (Fast) — Identifies and segments pixels belonging to people. The output resolution is 384 x 384.
- Living Room Segmentation Model (Fast) — Identifies and segments pixels belonging to living room objects (chair, windows, floor, wall, etc). The output resolution is 384 x 384.
- Outdoor Segmentation Model (Fast) — Identifies and segments pixels belonging to outdoor objects (buildings, cars, bikes, etc). The output resolution is 384 x 384.
- People Segmentation Model (Accurate)— Identifies and segments pixels belonging to people. The output resolution is 768 x 768.
In this tutorial, we’ll use the People Segmentation Model (Small) and bundle it with our app.*
To download the model, include the following dependency in your app/build.gradle:
*Note: We use TensorFlow Lite models in our SDK. You’ll need to specify the noCompress option in your app’s build.gradle file to make sure the model is not compressed when it’s built.
Pulling down this dependency will provide a class called PeopleSegmentOnDeviceModelFast (a subclass of FritzOnDeviceModel).
Putting this all together, here’s the complete code for running Image Segmentation:
// Create the on device model for People Segmentation
// PeopleSegmentationOnDeviceModel is a subclass of FritzOnDeviceModel
PeopleSegmentOnDeviceModelFast onDeviceModel = new PeopleSegmentOnDeviceModelFast();

// Get the predictor with the People Segmentation Model
// FritzVisionSegmentPredictor is a subclass of FritzVisionPredictor
FritzVisionSegmentPredictor predictor = FritzVision.ImageSegmentation.getPredictor(onDeviceModel);

// Create a a visionImage
FritzVisionImage visionImage = FritzVisionImage.fromBitmap(inputBitmap);

// Run predict on an image
// FritzVisionSegmentResult is a subclass of FritzVisionResult
FritzVisionSegmentResult segmentResult = predictor.predict(visionImage);

// Get a masked bitmap of People detected in the image.
// Set the max alpha to 255 and .5f for clippingScoresAbove and .5f for zeroingScoresBelow
// For more details on this option, take a look at the documentation:
// https://docs.fritz.ai/develop/vision/image-segmentation/android.html#run-prediction-on-fritzvisionimage
Bitmap peopleMask = segmentResult.buildSingleClassMask(MaskType.PERSON, 255, .5f, .5f);

// Return a cut out option of the person
// Set option to trim any transparent pixels.
Bitmap peopleInPhoto = visionImage.mask(peopleMask, true);
This is a high-level overview but if you’d like more details, you can take a look at our Image Segmentation documentation for Android.
With that in mind, let’s get started building our app for background replacement.
*In order to reduce the initial app size, you can also choose to lazy load the model. For more information, take a look at the documentation.
Step 1: Include the Android SDK
To get started with Fritz AI, follow these steps:
- First, create a new account and add Image Segmentation to your project.
- Pull down the fritz-examples / Android repository on GitHub. This contains sample apps you can use to make it easy to work with the camera code in Android. (git clone https://github.com/fritzlabs/fritz-examples.git)
- Import fritz-examples/Android/BackgroundReplacementApp/ into Android Studio and sync the Gradle dependencies. This contains the full, finished version of the code we’ll be referencing throughout this post.
- In your Fritz account, create a new Android app. Set the package name to ai.fritz.backgroundChanger as defined in app/build.gradle.
- In the app code, change the API token in MainActivity.java to the one provided for you in the previous step.
Step 2: Creating a simple UI to replace the image background
One of the main benefits of using image segmentation is that you can create experiences that work like magic. Instead of manually selecting the pixels or outlining the person, you can just click a button and automatically identify the most important part of the photo — the people in it.
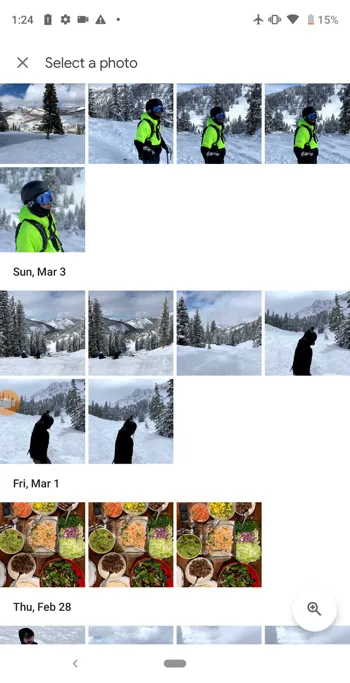
For our app, users will take a picture of someone and then choose an image from their gallery to serve as the background.

We won’t dive into the code to set up the UI, but if you’d like to change it, take a look at the layout file and MainActivity.java.
Step 3: Set up a FritzVisionSegmentPredictor with a People Segment Model to use in the Activity.
As mentioned before, you’ll need to create a FritzVisionSegmentPredictor. We’ll initialize a predictor for the MainActivity once the camera is set up.
@Override
protected void onCreate(final Bundle savedInstanceState) {
   // ...
   // PeopleSegmentOnDeviceModel is a subclass of FritzOnDeviceModel
   PeopleSegmentOnDeviceModel onDeviceModel = new PeopleSegmentOnDeviceModelFast();

   // Get the predictor with the People Segmentation Model
   // FritzVisionSegmentPredictor is a subclass of FritzVisionPredictor
   FritzVisionSegmentPredictor predictor = FritzVision.ImageSegmentation.getPredictor(onDeviceModel);
}
Step 4: Create a FritzVisionImage object from the camera feed
There are 2 image formats we currently support:
// ---------------------------------
// Handle Bitmap (ARG_8888)
// ---------------------------------

// Standard FritzVisionImage creation
FritzVisionImage visionImage = FritzVisionImage.fromBitmap(bitmap);

// Applying a rotation to the bitmap (how to get the rotation value)
// https://stackoverflow.com/questions/7286714/android-get-orientation-of-a-camera-bitmap-and-rotate-back-90-degrees
FritzVisionImage visionImage = FritzVisionImage.fromBitmap(bitmap, rotation);

// ----------------------------------
// android.media.Image (YUV_420_888)
// ----------------------------------

// Get the rotation to apply on the image backed on the camera orientation
ImageRotation cameraRotation = FritzVisionOrientation.getImageRotationFromCamera(this, cameraId);

// Create the FritzVisionImage with the camera orientation
FritzVisionImage visionImage = FritzVisionImage.fromMediaImage(image, cameraRotation);
Our camera is already set up to preview android.media.Image so we simply pass that along with the camera orientation:
FritzVisionImage visionImage;

@Override
public void onImageAvailable(final ImageReader reader) {
    Image image = reader.acquireLatestImage();

    if (image == null) {
        return;
    }

    visionImage = FritzVisionImage.fromMediaImage(image, imgRotation);
    image.close();
}
Step 5: Take a portrait snapshot
When the user takes a picture, we use the last saved FritzVisionImage object and pass it into predictor.predict function. Here’s the important code in the click handler:
FritzVisionSegmentResult segmentResult;
// ...
snapshotButton.setOnClickListener(new View.OnClickListener() {
    @Override
    public void onClick(View view) {

        runInBackground(
                new Runnable() {
                    @Override
                    public void run() {
                        segmentResult = predictor.predict(visionImage);
                        snapshotOverlay.postInvalidate();
                    }
                });
    }
});
Once prediction completes, we get a FritzVisionSegmentResult back. The result class provides easy-to-use methods to access the prediction results.
For displaying the result, we use buildSingleClassMask which creates a Bitmap mask which you can overlay on the original image.
Step 6: Display the mask overlay from the segmentation result.
We’ve set up an OverlayView in order to display the result to the user. In the code above, we redraw the overlay with snapshotOverlay.postInvalidate(); This triggers the following draw callback, defined below:
snapshotOverlay.setCallback(new OverlayView.DrawCallback() {
    @Override
    public void drawCallback(final Canvas canvas) {

        // If the prediction has not run
        if(segmentResult == null) {
            return;
        }

        // STEP 6: Show the people segmentation result when the background hasn't been chosen.
        if (backgroundBitmap == null) {
            // Create the person mask
            Bitmap personMask = segmentResult.buildSingleClassMask(MaskType.PERSON, 180, clippingThreshold, zeroCutoff);
            // Overlay the mask on the original image
            Bitmap result = visionImage.overlay(personMask);
            // Scale the bitmap to the viewport
            Bitmap scaledBitmap = BitmapUtils.resize(result, cameraSize.getWidth(), cameraSize.getHeight());
            // Draw it on the canvas to render
            canvas.drawBitmap(scaledBitmap, new Matrix(), new Paint());
            return;
        }

        // ...
    }
});
Walking through this code, here are the specific steps we’ve taken with the segmentation result:
- Create a person mask with a max alpha value of 180 (out of 255).
- Overlay the mask on top of the visionImage to get a quick preview.
- Scale the combined bitmap to the size of the camera view.
- Draw the scaled bitmap to the canvas.
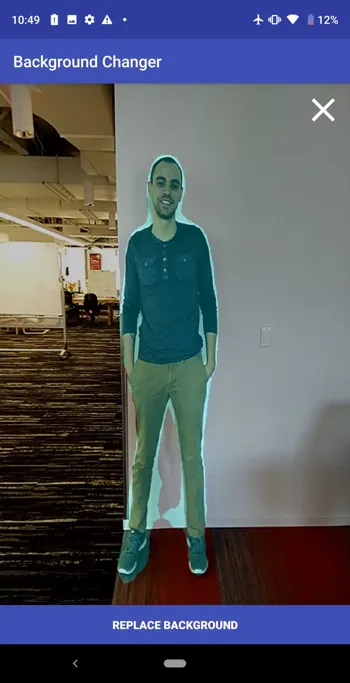
Here’s what this looks like at this stage. The pixels the model detected as part of a person are colored in light blue:

Step 7: Fetching an image from the gallery to replace the background.
Next, let’s choose an image to replace the background. To do this, we’ll create an intent to open up the gallery and choose an image.
selectBackgroundBtn.setOnClickListener(new View.OnClickListener() {
    @Override
    public void onClick(View view) {
        Intent intent = new Intent();
        intent.setType("image/*");
        intent.setAction(Intent.ACTION_GET_CONTENT);
        startActivityForResult(Intent.createChooser(intent, "Select Picture"), SELECT_IMAGE);
    }
});
After an image is selected, the image is returned to onActivityResult. If we displayed the image, there could be a rotation applied to it depending on which camera took the photo. In this case, we use ExifInterface to determine the saved photo orientation and rotate it properly to display it in a view.
@Override
protected void onActivityResult(int requestCode, int resultCode, Intent data) {
    super.onActivityResult(requestCode, resultCode, data);

    if (resultCode == Activity.RESULT_CANCELED) {
        Toast.makeText(this, "Canceled", Toast.LENGTH_SHORT).show();
        return;
    }

    if (resultCode == Activity.RESULT_OK) {
        if (data == null) {
            return;
        }
        try {
            Uri selectedPicture = data.getData();

            InputStream inputStream = getContentResolver().openInputStream(selectedPicture);
            ExifInterface exif = new ExifInterface(inputStream);
            int orientation = exif.getAttributeInt(ExifInterface.TAG_ORIENTATION, ExifInterface.ORIENTATION_NORMAL);

            backgroundBitmap = MediaStore.Images.Media.getBitmap(getContentResolver(), selectedPicture);

            switch (orientation) {
                case ExifInterface.ORIENTATION_ROTATE_90:
                    backgroundBitmap = BitmapUtils.rotate(backgroundBitmap, 0);
                case ExifInterface.ORIENTATION_ROTATE_180:
                    backgroundBitmap = BitmapUtils.rotate(backgroundBitmap, 270);
                case ExifInterface.ORIENTATION_ROTATE_270:
                    backgroundBitmap = BitmapUtils.rotate(backgroundBitmap, 180);
            }

        } catch (IOException e) {
            throw new RuntimeException(e);
        }
    }
}
Step 8: Replacing the background
The last step is to draw the specific person mask onto the background photo. We use the same OverlayView to redraw the final result:
snapshotOverlay.setCallback(new OverlayView.DrawCallback() {
  @Override
  public void drawCallback(final Canvas canvas) {

      // 1. Resize the background image
      Bitmap scaledBackgroundBitmap = BitmapUtils.resize(backgroundBitmap, cameraSize.getWidth(), cameraSize.getHeight());

      // 2. Draw the background to the canvas
      canvas.drawBitmap(scaledBackgroundBitmap, new Matrix(), new Paint());

      // 3. Create person mask
      Bitmap maskedBitmap = segmentResult.buildSingleClassMask(MaskType.PERSON, 255, clippingThreshold, zeroCutoff);

      // 4. Cut out the people using the mask (the transparent pixels trimmed)
      Bitmap croppedMask = visionImage.mask(maskedBitmap, true);

      // 5. Scale the combined bitmap to the camera view.
      if (croppedMask != null) {
          float scaleWidth = ((float) cameraSize.getWidth()) / croppedMask.getWidth();
          float scaleHeight = ((float) cameraSize.getWidth()) / croppedMask.getHeight();

          final Matrix matrix = new Matrix();
          float scale = Math.min(scaleWidth, scaleHeight);
          matrix.postScale(scale, scale);

          Bitmap scaledMaskBitmap = Bitmap.createBitmap(croppedMask, 0, 0, croppedMask.getWidth(), croppedMask.getHeight(), matrix, false);
          // Print the background bitmap with the masked bitmap
          // Center the masked bitmap at the bottom of the image.
          canvas.drawBitmap(scaledMaskBitmap, (cameraSize.getWidth() - scaledMaskBitmap.getWidth()) / 2, cameraSize.getHeight() - scaledMaskBitmap.getHeight(), new Paint());
      }
  }
});
Let’s go through this step by step:
- First we resize the background bitmap to take up the viewport.
- We draw the background to the canvas
- Next, we create a person mask from the segmentResult. Note: This mask will have the same dimensions as the original image passed in.
- Crop out people from the original image using the mask. Note: Trim removes extra transparent pixels.
- Scale and draw the resulting bitmap onto the canvas.
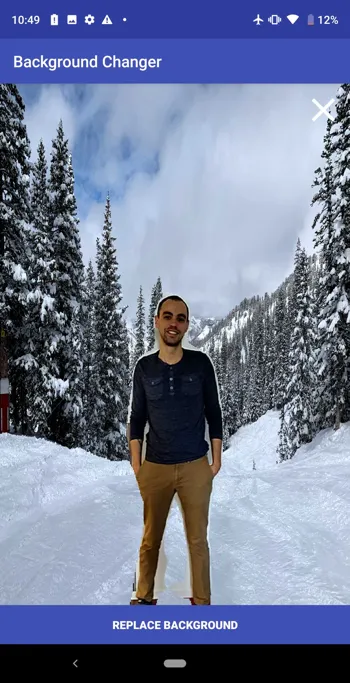
Here’s the final image with the background replaced:

We’re almost there, but there are still some small pixels hanging around in our result that aren’t part of the subject we care about. So what can we do about this?
A couple of ideas:
- Adjust the confidence threshold for the predictor to display pixels with a higher score.
- Apply alpha matting.
- Use color, tone, or depth to select pixels and improve the edges.
Try it out and leave a comment or submit a PR to the repo. We’ll send some Fritz swag for the person that comes up with the best mask created with Image Segmentation.
In a follow up post, we’ll look into how we can further refine this mask with common techniques.
Image segmentation opens the door to create novel photo editing tools and effects. Developers can use it to cut and paste images, replace backgrounds, add effects to specific masks — the possibilities are endless. With this post, I hope this gives you all a small idea of what kind of experiences you can create with machine learning.
Now go out and build something truly unique.
Editor’s Note: Heartbeat is a contributor-driven online publication and community dedicated to exploring the emerging intersection of mobile app development and machine learning. We’re committed to supporting and inspiring developers and engineers from all walks of life.
Editorially independent, Heartbeat is sponsored and published by Fritz AI, the machine learning platform that helps developers teach devices to see, hear, sense, and think. We pay our contributors, and we don’t sell ads.
If you’d like to contribute, head on over to our call for contributors. You can also sign up to receive our weekly newsletters (Deep Learning Weekly and the Fritz AI Newsletter), join us on Slack, and follow Fritz AI on Twitter for all the latest in mobile machine learning.

Comments 0 Responses