Image labeling techniques can be used to obtain insights into the contents of an image. Some of the use cases for this are moderation of content as well as automatic metadata generation.
Using Fritz AI, we can do this on Android, identifying the contents of an image or even a video frame. In this piece, we’ll see how we can label images from our phone’s gallery.
Getting Started
The first step is to jump into your favorite editor and create a project. Once you do, copy the application ID. This can be found in your app’s build.gradle file. It will look something like this:
applicationId "com.namespace.labs"Next, you’ll need a Fritz AI account. For this project, you’ll want to select the “Pre-Trained Models” option. Just as a note, Fritz AI also has a model building platform (Fritz AI Studio) that allows you to build custom mobile-ready models from end-to-end.
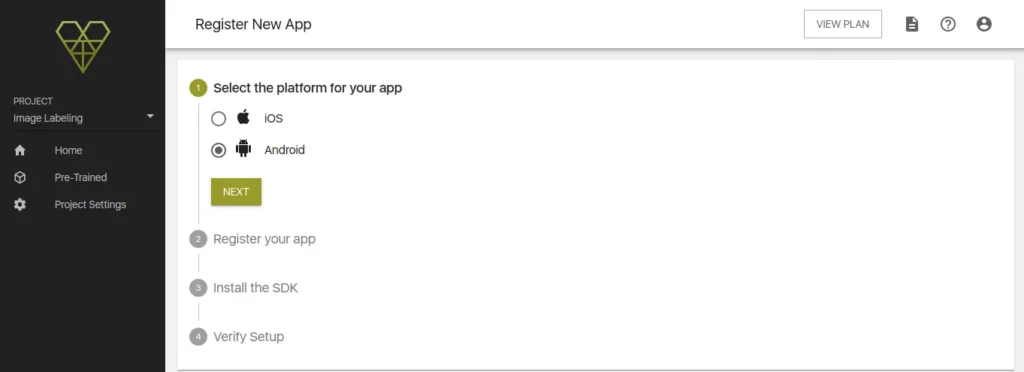
Once you’re logged in, click on follow the 4 prompts to register your new application. First, select your target platform (here, Android).

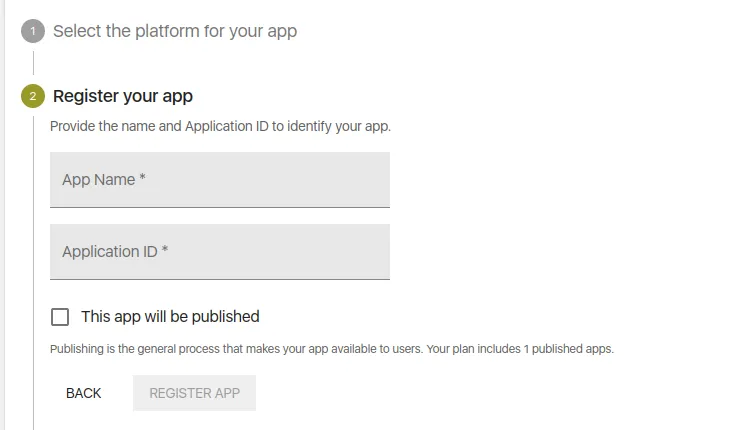
Give your application a name and enter your application ID. Ensure you type the application ID in your app’s build.gradle file. Otherwise, the Fritz SDK won’t be able to communicate with your application.

The next step is to install the Fritz SDK. Jump over to your root-level Gradle file (build.gradle) and include the Maven repository for Fritz AI:
allprojects {
    repositories {
        maven { url "https://fritz.mycloudrepo.io/public/repositories/android" }
    }
}
Next, add the dependency for the SDK to your app-level Gradle file (app/build.gradle):
dependencies {
    implementation 'ai.fritz:core:+'
}
Now, let’s register the FritzCustomModelService in our AndroidManifest:
<manifest xmlns:android="http://schemas.android.com/apk/res/android">
    <!-- For model performance tracking & analytics -->
    <uses-permission android:name="android.permission.INTERNET" />

    <application>
        <!-- Register the custom model service for OTA model updates -->
        <service
            android:name="ai.fritz.core.FritzCustomModelService"
            android:exported="true"
            android:permission="android.permission.BIND_JOB_SERVICE" />
    </application>
</manifest>
The only thing remaining now is to initialize the SDK by calling Fritz.configure() with our API key:
public class MainActivity extends AppCompatActivity {
    @Override
    protected void onCreate(Bundle savedInstanceState) {
        // Initialize Fritz
        Fritz.configure(this, "YOUR_API_KEY");
    }
}
With that in place, click next to verify that your application is able to communicate with Fritz AI.
Use Fritz Pre-trained Models
The pre-trained model we’ll use here has labels for more than 680 common objects. The model will give us the predicted label accompanied by the confidence interval.

According to the Fritz AI docs, we also need to specify aaptOptions in order to prevent compression of the tflite model. After adding it, your app/build.gradle file will look like this:
android {
    defaultConfig {
        renderscriptTargetApi 21
        renderscriptSupportModeEnabled true
    }

    // Don't compress included TensorFlow Lite models on build.
    aaptOptions {
        noCompress "tflite"
    }
}

dependencies {
    implementation 'ai.fritz:vision:+'
}
You can include the model in your app by adding this dependency in your app/build.gradle file. Note that this will make your app larger in size.
implementation 'ai.fritz:vision-labeling-model-fast:+'
Ensure that you sync your project with your Gradle files so that the model can be downloaded.
The App Elements
This application contains just three key elements:
- a TextView that will display the label of the image
- a Button that when clicked prompts you to select an image
- an ImageView for displaying the picked image
<?xml version="1.0" encoding="utf-8"?>
<androidx.constraintlayout.widget.ConstraintLayout xmlns:android="http://schemas.android.com/apk/res/android"
    xmlns:app="http://schemas.android.com/apk/res-auto"
    xmlns:tools="http://schemas.android.com/tools"
    android:layout_width="wrap_content"
    android:layout_height="match_parent"
    tools:context=".MainActivity">

    <Button
        android:id="@+id/buttonClick"
        android:layout_width="wrap_content"
        android:layout_height="wrap_content"
        android:layout_marginStart="170dp"
        android:layout_marginEnd="150dp"
        android:layout_marginBottom="24dp"
        android:text="Pick Image"
        app:layout_constraintBottom_toBottomOf="parent"
        app:layout_constraintEnd_toEndOf="parent"
        app:layout_constraintHorizontal_bias="1.0"
        app:layout_constraintStart_toStartOf="parent"
        app:layout_constraintTop_toTopOf="parent"
        app:layout_constraintVertical_bias="0.198" />

    <ImageView
        android:id="@+id/imageView"
        android:layout_width="wrap_content"
        android:layout_height="wrap_content"
        android:layout_marginStart="153dp"
        android:layout_marginTop="50dp"
        android:layout_marginEnd="150dp"
        app:layout_constraintEnd_toEndOf="parent"
        app:layout_constraintStart_toStartOf="parent"
        app:layout_constraintTop_toBottomOf="@+id/buttonClick"
        app:srcCompat="@drawable/ic_launcher_foreground" />

    <TextView
        android:id="@+id/textView2"
        android:layout_width="wrap_content"
        android:layout_height="wrap_content"
        android:layout_marginStart="166dp"
        android:layout_marginTop="50dp"
        android:layout_marginEnd="187dp"
        android:layout_marginBottom="20dp"
        android:hint="Image Label"
        android:textSize="14sp"
        app:layout_constraintBottom_toTopOf="@+id/buttonClick"
        app:layout_constraintEnd_toEndOf="parent"
        app:layout_constraintHorizontal_bias="1.0"
        app:layout_constraintStart_toStartOf="parent"
        app:layout_constraintTop_toTopOf="parent"
        app:layout_constraintVertical_bias="0.0" />

</androidx.constraintlayout.widget.ConstraintLayout>
Obtaining the Image
The first thing we need to do is obtain the user’s permission so that the application can access their images. Once we get permission, we call the pickImage method, which will pick the image from the user’s phone. We do that by creating a listener on the button and overriding its onClick method:
ImageView imageView;
    Button buttonClick;
    TextView textView2;

    private static final int IMAGE_PICK_CODE = 1000;
    private static final int PERMISSION_CODE = 1001;

    @Override
    protected void onCreate(Bundle savedInstanceState) {
        super.onCreate(savedInstanceState);
        Fritz.configure(this, "YOUR_API_TOKEN");
        setContentView(R.layout.activity_main);

        imageView = findViewById(R.id.imageView);
        buttonClick = findViewById(R.id.buttonClick);
        textView2 = findViewById(R.id.textView2);

        buttonClick.setOnClickListener(new View.OnClickListener() {
            @Override
            public void onClick(View v) {
                if (Build.VERSION.SDK_INT >= Build.VERSION_CODES.M){
                    if (checkSelfPermission(Manifest.permission.READ_EXTERNAL_STORAGE)
                            == PackageManager.PERMISSION_DENIED){

                        String[] permissions = {Manifest.permission.READ_EXTERNAL_STORAGE};
                        requestPermissions(permissions, PERMISSION_CODE);
                    }
                    else {
                        pickImage();
                    }
                }
                else {
                    pickImage();
                }

            }
        });
    }
Next, override the method used to request permission:
 @Override
    public void onRequestPermissionsResult(int requestCode, @NonNull String[] permissions, @NonNull int[] grantResults) {
        switch (requestCode){
            case PERMISSION_CODE:{
                if (grantResults.length >0 && grantResults[0] ==
                        PackageManager.PERMISSION_GRANTED){
                    pickImage();
                }
                else {
                    Toast.makeText(this, "Permission not Granted", Toast.LENGTH_LONG).show();
                }
            }
        }
    }
The pickImage will obtain the image using an Intent:
 private void pickImage() {
        Intent intent = new Intent(Intent.ACTION_PICK);
        intent.setType("image/*");
        startActivityForResult(intent, IMAGE_PICK_CODE);
    }
Obtain the Image
We can now obtain the picked image by overriding the onActivityResult method. The first thing we do upon obtaining the image is to set it on the imageView.
imageView.setImageURI(data.getData());
Create a Bitmap Image
Next, let’s create a bitmap image that we’ll pass on to Fritz AI in order to get the prediction.
            Uri selectedImage = data.getData();

            String[] filePath = {MediaStore.Images.Media.DATA};
            Cursor c = getContentResolver()
                    .query(selectedImage, filePath, null, null, null);
            c.moveToFirst();
            int columnIndex = c.getColumnIndex(filePath[0]);
            String picturePath = c.getString(columnIndex);
            c.close();
            Bitmap image = (BitmapFactory.decodeFile(picturePath));
Create a FritzVisionImage from an image
We now have a bitmap image. We can use it to create a FritzVisionImage:
FritzVisionImage visionImage = FritzVisionImage.fromBitmap(image);Get a FritzVisionLabelPredictor
Since we’re using an on-device model, we can obtain a predictor immediately:
  LabelingOnDeviceModel imageLabelOnDeviceModel = FritzVisionModels.getImageLabelingOnDeviceModel();
            FritzVisionLabelPredictor predictor = FritzVision.ImageLabeling.getPredictor(
                    imageLabelOnDeviceModel
            );
Label the image
We’re now ready to use this predictor to run predictions on the image. This is done using the predict function and passing it into the visionImage.
FritzVisionLabelResult labelResult = predictor.predict(visionImage);
Display the Label
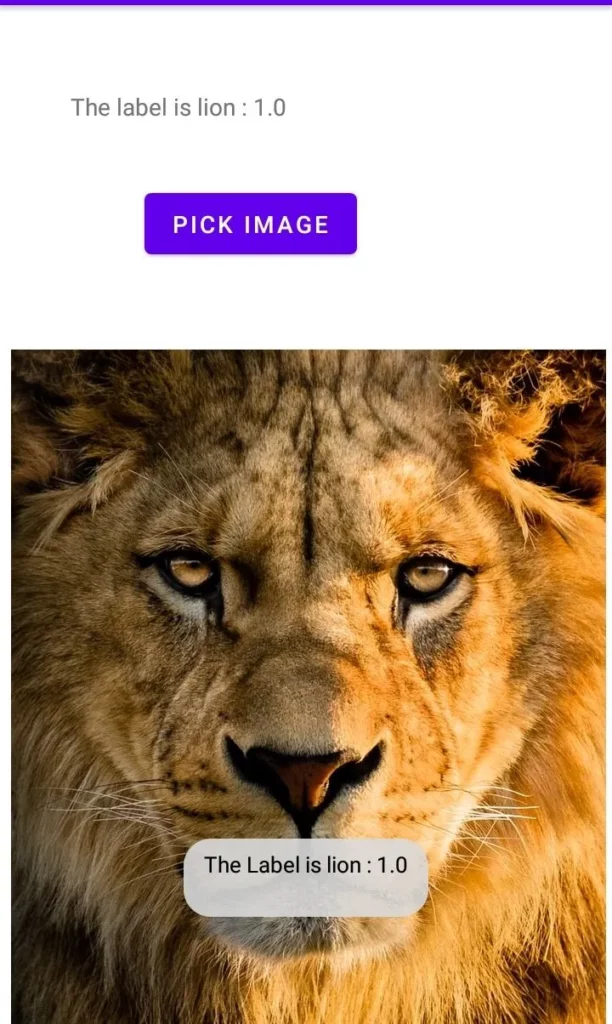
You can decide how you want to display the result. Here, I use a Toast as well as a TextView. The getResultString method from labelResult gives us the label and confidence score. After obtaining the result, we append it to the TextView and show it as a Toast as well.
textView2.append("The label is " + labelResult.getResultString());
Toast.makeText(this, "The Label is " + labelResult.getResultString(), Toast.LENGTH_LONG).show();
Conclusion
Hopefully, this piece has shown you how easy it is to incorporate machine learning capabilities in your Android applications using Fritz AI. Check out the full source code in the repo below.

Comments 0 Responses