Welcome back to my series on building image effects for Android using OpenCV. In this tutorial, which is part 5 of the series, we’re going to build an image pattern—filling a large image with a pattern created by repeating a small image.
The GitHub project for the series is available on this page. The project of this tutorial is available inside the Part 5 folder under the project.
The sections covered in this tutorial:
- A review of 2D convolutions
- Creating patterns
- Adding a pattern to an image
- Editing our Android Studio project
The image used in this tutorial is given below.

The effect of this tutorial is creating an empty image that’s filled by a pattern that uses a smaller image. It can also be used for filling an existing image with a pattern. The final result will look like the following:

The small image used to fill the above image is actually the logo of Heartbeat. Let’s get started to see how this work.
Table of contents
A review of 2D convolution
In order to fill an image with a smaller image in a pattern, let’s think about how we might approach this problem. We need to start from the upper-left corner and then place the small image starting from that location.
After placing the first image, we need to make a shift horizontally to find the area in which the image will be placed for the second time. After that, shifting takes place again to move to the right, placing the image again. After going to the right-most region in the image, we then move down and start again from the left-most side.
It makes sense that the above discussion is similar to convolving an image with a mask. So let’s start by reviewing how a mask convolves an image and then discuss how to place a pattern over that same image.
Convolution can take place for signals (e.g. images) with one or more dimensions. When working with images, 2D convolution is required, as the images have 2 dimensions representing the width and height.
Some images are 3D or have higher dimensionality, but actually convolving a 3D image is just repeating the 2D convolution 3 times—once for each channel.
In our discussion of convolution, we can refer to the image below:
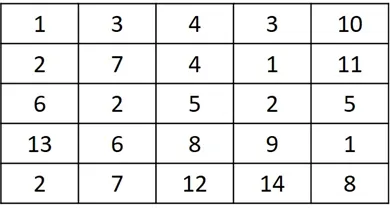
If the kernel (i.e. mask) used for convolving the above image is given below, how does convolution work in that case?
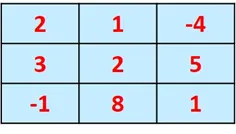
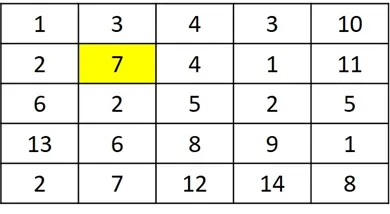
Convolution works by placing the mask over each pixel in the image. The figure below highlights the pixel in the second row and second column where the mask will be placed.
After placing the mask over the image, the result is represented in the next figure.
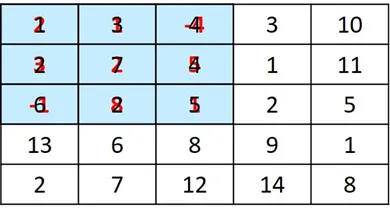
Each element in the mask is multiplied by its corresponding element in the image, and the sum of all multiplications is calculated according to the equation below.
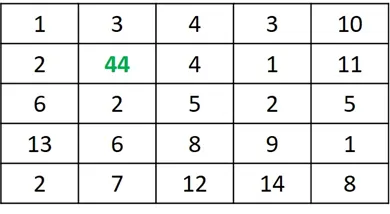
After calculating the sum of products, which is 44, what do we do next? The result is saved in the pixel in which the mask is centered—the resulting new pixel is shown in the next figure. Because the mask size is 3×3, which is odd, we can easily find a single pixel representing the center.
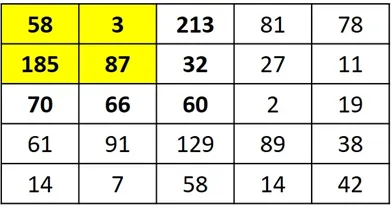
Assume that a mask of size 2×2 is used, which is even according to the figure below—where then is the center pixel that holds the result? There is no center pixel in this case. This is why the mask size used for convolution should be odd.
After working with that pixel, the next step is to shift the mask to the right by a single pixel, according to the figure below.
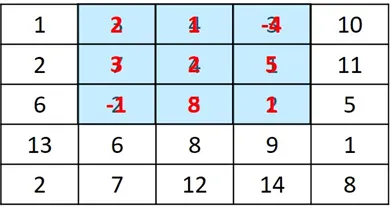
The sum of products is calculated according to the next equation.
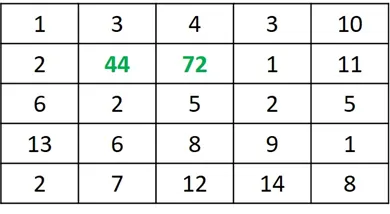
The result, which is 72, is placed in the pixel where the mask is centered, as shown below. In this case, it’s the pixel in the second row and third column. The process continues until convolving the mask with all image pixels.
Thinking of how the convolution works, there is a question that must be answered. What if the mask is centered on a pixel at the edges of the images?
According to the case given below, the left-most column of the mask has no corresponding image pixels to be multiplied by. What do we do in such a case?
There are 2 primary solutions. The first one is to avoid working with the edge pixels and just work with the inner pixels in the image, where you ensure that all mask elements will have corresponding image pixels. This solution neglects some rows and columns from the image, and thus some details will be lost.
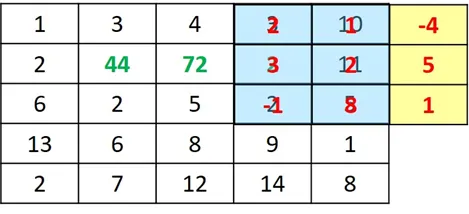
The other solution, which will be used in this tutorial, is to pad the image with rows and columns of zeros. Even when the mask is placed in an edge pixel, as given in the case shown above, then the padded zeros will ensure that each mask element has a corresponding image pixel. This leaves us with another question: How many rows and columns do we pad?
For the above 3×3 mask, there are 2 columns and 2 rows that need to be padded. That is, the number of rows to be padded equals the number of rows in the mask minus 1. The number of columns to be padded equals the number of columns in the mask minus 1. For the 2 rows, there’s one row at the top and another at the bottom of the image. For the 2 columns, one column is placed to the right-most side of the image and another to the left-most side.
Applying convolution to our project
Now we’re ready to apply the idea to our project. Initially, the convolution in its current form isn’t able to fill an image with a pattern. The reason is that when the mask is convolved by the image, it moves a single row or column at a time. As a result, the single row or column in the image will be convolved more than one time.
For our project, we need to place the small image once per image region. Thus, the small image won’t move by only one row or column, but rather by the number of rows and columns equal to the width and height of the small image used for creating the pattern.
The figure below shows that the small image is placed over the top-left region of the large image.
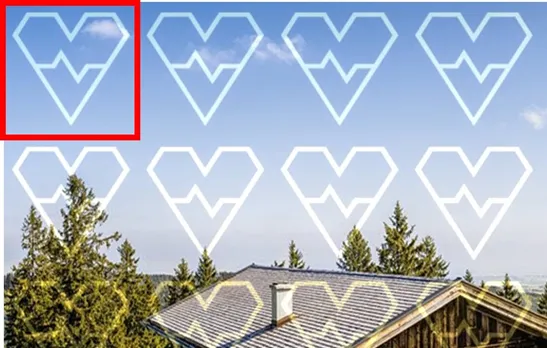
After placing the small image there, the next step is to move to the next region where the small image will be placed again, according to the next figure. Note that there’s no overlap between the current region and the previous region. By how many pixels have the mask moved? The number of pixels is equal to the width of the mask.
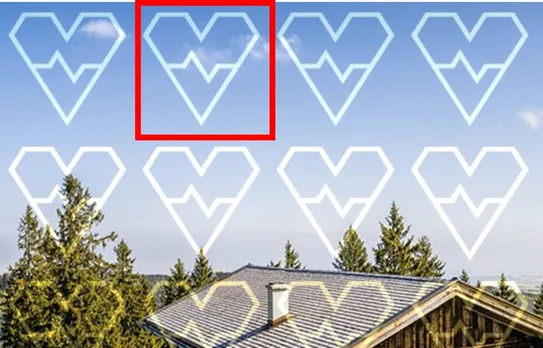
After being placed in the second region, the small image is right-shifted and then gets placed. After reaching the right-most column in image, the mask is then shifted down, and the process repeats itself.
Now that we understand the main idea and technique of this project, the next step is to apply it in OpenCV.
Before going ahead with the rest of the tutorial, just make sure Android Studio is linked properly with OpenCV. For a detailed guide, you can check out a previous tutorial:
Creating Patterns
The first thing we need to do is create an empty image where the pattern will be placed, according to the line below:
After that, the small image (template) will be read in the template_orig variable according to the code below. The variable ts refers to the template size. It’s assumed that the template width is equal to its height, and thus it doesn’t matter whether the value for this variable is assigned from the width or height of the template.
Because padding is required for the image in order to work with its edges, rows and columns are padded. The line below creates a Mat array for holding the rows of zeros to be padded.
As previously discussed, the number of rows and columns should equal the number of rows and columns in the mask minus 1. According to the line below, the number of zero rows to be created is equal to the number of rows in the template minus 1 (ts-1) but divided by 2. Why division by 2? Remember that half of the rows to be padded will be added at the top, and the other half will be added at the bottom of the image. Thus, the rows Mat created below holds this half.
After preparing the rows to be padded, the next step is to pad them to the image, according to the code below. It starts by creating a Java list that holds the 2 Mat arrays to be concatenated together. In the asList() method, the img_orig Mat representing the image is passed before the rows Mat. This means the rows will be padded at the end of the image.
After that, a new Mat named new_img_orig is created, which holds the padding result. For padding the rows to the image, the hconcat() method is used. Note that it was used previously for horizontal stitching, which is the effect discussed in the first part of this series.
After padding the rows at the bottom of the image, the next step is to pad other rows but at the top, according to the code below. In this case, the rows Mat is passed to the asList() method as the first argument.
For working with the columns, the cols Mat is created, according to the next line, which holds the cols to be padded to one side of the image.
After that, the columns are padded to the right side of the image, according to the following code. They are padded to the right because the cols Mat is passed to the asList() method as the second argument. For padding the image with the columns, the vconcat() method is used.
For working with padding the columns to the left side of the image, the next 2 lines are used:
The code listed below combines the individual codes listed previously:
Mat img_orig = Mat.zeros(new Size(1000, 1000), 16);

Mat template_orig = Imgcodecs.imread("template.jpg");
int ts = template_orig.width();

System.out.println("Original Image Size : " + img_orig.rows() + " " + img_orig.cols());
System.out.println("Number of Rows & Columns to be Appended Image Size : " + (ts-1));

// Appending rows
Mat rows = Mat.zeros(new Size((ts - 1) / 2.0, img_orig.rows()), img_orig.type());

List<Mat> src = Arrays.asList(img_orig, rows);
Mat new_img_orig = new Mat();
Core.hconcat(src, new_img_orig);

src = Arrays.asList(rows, new_img_orig);
Core.hconcat(src, new_img_orig);

// Appending Columns
Mat cols = Mat.zeros(new Size(new_img_orig.cols(), (ts - 1)/2.0), new_img_orig.type());

src = Arrays.asList(new_img_orig, cols);
Core.vconcat(src, new_img_orig);

src = Arrays.asList(cols, new_img_orig);
Core.vconcat(src, new_img_orig);

System.out.println("Appended Image Size : " + new_img_orig.rows() + " " + new_img_orig.cols());
The outputs of the prints statements are as follows. The size of the image in which the pattern will be created if 1000×1000. Because the size of the template used is 127×127, then the number of rows/columns to be padded is 126. As a result, the size of the image after padding is 1126×1126.
After preparing the image with the padded zeros, the next step is to place the template over the image, similar to how the convolution works. For such a purpose, 2 for loops are used to loop through the rows and columns of the image, according to the code snippet below.
The outer loop goes through the rows. It’s very important to note how the range for the loop works. The loops starts from a value equal to ((ts — 1) / 2.0). Because ts is equal to 127, then this value is equal to 63. This allows the template to be centered on the pixels in the first column in the image.
The outer loop ends at a value equal to img_orig.height() + ((ts — 1) / 2.0), which indicates that the loop stops 63 rows before the end of the padded image. This makes room for working with the right-most column of the original image.
To avoid shifting the template by a single row, the loop variable is incremented by a value equal to the template size (ts).
What happens for the outer loop is repeated for the inner loop, but uses the width for calculating the end of the loop.
for (int r = (int) ((ts - 1) / 2.0); r < img_orig.height() + (int) ((ts - 1) / 2.0); r += ts) {
    for (int c = (int) ((ts - 1) / 2.0); c < img_orig.width() + (int) ((ts - 1) / 2.0); c += ts) {
        int x = c - (int) ((ts - 1) / 2.0);
        int y = r - (int) ((ts - 1) / 2.0);
        int width = ts;
        int height = ts;

        template_orig.copyTo(new_img_orig.rowRange(y, y + height).colRange(x, x + width));
    }
}
Inside the loops, the upper-left corner at which the template will be placed is stored into the x and y integer variables. The template starts from such a point and extends to cover the width and height defined in the width and height variables. These variables have the same value because the template has an equal width and height.
By preparing the 4 variables x, y, width, and height, we have successfully defined the region in which the template will be placed. In order to place the template inside the image, the copyTo() method is used. It’s called by the template Mat template_orig.
Inside this method, the range of the rows and columns of the region are specified. For specifying the row range (that is, the first row and last row), the rowRange() method is used. It accepts 2 values, where the first one represents the first row index, and the second one represents the last row index. The colRange() method is used for specifying the range of the columns. By calling the copyTo() method, the template will be copied to the region specified by the ranges.
After the 2 for loops end, the padded image will be filled by the template. But note that the result is currently saved in a padded image of size 1126×1126, not the size specified while creating the image, which is 1000×1000. For such a reason, the image is cropped back to the 1000×1000 size according to the next lines. The Rect() class constructor specifies the region of the image to be clipped, and then the region is returned from the padded image new_img_orig using the Mat() class constructor.
For collecting all the code discussed previously, there is a method named createPattern(), as shown below. It accepts the image and the template and returns the result after filling the image with the template.
Mat createPattern(Mat img_orig, Mat template_orig) {
    int ts = template_orig.width();

    System.out.println("Original Image Size : " + img_orig.rows() + " " + img_orig.cols());
    System.out.println("Number of Rows & Columns to be Appended Image Size : " + (ts - 1));

    // Appending rows
    Mat rows = Mat.zeros(new Size((ts - 1) / 2.0, img_orig.rows()), img_orig.type());

    List<Mat> src = Arrays.asList(img_orig, rows);
    Mat new_img_orig = new Mat();
    Core.hconcat(src, new_img_orig);

    src = Arrays.asList(rows, new_img_orig);
    Core.hconcat(src, new_img_orig);

    // Appending Columns
    Mat cols = Mat.zeros(new Size(new_img_orig.cols(), (ts - 1) / 2.0), new_img_orig.type());

    src = Arrays.asList(new_img_orig, cols);
    Core.vconcat(src, new_img_orig);

    src = Arrays.asList(cols, new_img_orig);
    Core.vconcat(src, new_img_orig);

    System.out.println("Appended Image Size : " + new_img_orig.rows() + " " + new_img_orig.cols());

    for (int r = (int) ((ts - 1) / 2.0); r < img_orig.height() + (int) ((ts - 1) / 2.0); r += ts) {
        for (int c = (int) ((ts - 1) / 2.0); c < img_orig.width() + (int) ((ts - 1) / 2.0); c += ts) {
            int x = c - (int) ((ts - 1) / 2.0);
            int y = r - (int) ((ts - 1) / 2.0);
            int width = ts;
            int height = ts;

            template_orig.copyTo(new_img_orig.rowRange(y, y + height).colRange(x, x + width));
        }
    }

    Rect roi = new Rect(0, 0, img_orig.width(), img_orig.height());
    Mat result = new Mat(new_img_orig, roi);

    return result;
}
The next lines prepare the image and the template and then call the createPattern() method and save its result.
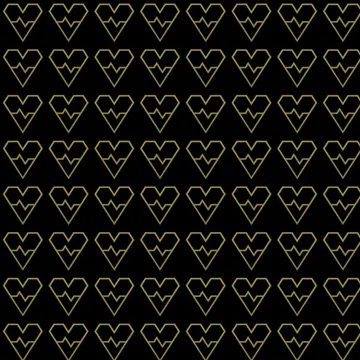
The result of calling this method is shown below. The 1000×1000 zeros Mat is filled by the template.
Adding a pattern to an image
The previous implementation fills an empty image with a pattern created by a template image. We can extend this implementation to fill an already existing image with a pattern. This effect is required to help preserve the copyrights of the content—for example, if you want to add a preview of an image on the web after adding your logo over it as a pattern.
The createPattern() method is slightly changed, as given below. It’s now named createImagePattern() and accepts 3 arguments. The first 2 arguments represent the image and the template. The third argument specifies the opacity of the pattern. This argument is multiplied by the template using the Core.multiply() method. If the opacity is set to 0, then the template won’t appear at all, as its elements are multiplied by zero. The higher the value for this argument, the clearer the template.
The result of the multiplication is then added to the current region available in the cropped variable using the Core.add() method. The result of the addition between the image region and the template is then added back to the padded image new_img_orig.
Mat createImagePattern(Mat img_orig, Mat template_orig, double opacity) {
    int ts = template_orig.width();

    System.out.println("Original Image Size : " + img_orig.rows() + " " + img_orig.cols());
    System.out.println("Number of Rows & Columns to be Appended Image Size : " + (ts - 1));

    // Appending rows
    Mat rows = Mat.zeros(new Size((ts - 1) / 2.0, img_orig.rows()), img_orig.type());

    List<Mat> src = Arrays.asList(img_orig, rows);
    Mat new_img_orig = new Mat();
    Core.hconcat(src, new_img_orig);

    src = Arrays.asList(rows, new_img_orig);
    Core.hconcat(src, new_img_orig);

    // Appending Columns
    Mat cols = Mat.zeros(new Size(new_img_orig.cols(), (ts - 1) / 2.0), new_img_orig.type());
    src = Arrays.asList(new_img_orig, cols);
    Core.vconcat(src, new_img_orig);

    src = Arrays.asList(cols, new_img_orig);
    Core.vconcat(src, new_img_orig);

    System.out.println("Appended Image Size : " + new_img_orig.rows() + " " + new_img_orig.cols());

    for (int r = (int) ((ts - 1) / 2.0); r < img_orig.height() + (int) ((ts - 1) / 2.0); r += ts) {
        for (int c = (int) ((ts - 1) / 2.0); c < img_orig.width() + (int) ((ts - 1) / 2.0); c += ts) {
            int x = c - (int) ((ts - 1) / 2.0);
            int y = r - (int) ((ts - 1) / 2.0);
            int width = ts;
            int height = ts;

            Rect roi = new Rect(x, y, width, height);
            Mat cropped = new Mat(new_img_orig, roi);

            Mat template_orig_new = new Mat();

            Core.multiply(template_orig, new Scalar(opacity, opacity, opacity), template_orig_new);

            Core.add(cropped, template_orig_new, cropped);

            cropped.copyTo(new_img_orig.rowRange(y, y + height).colRange(x, x + width));
        }
    }

    Rect roi = new Rect((int) ((ts - 1) / 2.0), (int) ((ts - 1) / 2.0), img_orig.width(), img_orig.height());
    Mat result = new Mat(new_img_orig, roi);

    return result;
}
The code below provides an example of how to create a pattern over the image:
When the opacity is set to 0.8, the template image is clearly visible, as showing in the figure below. Note that using an opacity of 0.8 means that just 20% of the template is lost, while the remaining 80% is kept.

When the value is set to 0.1, the template is less clear because 90% of its colors are lost and just 10% are kept.

The next figure shows the result after using an opacity set to 5. The template is much clearer.

At this time, the implementation of the method used to create the image pattern is complete. Next we need to edit our ongoing Android Studio project to add this new feature.
Editing Android Studio Project
The Activity XML layout is listed below after adding 2 buttons for building the 2 effects discussed in this tutorial.
<?xml version="1.0" encoding="utf-8"?>
<LinearLayout xmlns:android="http://schemas.android.com/apk/res/android"
    xmlns:tools="http://schemas.android.com/tools"
    android:layout_width="match_parent"
    android:layout_height="match_parent"
    android:orientation="vertical"
    tools:context=".MainActivity">

    <GridLayout
        android:layout_width="match_parent"
        android:layout_height="wrap_content"
        android:columnCount="2"
        android:orientation="horizontal">

        <Button
            android:id="@+id/stitchHorizontal"
            android:layout_width="wrap_content"
            android:layout_height="wrap_content"
            android:onClick="stitchHorizontal"
            android:text="Stitch Horizontally" />

        <Button
            android:id="@+id/stitchVertical"
            android:layout_width="wrap_content"
            android:layout_height="wrap_content"
            android:onClick="stitchVectical"
            android:text="Stitch Vertically" />

        <Button
            android:id="@+id/reduceColors"
            android:layout_width="wrap_content"
            android:layout_height="wrap_content"
            android:onClick="reduceImageColors"
            android:text="Reduce Colors" />

        <Button
            android:id="@+id/reduceColorsGray"
            android:layout_width="wrap_content"
            android:layout_height="wrap_content"
            android:onClick="reduceImageColorsGray"
            android:text="Reduce Colors Gray" />

        <Button
            android:id="@+id/medianFilter"
            android:layout_width="wrap_content"
            android:layout_height="wrap_content"
            android:onClick="medianFilter"
            android:text="Median Filter" />

        <Button
            android:id="@+id/adaptiveThreshold"
            android:layout_width="wrap_content"
            android:layout_height="wrap_content"
            android:onClick="adaptiveThreshold"
            android:text="Adaptive Threshold" />

        <Button
            android:id="@+id/cartoon"
            android:layout_width="wrap_content"
            android:layout_height="wrap_content"
            android:onClick="cartoonImage"
            android:text="Cartoon Image" />

        <Button
            android:id="@+id/transparency"
            android:layout_width="wrap_content"
            android:layout_height="wrap_content"
            android:onClick="blendImages"
            android:text="Image Blending" />

        <Button
            android:id="@+id/regionBlending"
            android:layout_width="wrap_content"
            android:layout_height="wrap_content"
            android:onClick="blendRegions"
            android:text="Region Blending" />

        <Button
            android:id="@+id/animatedGIF"
            android:layout_width="wrap_content"
            android:layout_height="wrap_content"
            android:onClick="createAnimatedGIF"
            android:text="GIF" />

        <Button
            android:layout_width="wrap_content"
            android:layout_height="wrap_content"
            android:onClick="pattern"
            android:text="Pattern" />

        <Button
            android:layout_width="wrap_content"
            android:layout_height="wrap_content"
            android:onClick="imagePattern"
            android:text="Image Pattern" />

    </GridLayout>

    <GridLayout
        android:layout_width="match_parent"
        android:layout_height="wrap_content"
        android:columnCount="2"
        android:rowCount="1"
        android:orientation="horizontal">

        <Button
            android:id="@+id/selectImage"
            android:layout_width="wrap_content"
            android:layout_height="wrap_content"
            android:background="#FFCCE5"
            android:onClick="selectImage"
            android:text="Select Image(s)" />

        <Button
            android:id="@+id/saveImage"
            android:layout_width="wrap_content"
            android:layout_height="wrap_content"
            android:background="#FFCCE5"
            android:layout_gravity="center"
            android:onClick="saveImage"
            android:text="Save Image" />
    </GridLayout>

    <ImageView
        android:id="@+id/opencvImg"
        android:layout_width="match_parent"
        android:layout_height="wrap_content" />

</LinearLayout>
The app screen is shown below.
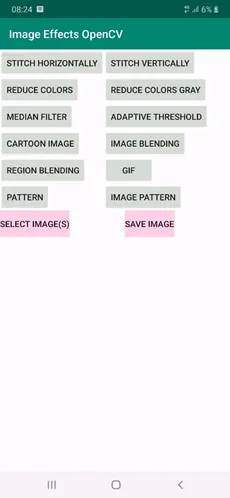
When the first button with text Pattern is clicked, a callback method named pattern() is called. This button is used for building a pattern for the zeros Mat array. When the other button is clicked, a method named imagePattern() is called, which creates a pattern over an existing image.
The activity class is edited to implement these methods. The new class implementation is listed below. The method resizes the template to 127×127.
Inside the pattern() method, the template image is prepared, and then the createPattern() method, which does the actual work, is called.
Similarly, the imagePattern() callback method prepares the image and the template and then calls the createImagePattern() method, which does the actual work.
package com.example.imageeffectsopencv;
import android.content.ClipData;
import android.content.ContentUris;
import android.content.Context;
import android.content.Intent;
import android.database.Cursor;
import android.graphics.Bitmap;
import android.graphics.BitmapFactory;
import android.graphics.drawable.AnimationDrawable;
import android.graphics.drawable.BitmapDrawable;
import android.media.MediaScannerConnection;
import android.net.Uri;
import android.os.Build;
import android.os.Bundle;
import android.os.Environment;
import android.provider.DocumentsContract;
import android.provider.MediaStore;
import android.support.v7.app.AppCompatActivity;
import android.util.Log;
import android.view.View;
import android.widget.EditText;
import android.widget.ImageView;
import android.widget.Toast;
import com.example.imageeffectsopencv.R;
import org.opencv.android.OpenCVLoader;
import org.opencv.android.Utils;
import org.opencv.core.Core;
import org.opencv.core.Mat;
import org.opencv.core.Rect;
import org.opencv.core.Scalar;
import org.opencv.core.Size;
import org.opencv.imgcodecs.Imgcodecs;
import org.opencv.imgproc.Imgproc;
import java.io.ByteArrayOutputStream;
import java.io.File;
import java.io.FileOutputStream;
import java.lang.reflect.Array;
import java.text.SimpleDateFormat;
import java.util.ArrayList;
import java.util.Arrays;
import java.util.Date;
import java.util.List;
import java.util.Locale;
import static org.opencv.core.Core.LUT;
import static org.opencv.core.CvType.CV_8UC1;
public class MainActivity extends AppCompatActivity {
final int SELECT_MULTIPLE_IMAGES = 1;
ArrayList<String> selectedImagesPaths; // Paths of the image(s) selected by the user.
boolean imagesSelected = false; // Whether the user selected at least an image or not.
Bitmap resultBitmap; // Result of the last operation.
String resultName = null; // Filename to save the result of the last operation.
boolean GIFLastEffect = false;
ByteArrayOutputStream GIFImageByteArray;
@Override
protected void onCreate(Bundle savedInstanceState) {
super.onCreate(savedInstanceState);
setContentView(R.layout.activity_main);
OpenCVLoader.initDebug();
}
public void pattern(View view){
GIFLastEffect = false;
Bitmap original = returnSingleImageSelected(selectedImagesPaths);
if (original == null) {
return;
}
Mat template = new Mat();
Utils.bitmapToMat(original, template);
Imgproc.resize(template, template, new Size(127, 127));
Mat result = createPattern(2000, 2000, template);
resultBitmap = Bitmap.createBitmap(result.cols(), result.rows(), Bitmap.Config.ARGB_8888);
Utils.matToBitmap(result, resultBitmap);
resultName = "pattern";
ImageView imageView = findViewById(R.id.opencvImg);
imageView.setImageBitmap(resultBitmap);
}
public void imagePattern(View view){
GIFLastEffect = false;
List<Mat> imagesMatList = returnMultipleSelectedImages(selectedImagesPaths, 2, false);
if (imagesMatList == null) {
return;
}
Mat template = imagesMatList.get(1);
Imgproc.resize(template, template, new Size(127, 127));
Mat result = createImagePattern(imagesMatList.get(0), template, 0.5);
resultBitmap = Bitmap.createBitmap(result.cols(), result.rows(), Bitmap.Config.ARGB_8888);
Utils.matToBitmap(result, resultBitmap);
resultName = "image_pattern";
ImageView imageView = findViewById(R.id.opencvImg);
imageView.setImageBitmap(resultBitmap);
}
Mat createPattern(int imageWidth, int imageHeight, Mat template_orig) {
Mat img_orig = Mat.zeros(new Size(imageWidth, imageHeight), template_orig.type());
int ts = template_orig.width();
// Appending rows
Mat rows = Mat.zeros(new Size((ts - 1) / 2.0, img_orig.rows()), img_orig.type());
List<Mat> src = Arrays.asList(img_orig, rows);
Mat new_img_orig = new Mat();
Core.hconcat(src, new_img_orig);
src = Arrays.asList(rows, new_img_orig);
Core.hconcat(src, new_img_orig);
// Appending Columns
Mat cols = Mat.zeros(new Size(new_img_orig.cols(), (ts - 1) / 2.0), new_img_orig.type());
src = Arrays.asList(new_img_orig, cols);
Core.vconcat(src, new_img_orig);
src = Arrays.asList(cols, new_img_orig);
Core.vconcat(src, new_img_orig);
for (int r = (int) ((ts - 1) / 2.0); r < img_orig.height() + (int) ((ts - 1) / 2.0); r += ts) {
for (int c = (int) ((ts - 1) / 2.0); c < img_orig.width() + (int) ((ts - 1) / 2.0); c += ts) {
int x = c - (int) ((ts - 1) / 2.0);
int y = r - (int) ((ts - 1) / 2.0);
int width = ts;
int height = ts;
template_orig.copyTo(new_img_orig.rowRange(y, y + height).colRange(x, x + width));
}
}
Rect roi = new Rect(0, 0, img_orig.width(), img_orig.height());
Mat result = new Mat(new_img_orig, roi);
return result;
}
Mat createImagePattern(Mat img_orig, Mat template_orig, double opacity) {
int ts = template_orig.width();
// Appending rows
Mat rows = Mat.zeros(new Size((ts - 1) / 2.0, img_orig.rows()), img_orig.type());
List<Mat> src = Arrays.asList(img_orig, rows);
Mat new_img_orig = new Mat();
Core.hconcat(src, new_img_orig);
src = Arrays.asList(rows, new_img_orig);
Core.hconcat(src, new_img_orig);
// Appending Columns
Mat cols = Mat.zeros(new Size(new_img_orig.cols(), (ts - 1) / 2.0), new_img_orig.type());
src = Arrays.asList(new_img_orig, cols);
Core.vconcat(src, new_img_orig);
src = Arrays.asList(cols, new_img_orig);
Core.vconcat(src, new_img_orig);
for (int r = (int) ((ts - 1) / 2.0); r < img_orig.height() + (int) ((ts - 1) / 2.0); r += ts) {
for (int c = (int) ((ts - 1) / 2.0); c < img_orig.width() + (int) ((ts - 1) / 2.0); c += ts) {
int x = c - (int) ((ts - 1) / 2.0);
int y = r - (int) ((ts - 1) / 2.0);
int width = ts;
int height = ts;
Rect roi = new Rect(x, y, width, height);
Mat cropped = new Mat(new_img_orig, roi);
Mat template_orig_new = new Mat();
Core.multiply(template_orig, new Scalar(opacity, opacity, opacity), template_orig_new);
Core.add(cropped, template_orig_new, cropped);
cropped.copyTo(new_img_orig.rowRange(y, y + height).colRange(x, x + width));
}
}
Rect roi = new Rect((int) ((ts - 1) / 2.0), (int) ((ts - 1) / 2.0), img_orig.width(), img_orig.height());
Mat result = new Mat(new_img_orig, roi);
return result;
}
public void createAnimatedGIF(View view) {
List<Mat> imagesMatList = returnMultipleSelectedImages(selectedImagesPaths, 2, false);
if (imagesMatList == null) {
return;
}
GIFImageByteArray = createGIF(imagesMatList, 150);
resultName = "animated_GIF";
GIFLastEffect = true;
}
ByteArrayOutputStream createGIF(List<Mat> imagesMatList, int delay) {
ByteArrayOutputStream imageByteArray = new ByteArrayOutputStream();
// Implementation of the AnimatedGifEncoder.java file: https://gist.githubusercontent.com/wasabeef/8785346/raw/53a15d99062a382690275ef5666174139b32edb5/AnimatedGifEncoder.java
AnimatedGifEncoder encoder = new AnimatedGifEncoder();
encoder.start(imageByteArray);
AnimationDrawable animatedGIF = new AnimationDrawable();
for (Mat img : imagesMatList) {
Bitmap imgBitmap = Bitmap.createBitmap(img.cols(), img.rows(), Bitmap.Config.ARGB_8888);
Utils.matToBitmap(img, imgBitmap);
encoder.setDelay(delay);
encoder.addFrame(imgBitmap);
animatedGIF.addFrame(new BitmapDrawable(getResources(), imgBitmap), delay);
}
encoder.finish();
ImageView imageView = findViewById(R.id.opencvImg);
imageView.setBackground(animatedGIF); // attach animation to a view
animatedGIF.run();
return imageByteArray;
}
void saveGif(ByteArrayOutputStream imageByteArray, String fileNameOpening) {
SimpleDateFormat formatter = new SimpleDateFormat("yyyy_MM_dd_HH_mm_ss", Locale.US);
Date now = new Date();
String fileName = fileNameOpening + "_" + formatter.format(now) + ".gif";
FileOutputStream outStream;
try {
// Get a public path on the device storage for saving the file. Note that the word external does not mean the file is saved in the SD card. It is still saved in the internal storage.
File path = Environment.getExternalStoragePublicDirectory(Environment.DIRECTORY_PICTURES);
// Creates a directory for saving the image.
File saveDir = new File(path + "/HeartBeat/");
// If the directory is not created, create it.
if (!saveDir.exists())
saveDir.mkdirs();
// Create the image file within the directory.
File fileDir = new File(saveDir, fileName); // Creates the file.
// Write into the image file by the BitMap content.
outStream = new FileOutputStream(fileDir);
outStream.write(imageByteArray.toByteArray());
MediaScannerConnection.scanFile(this.getApplicationContext(),
new String[]{fileDir.toString()}, null,
new MediaScannerConnection.OnScanCompletedListener() {
public void onScanCompleted(String path, Uri uri) {
}
});
// Close the output stream.
outStream.close();
} catch (Exception e) {
e.printStackTrace();
}
}
public void saveImage(View v) {
if (resultName == null) {
Toast.makeText(getApplicationContext(), "Please Apply an Operation to Save its Result.", Toast.LENGTH_LONG).show();
return;
}
if (GIFLastEffect == true) {
saveGif(GIFImageByteArray, "animated_GIF");
} else {
saveBitmap(resultBitmap, resultName);
}
Toast.makeText(getApplicationContext(), "Image Saved Successfully.", Toast.LENGTH_LONG).show();
}
public void selectImage(View v) {
Intent intent = new Intent();
intent.setType("*/*");
intent.putExtra(Intent.EXTRA_ALLOW_MULTIPLE, true);
intent.setAction(Intent.ACTION_GET_CONTENT);
startActivityForResult(Intent.createChooser(intent, "Select Picture"), SELECT_MULTIPLE_IMAGES);
}
@Override
protected void onActivityResult(int requestCode, int resultCode, Intent data) {
try {
if (requestCode == SELECT_MULTIPLE_IMAGES && resultCode == RESULT_OK && null != data) {
// When a single image is selected.
String currentImagePath;
selectedImagesPaths = new ArrayList<>();
if (data.getData() != null) {
Uri uri = data.getData();
currentImagePath = getPath(getApplicationContext(), uri);
Log.d("ImageDetails", "Single Image URI : " + uri);
Log.d("ImageDetails", "Single Image Path : " + currentImagePath);
selectedImagesPaths.add(currentImagePath);
imagesSelected = true;
} else {
// When multiple images are selected.
// Thanks tp Laith Mihyar for this Stackoverflow answer : https://stackoverflow.com/a/34047251/5426539
if (data.getClipData() != null) {
ClipData clipData = data.getClipData();
for (int i = 0; i < clipData.getItemCount(); i++) {
ClipData.Item item = clipData.getItemAt(i);
Uri uri = item.getUri();
currentImagePath = getPath(getApplicationContext(), uri);
selectedImagesPaths.add(currentImagePath);
Log.d("ImageDetails", "Image URI " + i + " = " + uri);
Log.d("ImageDetails", "Image Path " + i + " = " + currentImagePath);
imagesSelected = true;
}
}
}
} else {
Toast.makeText(this, "You haven't Picked any Image.", Toast.LENGTH_LONG).show();
}
Toast.makeText(getApplicationContext(), selectedImagesPaths.size() + " Image(s) Selected.", Toast.LENGTH_LONG).show();
} catch (Exception e) {
Toast.makeText(this, "Something Went Wrong.", Toast.LENGTH_LONG).show();
e.printStackTrace();
}
super.onActivityResult(requestCode, resultCode, data);
}
public void blendRegions(View view) {
GIFLastEffect = false;
List<Mat> imagesMatList = returnMultipleSelectedImages(selectedImagesPaths, 3, false);
if (imagesMatList == null) {
return;
}
Mat img1Mask = imagesMatList.get(imagesMatList.size() - 1);
Imgproc.cvtColor(img1Mask, img1Mask, Imgproc.COLOR_BGRA2BGR);
Imgproc.cvtColor(img1Mask, img1Mask, Imgproc.COLOR_BGR2GRAY);
Imgproc.threshold(img1Mask, img1Mask, 200, 255.0, Imgproc.THRESH_BINARY);
Mat result = regionBlending(imagesMatList.get(0), imagesMatList.get(1), img1Mask);
resultBitmap = Bitmap.createBitmap(result.cols(), result.rows(), Bitmap.Config.ARGB_8888);
Utils.matToBitmap(result, resultBitmap);
resultName = "region_blending";
ImageView imageView = findViewById(R.id.opencvImg);
imageView.setImageBitmap(resultBitmap);
}
public void blendImages(View view) {
GIFLastEffect = false;
List<Mat> imagesMatList = returnMultipleSelectedImages(selectedImagesPaths, 2, false);
if (imagesMatList == null) {
return;
}
Mat result = imageBlending(imagesMatList.get(0), imagesMatList.get(1), 128.0);
resultBitmap = Bitmap.createBitmap(result.cols(), result.rows(), Bitmap.Config.ARGB_8888);
Utils.matToBitmap(result, resultBitmap);
resultName = "image_blending";
ImageView imageView = findViewById(R.id.opencvImg);
imageView.setImageBitmap(resultBitmap);
}
public void cartoonImage(View view) {
GIFLastEffect = false;
Bitmap original = returnSingleImageSelected(selectedImagesPaths);
if (original == null) {
return;
}
Mat img1 = new Mat();
Utils.bitmapToMat(original, img1);
Imgproc.cvtColor(img1, img1, Imgproc.COLOR_BGRA2BGR);
Mat result = cartoon(img1, 80, 15, 10);
resultBitmap = Bitmap.createBitmap(result.cols(), result.rows(), Bitmap.Config.ARGB_8888);
Utils.matToBitmap(result, resultBitmap);
resultName = "cartoon";
ImageView imageView = findViewById(R.id.opencvImg);
imageView.setImageBitmap(resultBitmap);
}
public void reduceImageColors(View view) {
GIFLastEffect = false;
Bitmap original = returnSingleImageSelected(selectedImagesPaths);
if (original == null) {
return;
}
Mat img1 = new Mat();
Utils.bitmapToMat(original, img1);
Mat result = reduceColors(img1, 80, 15, 10);
resultBitmap = Bitmap.createBitmap(result.cols(), result.rows(), Bitmap.Config.ARGB_8888);
Utils.matToBitmap(result, resultBitmap);
resultName = "reduce_colors";
ImageView imageView = findViewById(R.id.opencvImg);
imageView.setImageBitmap(resultBitmap);
}
Bitmap returnSingleImageSelected(ArrayList<String> selectedImages) {
if (imagesSelected == true) {
return BitmapFactory.decodeFile(selectedImagesPaths.get(0));
} else {
Toast.makeText(getApplicationContext(), "No Image Selected. You have to Select an Image.", Toast.LENGTH_LONG).show();
return null;
}
}
public void reduceImageColorsGray(View view) {
GIFLastEffect = false;
Bitmap original = returnSingleImageSelected(selectedImagesPaths);
if (original == null) {
return;
}
Mat img1 = new Mat();
Utils.bitmapToMat(original, img1);
Imgproc.cvtColor(img1, img1, Imgproc.COLOR_BGR2GRAY);
Mat result = reduceColorsGray(img1, 5);
resultBitmap = Bitmap.createBitmap(result.cols(), result.rows(), Bitmap.Config.ARGB_8888);
Utils.matToBitmap(result, resultBitmap);
resultName = "reduce_colors_gray";
ImageView imageView = findViewById(R.id.opencvImg);
imageView.setImageBitmap(resultBitmap);
}
public void medianFilter(View view) {
GIFLastEffect = false;
Bitmap original = returnSingleImageSelected(selectedImagesPaths);
if (original == null) {
return;
}
Mat img1 = new Mat();
Utils.bitmapToMat(original, img1);
Mat medianFilter = new Mat();
Imgproc.cvtColor(img1, medianFilter, Imgproc.COLOR_BGR2GRAY);
Imgproc.medianBlur(medianFilter, medianFilter, 15);
resultBitmap = Bitmap.createBitmap(medianFilter.cols(), medianFilter.rows(), Bitmap.Config.ARGB_8888);
Utils.matToBitmap(medianFilter, resultBitmap);
resultName = "median_filter";
ImageView imageView = findViewById(R.id.opencvImg);
imageView.setImageBitmap(resultBitmap);
}
public void adaptiveThreshold(View view) {
GIFLastEffect = false;
Bitmap original = returnSingleImageSelected(selectedImagesPaths);
if (original == null) {
return;
}
Mat adaptiveTh = new Mat();
Utils.bitmapToMat(original, adaptiveTh);
Imgproc.cvtColor(adaptiveTh, adaptiveTh, Imgproc.COLOR_BGR2GRAY);
Imgproc.medianBlur(adaptiveTh, adaptiveTh, 15);
Imgproc.adaptiveThreshold(adaptiveTh, adaptiveTh, 255, Imgproc.ADAPTIVE_THRESH_MEAN_C, Imgproc.THRESH_BINARY, 9, 2);
resultBitmap = Bitmap.createBitmap(adaptiveTh.cols(), adaptiveTh.rows(), Bitmap.Config.ARGB_8888);
Utils.matToBitmap(adaptiveTh, resultBitmap);
resultName = "adaptive_threshold";
ImageView imageView = findViewById(R.id.opencvImg);
imageView.setImageBitmap(resultBitmap);
}
List<Mat> returnMultipleSelectedImages(ArrayList<String> selectedImages, int numImagesRequired, boolean moreAccepted) {
if (selectedImages == null) {
Toast.makeText(getApplicationContext(), "No Images Selected. You have to Select More than 1 Image.", Toast.LENGTH_LONG).show();
return null;
} else if (selectedImages.size() == 0 && moreAccepted == true) {
Toast.makeText(getApplicationContext(), "No Images Selected. You have to Select at Least " + numImagesRequired + " Images.", Toast.LENGTH_LONG).show();
return null;
} else if (selectedImages.size() == 0 && moreAccepted == false) {
Toast.makeText(getApplicationContext(), "No Images Selected. You have to Select Exactly " + numImagesRequired + " Images.", Toast.LENGTH_LONG).show();
return null;
} else if (selectedImages.size() < numImagesRequired && moreAccepted == true) {
Toast.makeText(getApplicationContext(), "Sorry. You have to Select at Least " + numImagesRequired + " Images.", Toast.LENGTH_LONG).show();
return null;
} else if (selectedImages.size() < numImagesRequired && moreAccepted == false) {
Toast.makeText(getApplicationContext(), "Sorry. You have to Select Exactly " + numImagesRequired + " Images.", Toast.LENGTH_LONG).show();
return null;
}
List<Mat> imagesMatList = new ArrayList<>();
Mat mat = Imgcodecs.imread(selectedImages.get(0));
Imgproc.cvtColor(mat, mat, Imgproc.COLOR_BGR2RGB);
imagesMatList.add(mat);
for (int i = 1; i < selectedImages.size(); i++) {
mat = Imgcodecs.imread(selectedImages.get(i));
Imgproc.cvtColor(mat, mat, Imgproc.COLOR_BGR2RGB);
if (imagesMatList.get(0).size().equals(mat)) {
imagesMatList.add(mat);
} else {
Imgproc.resize(mat, mat, imagesMatList.get(0).size());
imagesMatList.add(mat);
}
}
return imagesMatList;
}
public void stitchVectical(View view) {
GIFLastEffect = false;
List<Mat> imagesMatList = returnMultipleSelectedImages(selectedImagesPaths, 2, true);
if (imagesMatList == null) {
return;
}
resultBitmap = stitchImagesVectical(imagesMatList);
resultName = "stitch_vectical";
ImageView imageView = findViewById(R.id.opencvImg);
imageView.setImageBitmap(resultBitmap);
}
public void stitchHorizontal(View view) {
GIFLastEffect = false;
List<Mat> imagesMatList = returnMultipleSelectedImages(selectedImagesPaths, 2, true);
if (imagesMatList == null) {
return;
}
resultBitmap = stitchImagesHorizontal(imagesMatList);
resultName = "stitch_horizontal";
ImageView imageView = findViewById(R.id.opencvImg);
imageView.setImageBitmap(resultBitmap);
}
Mat regionBlending(Mat img, Mat img2, Mat mask) {
Mat result = img2;
for (int row = 0; row < img.rows(); row++) {
for (int col = 0; col < img.cols(); col++) {
double[] img1Pixel = img.get(row, col);
double[] binaryPixel = mask.get(row, col);
if (binaryPixel[0] == 255.0) {
result.put(row, col, img1Pixel);
}
}
}
return result;
}
Mat imageBlending(Mat img, Mat img2, double alpha) {
Mat result = img;
if (alpha == 0.0) {
return img2;
} else if (alpha == 255.0) {
return img;
}
for (int row = 0; row < img.rows(); row++) {
for (int col = 0; col < img.cols(); col++) {
double[] pixel1 = img.get(row, col);
double[] pixel2 = img2.get(row, col);
double fraction = alpha / 255.0;
pixel1[0] = pixel1[0] * fraction + pixel2[0] * (1.0 - fraction);
pixel1[1] = pixel1[1] * fraction + pixel2[1] * (1.0 - fraction);
pixel1[2] = pixel1[2] * fraction + pixel2[2] * (1.0 - fraction);
result.put(row, col, pixel1);
}
}
return result;
}
Mat cartoon(Mat img, int numRed, int numGreen, int numBlue) {
Mat reducedColorImage = reduceColors(img, numRed, numGreen, numBlue);
Mat result = new Mat();
Imgproc.cvtColor(img, result, Imgproc.COLOR_BGR2GRAY);
Imgproc.medianBlur(result, result, 15);
Imgproc.adaptiveThreshold(result, result, 255, Imgproc.ADAPTIVE_THRESH_MEAN_C, Imgproc.THRESH_BINARY, 15, 2);
Imgproc.cvtColor(result, result, Imgproc.COLOR_GRAY2BGR);
Log.d("PPP", result.height() + " " + result.width() + " " + reducedColorImage.type() + " " + result.channels());
Log.d("PPP", reducedColorImage.height() + " " + reducedColorImage.width() + " " + reducedColorImage.type() + " " + reducedColorImage.channels());
Core.bitwise_and(reducedColorImage, result, result);
return result;
}
Mat reduceColors(Mat img, int numRed, int numGreen, int numBlue) {
Mat redLUT = createLUT(numRed);
Mat greenLUT = createLUT(numGreen);
Mat blueLUT = createLUT(numBlue);
List<Mat> BGR = new ArrayList<>(3);
Core.split(img, BGR); // splits the image into its channels in the List of Mat arrays.
LUT(BGR.get(0), blueLUT, BGR.get(0));
LUT(BGR.get(1), greenLUT, BGR.get(1));
LUT(BGR.get(2), redLUT, BGR.get(2));
Core.merge(BGR, img);
return img;
}
Mat reduceColorsGray(Mat img, int numColors) {
Mat LUT = createLUT(numColors);
LUT(img, LUT, img);
return img;
}
Mat createLUT(int numColors) {
// When numColors=1 the LUT will only have 1 color which is black.
if (numColors < 0 || numColors > 256) {
System.out.println("Invalid Number of Colors. It must be between 0 and 256 inclusive.");
return null;
}
Mat lookupTable = Mat.zeros(new Size(1, 256), CV_8UC1);
int startIdx = 0;
for (int x = 0; x < 256; x += 256.0 / numColors) {
lookupTable.put(x, 0, x);
for (int y = startIdx; y < x; y++) {
if (lookupTable.get(y, 0)[0] == 0) {
lookupTable.put(y, 0, lookupTable.get(x, 0));
}
}
startIdx = x;
}
return lookupTable;
}
Bitmap stitchImagesVectical(List<Mat> src) {
Mat dst = new Mat();
Core.vconcat(src, dst); //Core.hconcat(src, dst);
Bitmap imgBitmap = Bitmap.createBitmap(dst.cols(), dst.rows(), Bitmap.Config.ARGB_8888);
Utils.matToBitmap(dst, imgBitmap);
return imgBitmap;
}
Bitmap stitchImagesHorizontal(List<Mat> src) {
Mat dst = new Mat();
Core.hconcat(src, dst); //Core.vconcat(src, dst);
Bitmap imgBitmap = Bitmap.createBitmap(dst.cols(), dst.rows(), Bitmap.Config.ARGB_8888);
Utils.matToBitmap(dst, imgBitmap);
return imgBitmap;
}
void saveBitmap(Bitmap imgBitmap, String fileNameOpening) {
SimpleDateFormat formatter = new SimpleDateFormat("yyyy_MM_dd_HH_mm_ss", Locale.US);
Date now = new Date();
String fileName = fileNameOpening + "_" + formatter.format(now) + ".jpg";
FileOutputStream outStream;
try {
// Get a public path on the device storage for saving the file. Note that the word external does not mean the file is saved in the SD card. It is still saved in the internal storage.
File path = Environment.getExternalStoragePublicDirectory(Environment.DIRECTORY_PICTURES);
// Creates a directory for saving the image.
File saveDir = new File(path + "/HeartBeat/");
// If the directory is not created, create it.
if (!saveDir.exists())
saveDir.mkdirs();
// Create the image file within the directory.
File fileDir = new File(saveDir, fileName); // Creates the file.
// Write into the image file by the BitMap content.
outStream = new FileOutputStream(fileDir);
imgBitmap.compress(Bitmap.CompressFormat.JPEG, 100, outStream);
MediaScannerConnection.scanFile(this.getApplicationContext(),
new String[]{fileDir.toString()}, null,
new MediaScannerConnection.OnScanCompletedListener() {
public void onScanCompleted(String path, Uri uri) {
}
});
// Close the output stream.
outStream.close();
} catch (Exception e) {
e.printStackTrace();
}
}
// Implementation of the getPath() method and all its requirements is taken from the StackOverflow Paul Burke's answer: https://stackoverflow.com/a/20559175/5426539
public static String getPath(final Context context, final Uri uri) {
final boolean isKitKat = Build.VERSION.SDK_INT >= Build.VERSION_CODES.KITKAT;
// DocumentProvider
if (isKitKat && DocumentsContract.isDocumentUri(context, uri)) {
// ExternalStorageProvider
if (isExternalStorageDocument(uri)) {
final String docId = DocumentsContract.getDocumentId(uri);
final String[] split = docId.split(":");
final String type = split[0];
if ("primary".equalsIgnoreCase(type)) {
return Environment.getExternalStorageDirectory() + "/" + split[1];
}
// TODO handle non-primary volumes
}
// DownloadsProvider
else if (isDownloadsDocument(uri)) {
final String id = DocumentsContract.getDocumentId(uri);
final Uri contentUri = ContentUris.withAppendedId(
Uri.parse("content://downloads/public_downloads"), Long.valueOf(id));
return getDataColumn(context, contentUri, null, null);
}
// MediaProvider
else if (isMediaDocument(uri)) {
final String docId = DocumentsContract.getDocumentId(uri);
final String[] split = docId.split(":");
final String type = split[0];
Uri contentUri = null;
if ("image".equals(type)) {
contentUri = MediaStore.Images.Media.EXTERNAL_CONTENT_URI;
} else if ("video".equals(type)) {
contentUri = MediaStore.Video.Media.EXTERNAL_CONTENT_URI;
} else if ("audio".equals(type)) {
contentUri = MediaStore.Audio.Media.EXTERNAL_CONTENT_URI;
}
final String selection = "_id=?";
final String[] selectionArgs = new String[]{
split[1]
};
return getDataColumn(context, contentUri, selection, selectionArgs);
}
}
// MediaStore (and general)
else if ("content".equalsIgnoreCase(uri.getScheme())) {
return getDataColumn(context, uri, null, null);
}
// File
else if ("file".equalsIgnoreCase(uri.getScheme())) {
return uri.getPath();
}
return null;
}
public static String getDataColumn(Context context, Uri uri, String selection,
String[] selectionArgs) {
Cursor cursor = null;
final String column = "_data";
final String[] projection = {
column
};
try {
cursor = context.getContentResolver().query(uri, projection, selection, selectionArgs,
null);
if (cursor != null && cursor.moveToFirst()) {
final int column_index = cursor.getColumnIndexOrThrow(column);
return cursor.getString(column_index);
}
} finally {
if (cursor != null)
cursor.close();
}
return null;
}
public static boolean isExternalStorageDocument(Uri uri) {
return "com.android.externalstorage.documents".equals(uri.getAuthority());
}
public static boolean isDownloadsDocument(Uri uri) {
return "com.android.providers.downloads.documents".equals(uri.getAuthority());
}
public static boolean isMediaDocument(Uri uri) {
return "com.android.providers.media.documents".equals(uri.getAuthority());
}
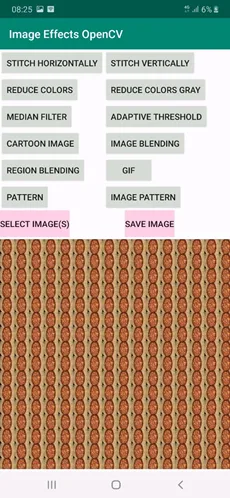
}The next figure shows the result when the Pattern button is clicked after selecting a single image.
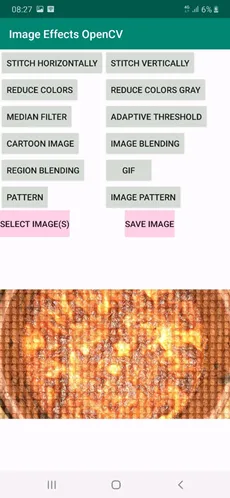
When the same button is clicked after selecting 2 images, the result is as follows.
Conclusion
This tutorial created a new image effect for Android using OpenCV in which a pattern is added to an image. The pattern built in this tutorial covers the entire rectangular area of the image. In a future tutorial, the pattern will be styled in different shapes.

Comments 0 Responses