In order to work with Fritz AI in Flutter, you’ll need some knowledge on how to write native Java/Kotlin code in Flutter. At the moment, there is no native plugin for working with Fritz AI in Flutter, however, since Flutter allows one to write native code, Fritz AI can still be integrated into Flutter. Let’s look at how the image labeling* API from Fritz can be integrated.
*Note: Flutter also allows you to write other kinds of native code (Obj-C, Swift), but for the purposes of this tutorial, we’ll focus on Java
Getting Started
The first step is to jump into your favorite editor and create a project. The default language for Android in Flutter applications is Kotlin. You can change that by declaring Java explicitly on the terminal as you create your project.
flutter create -i objc -a java native_code
Once you do, copy the application ID. This can be found in your app’s build.gradle file. It will look something like this:
applicationId "com.namespace.labs"Next, you’ll need a Fritz AI account. For this project, you’ll want to select the “Pre-Trained Models” option. Just as a note, Fritz AI also has a model building platform (Fritz AI Studio) that allows you to build custom mobile-ready models from end-to-end.
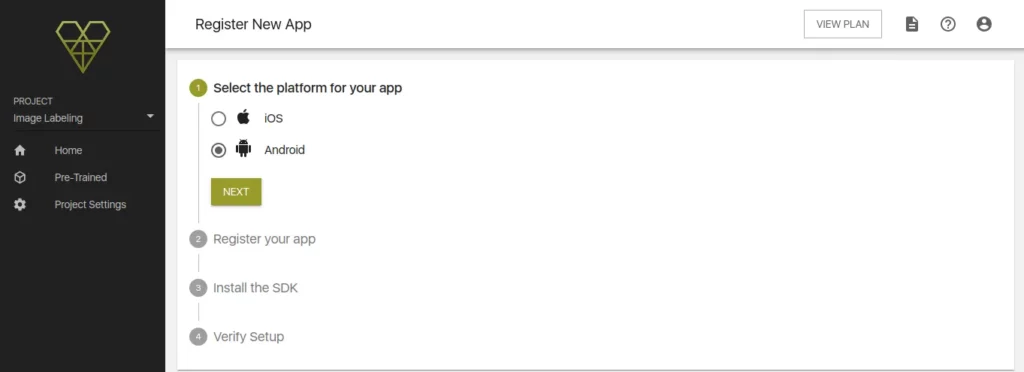
Once you’re logged in, click on follow the four prompts to register your new application. First, select your target platform (here, Android).

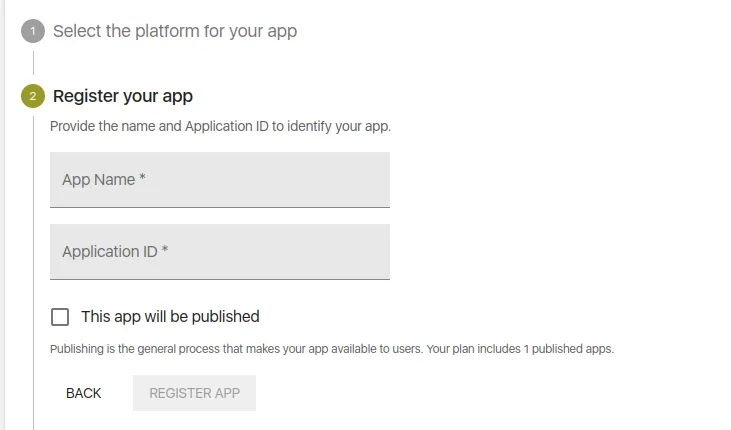
Give your application a name and enter your application ID. Ensure you type the application ID in your app’s build.gradle file. Otherwise, the Fritz SDK won’t be able to communicate with your application.

The next step is to install the Fritz SDK. Jump over to your root-level Gradle file (build.gradle) and include the Maven repository for Fritz AI:
allprojects {
    repositories {
        maven { url "https://fritz.mycloudrepo.io/public/repositories/android" }
    }
}
Next, add the dependency for the SDK to your app-level Gradle file (app/build.gradle). We add the Fritz Core, Image Labelling, and Vision dependencies. Including the Image Labelling model in your application will make your application larger in size. Now that you have changed the Gradle files, ensure that you sync that with your project. That will download all the necessary dependencies.
implementation 'ai.fritz:vision-labeling-model-fast:+'
implementation 'ai.fritz:vision:+'
implementation 'ai.fritz:core:+'
Now, let’s register the FritzCustomModelService in our AndroidManifest:
<manifest xmlns:android="http://schemas.android.com/apk/res/android">
    <!-- For model performance tracking & analytics -->
    <uses-permission android:name="android.permission.INTERNET" />

    <application>
        <!-- Register the custom model service for OTA model updates -->
        <service
            android:name="ai.fritz.core.FritzCustomModelService"
            android:exported="true"
            android:permission="android.permission.BIND_JOB_SERVICE" />
    </application>
</manifest>
The only thing remaining now is to initialize the SDK by calling Fritz.configure() with our API key. This will be done in the Android folder in the MainActivity.java file.
@Override
  public void configureFlutterEngine(@NonNull FlutterEngine flutterEngine) {
    Fritz.configure(this, "YOUR_API_KEY");
    GeneratedPluginRegistrant.registerWith(flutterEngine);
  }
With that in place, click next to verify that your application is able to communicate with Fritz AI.
Use Fritz Pre-trained Models
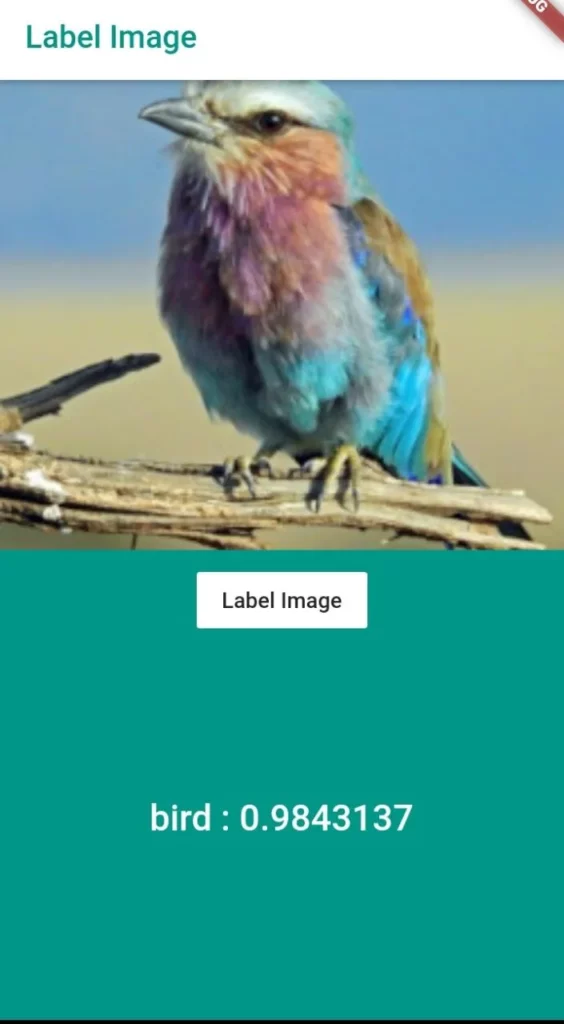
The pre-trained model we’ll use here has labels for more than 680 common objects. The model will give us the predicted label accompanied by the confidence interval.

According to the Fritz AI docs, we also need to specify aaptOptions in order to prevent compression of the tflite model. After adding it, your app/build.gradle file will look like this:
android {
    defaultConfig {
        renderscriptTargetApi 21
        renderscriptSupportModeEnabled true
    }

    // Don't compress included TensorFlow Lite models on build.
    aaptOptions {
        noCompress "tflite"
    }
}

dependencies {
    implementation 'ai.fritz:vision:+'
}
As you can see, RenderScript support is also added in order to improve image processing performance.
The App Elements
This application contains just two key elements:
- a Text widget that will display the label of the image
- a Button that processes the image when clicked
Here is the entire widget tree for reference.
Obtaining the Image
For simplicity, we’ll use an image from the drawable folder. So you can add the image you’d like to experiment with in that folder. That said, you can work with an image from the web or request the user to select an image. We’ve done something similar to that here. We’ll get to the image loading in a moment. First, let’s see how we can get Flutter to communicate with Java.
Calling Android Code Using Platform Channels
In Flutter, messages can be sent between different channels via a platform channel. The message will be sent to the host operating system(in this case Android). The operating system will then send the response to Flutter. In this transaction, Flutter is the client and the native code is the host. The transaction is asynchronous and so it returns a Future. We’ll see this in a trice.
For this transaction to be successful we have to add a MethodChannel in Flutter. Its purpose is to communicate with platform plugins via asynchronous method calls. The name given to this has to be the same in Flutter as well as in the Java code. If the names are different, the communication will fail.
On the Java side it is defined as CHANNEL. Since Dart (the language Flutter is written in) and Java have different types, serialization, and deserialization of data types is done automatically.
With that out of the way, let’s start with the Flutter side of things. Begin by importing the services and async packages.
import 'package:flutter/services.dart';
import 'dart:async';
The next step is to define the MethodChannel. You can give it any name as long as it’s the same on the Java side of things.
static const platformMethodChannel =
      const MethodChannel('heartbeat.fritz.ai/native');
Let’s now define the function that will handle the communication between the host and Flutter. As mentioned earlier, the process is async, and so we define a function that returns a Future.
Future<Null> _labelImage() async {
    String _message;
    try {
      final String result =
          await platformMethodChannel.invokeMethod('labelImage');
      _message = result;
    } on PlatformException catch (e) {
      _message = "Can't do native stuff ${e.message}.";
    }
    setState(() {
      nativeMessage = _message;
    });
  }
This function will run once the button has been clicked.
FlatButton(
color: Colors.white,
onPressed: _labelImage,
child: Text("Label Image",))
When the result is obtained, we display it on a text widget.
Text(nativeMessage,
style: TextStyle(color: Colors.white,
                    fontWeight: FontWeight.w500,
                    fontSize: 23.0),
              )
Here’s the entire dart file for reference:
import 'package:flutter/material.dart';
import 'package:flutter/services.dart';
import 'dart:async';

void main() {
  runApp(MaterialApp(
    theme: ThemeData(
      primaryColor: Colors.teal,
      fontFamily: 'Lato',
    ),
    home: Scaffold(
      appBar: AppBar(
        title: Text(
          'Label Image',
          style: TextStyle(
            color: Colors.teal,
          ),
        ),
        backgroundColor: Colors.white,
      ),
      body: NativeStuff(),
    ),
  ));
}

class NativeStuff extends StatefulWidget {
  @override
  NativeStuffState createState() {
    return NativeStuffState();
  }
}

class NativeStuffState extends State<NativeStuff> {
  static const platformMethodChannel =
      const MethodChannel('heartbeat.fritz.ai/native');
  String nativeMessage = '';

  Future<Null> _labelImage() async {
    String _message;
    try {
      final String result =
          await platformMethodChannel.invokeMethod('labelImage');
      _message = result;
    } on PlatformException catch (e) {
      _message = "Can't do native stuff ${e.message}.";
    }
    setState(() {
      nativeMessage = _message;
    });
  }

  @override
  Widget build(BuildContext context) {
    return Container(
      color: Colors.teal,
      child: Column(
        crossAxisAlignment: CrossAxisAlignment.stretch,
        children: <Widget>[
          Container(
            margin: EdgeInsets.fromLTRB(0, 0, 0, 8),
            height: 300,
            child: Image.asset(
              'assets/bird.jpg',
              fit: BoxFit.cover,
            ),
          ),
          Padding(
            padding: const EdgeInsets.only(left: 8.0, right: 8.0, top: 0.0),
            child: Center(
              child: FlatButton(
                  color: Colors.white,
                  onPressed: _labelImage,
                  child: Text(
                    "Label Image",
                  )),
            ),
          ),
          Padding(
            padding: const EdgeInsets.only(left: 8.0, right: 8.0, top: 102.0),
            child: Center(
              child: Text(
                nativeMessage,
                style: TextStyle(
                    color: Colors.white,
                    fontWeight: FontWeight.w500,
                    fontSize: 23.0),
              ),
            ),
          )
        ],
      ),
    );
  }
}
The Java Side
In mainActivity.java, define the CHANNEL with the same name as the one in Flutter. mainActivity.java is found in the Android folder:
private static final String CHANNEL = "heartbeat.fritz.ai/native";
The next step is to define the MethodChannel and set a MethodCallHandler. Notice the labelImage method. The method will return the label as a string and we then attach that to the result. Next, let’s define that method.
@Override
  public void configureFlutterEngine(@NonNull FlutterEngine flutterEngine) {
    Fritz.configure(this, "YOUR_API_KEY");
    GeneratedPluginRegistrant.registerWith(flutterEngine);

    new MethodChannel(flutterEngine.getDartExecutor().getBinaryMessenger(), CHANNEL)
        .setMethodCallHandler((call, result) -> {
          if (call.method.equals("labelImage")) {

            String obtainedLabel = labelImage();
            result.success(obtainedLabel);
          }

        });
  }
We start by obtaining an image as a Bitmap, this is what is required by Fritz AI. After that we:
- create a FritzVisionImage from it
- create an instance of the on-device image labeling model
- define the FritzVisionLabelPredictor
- run the prediction and obtain the result
- get the obtained result as a string.
This gives us the label and the confidence level and, finally, we return that result:
 private String labelImage(){

        Bitmap loadedImage = BitmapFactory.decodeResource(getResources(), R.drawable.bird);

        FritzVisionImage visionImage = FritzVisionImage.fromBitmap(loadedImage);
        LabelingOnDeviceModel imageLabelOnDeviceModel = FritzVisionModels.getImageLabelingOnDeviceModel();
        FritzVisionLabelPredictor predictor = FritzVision.ImageLabeling.getPredictor(
                imageLabelOnDeviceModel
        );
        FritzVisionLabelResult labelResult = predictor.predict(visionImage);
       String label = labelResult.getResultString();
        Log.i( "Info", "Label 1 is "  + label);

        return label;
  }
Final Thoughts
In this piece, we’ve seen how to use Fritz image labeling models in Flutter. Writing Swift, Kotlin, and Objective-C code takes a similar approach.

Comments 0 Responses