Learn to train a custom dog-breed classification Core ML model to use in your iOS and macOS apps — your Core ML model will be able to distinguish between five different breeds by the end of this tutorial!
You may recall that Apple acquired the machine learning and artificial intelligence startup Turi a few years ago for upwards of $200M; it offers powerful tools to create advanced machine learning models in a short amount of time.
In this tutorial, you’ll be learning to install Turi Create on your Mac, create a Python script, and use that script to train a Core ML model that you can drag directly into your Xcode projects and quickly implement in your apps.
Getting Started
Before we get started with the actual machine learning part of it, let’s get the installation of Turi and Python out of the way first — and, of course, you’ll need to make sure your hardware and software meet Turi’s requirements.
Requirements
As with any software you install, Turi Create has some specific requirements, which can be found on their official GitHub page as well.
Turi Create supports:
- macOS 10.12+
- Linux (with glibc 2.12+)
- Windows 10 (via WSL)
Turi Create requires:
- Python 2.7, 3.5, 3.6
- x86_64 architecture
- At least 4 GB of RAM
The bottom line is, as long as your Mac is reasonably new, you should be able to run Turi Create. If you’d like, you can follow along with another operating system; however, you may need to alter some steps for them to work.
Installation
Installing Turi Create is fairly simple, especially if you’re familiar with the command line. While you may choose to use a newer version of Python, I’ll be using Python 2.7 in this tutorial.
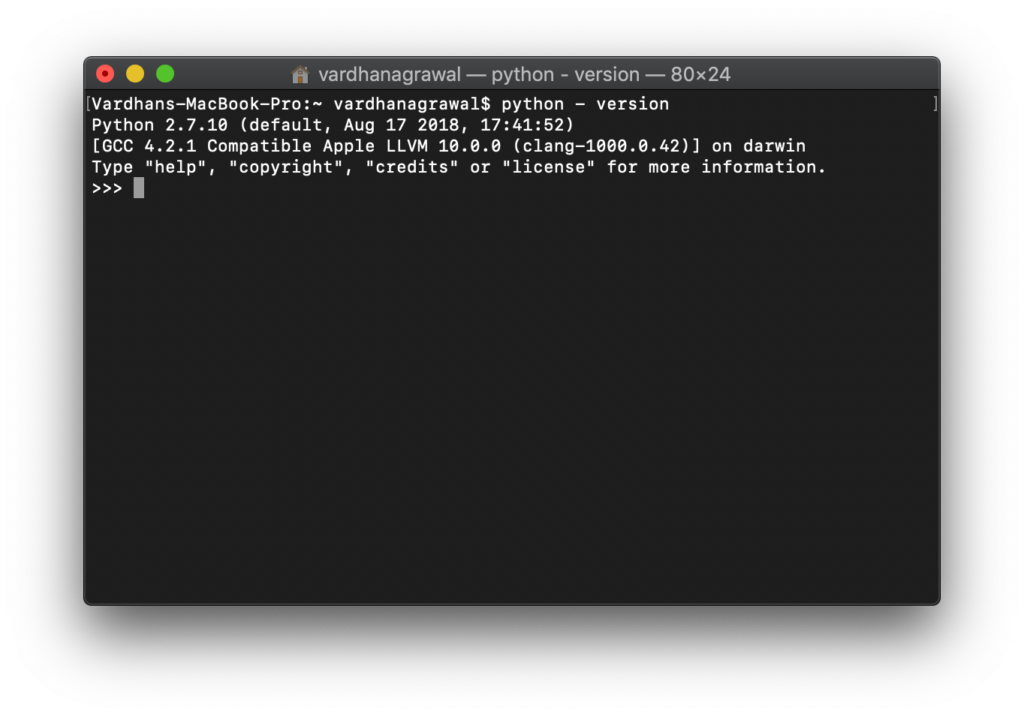
In macOS Mojave, Python 2.7 comes installed by default, so all you’d need to do is check the version. On your Mac, open Applications > Utilities > Terminal or simply search for it with they keyboard shortcut Command-Space.
To check the version of Python on your Mac, enter:
This will tell you the version of Python, and your console should look something like this:

If your version is not Python 2.7, or if it isn’t installed on your computer for some reason, you should install it at this link. If your output looks similar to mine, you’re ready to proceed.
To install Turi Create, just enter the following in your Terminal window:
That’s all! Turi Create is successfully installed on your Mac, and it’s ready to use. You can now build classification, detection, regression, and other types of models.
Dataset
For any machine learning model, you need a dataset. In this tutorial, you’ll be learning how to train a simple dog-breed classification model, which requires image classification. The data that I’ll be using comes from Stanford University’s Dogs Dataset.
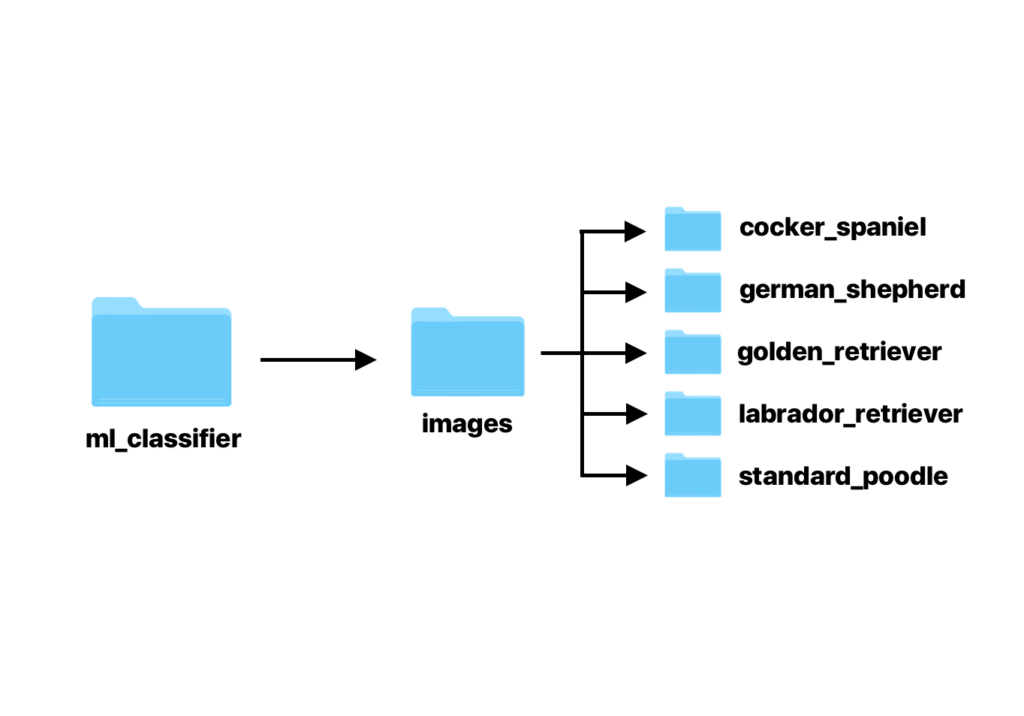
In order for Turi to be able to recognize the pre-classified images, you’ll need to organize them based on what they represent. For example, all of the images of golden retrievers would be in one folder, while all pictures of labradoodles would be in another.
For the sake of simplicity, we’ll just be using five breeds out of the hundreds in Stanford’s dataset, but you can use as many as you’d like. I’ve gone ahead and organized it for you and created a repository for it. If you choose to add more dog breeds, simply add more folders and name them as you wish.
Folder Structure
By now, you may have figured out that the way you arrange your dataset is critical to being able to train the model correctly — there’s no other way that Turi Create knows about what goes where. Take a moment now to organize yourself.

This hierarchy diagram should explain everything, and you’ll need to get your folders in this order before continuing with this tutorial. If you want to change names or arrange things differently, you’ll need to make sure you make a note of this.
Training the Classifier
After you’ve finished setting up, you’re ready to dive into the meat of this tutorial — actually training your classifier. We’ll be working mostly in Python, but if you’ve never used Python before, that’s okay. I’ll explain each step as we go along, and if you have any questions, don’t hesitate to leave a comment below.
Python File
First, we’ll need to have a place to put down our thoughts (that is, of course, in Python). If you already have an editor that supports Python, such as Atom or an integrated development environment such as PyCharm, you can use them to create a blank file called dog_breeds.py.
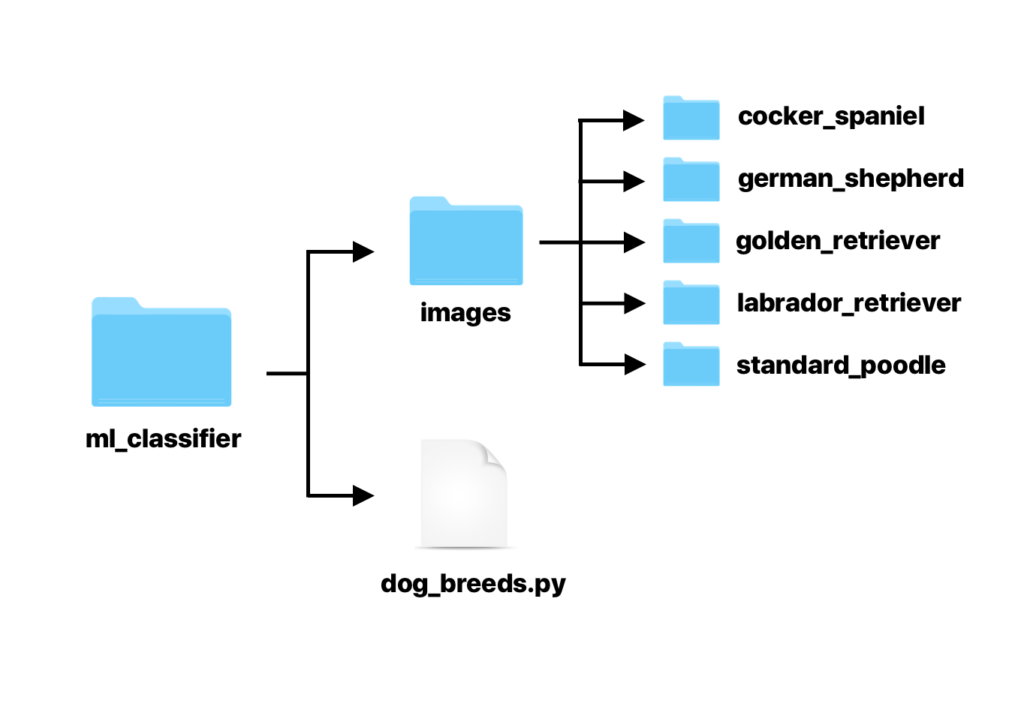
If you prefer the more developer-y route, like me, you can use the Terminal to do the same thing. You’ll need to create this file inside your ml_classifier folder, alongside the images folder so that your hierarchy looks like this:

To create a new file, first enter into the target directory:
Then, create a new file named dog_breeds.py.
Voilà! Your folders, files, and images are all where they need to be, and you’re ready to continue with the next step. We’ll be using Xcode to open our file, so make sure you have it installed and up-to-date.
Loading Dataset Images
Finally, it’s time to begin telling Turi what it needs to do via the Python file we just created. If you double-click the file, it should open up by default in Xcode, if you have it installed. If not, you can also use another editor or a Python IDE.
1. Import Frameworks
At the top of the file, you’ll need to import the Turi Create framework. If you want, you can create a name for reference by adding as <your name>. For example, if you wanted to refer to it as tc in your code, you could write:
This would allow you to call it tc instead of writing out turicreate. In this tutorial, I’ll be using the full version, calling it turicreate to reduce ambiguity.
You’ll also need to deal with folder names and other os-related tasks in order to classify your images. This will require another Python library called os. To import it, simply add the following:
2. Loading Images
Here, we’re storing all of the images in our dataset into a variable called data. Since our dog_breeds.py file is in the same directory as the images folder, we can simply put “images/” as the path.
3. Defining Labels
Now that Turi Create has all of your images, you need to link the folder names to a label name. These label names are what will be returned in your Core ML model when it’s being used in an iOS or macOS app.
This allows you to map all of your folder names to a “label” name, which tells Turi Create that all of the images that are in the “cocker_spaniel” folder are indeed Cocker Spaniels, for example.
4. Save as SFrame
In case you’re not familiar with an SFrame, in simple terms, it’s a dictionary of all of your data (in this case, an image) and all of the labels (in this case, the dog breed). Save your SFrame like this:
This allows you to store your labeled images for use in the next step. This is a fairly standard data type in the machine learning industry.
Training and Testing
After Turi Create has all of your labeled images in place, it’s time to enter the home stretch and finally train your model. We also need to split the data so that 80% is used for training, and 20% is saved for testing the model once it’s done training — we won’t have to test it manually.
1. Loading SFrame
Now, we need to load the SFrame we just created in the previous step. This is what we’ll use to split into testing and training data later.
This assigns the data variable, which is now of type SFrame to the SFrame that we saved in the previous step. Now, we’ll need to split up the data into testing and training data. As aforementioned, we’ll be doing an 80:20 split of testing to training data.
2. Splitting Data
It’s time to split the data. After your SFrame code, add the following:
This code randomly splits the data 80–20 and assigns it to two variables, testing and training, respectively. Now, Turi will automatically test your model without you needing to manually supply test images and create an app — if you need to make adjustments, you won’t need to fully implement it first, and instead, you can do them right in your Python file.
3. Training, Testing, and Exporting
Your hard work has finally paid off! In this line of Python code, you’ll just tell Turi Create to train your model, while specifying the architecture that you’d like to use.
You’re simply telling Turi to use your testing data (specified earlier), and use them to predict the labels (based on the folder structure from before), while using resnet-50, which is one of the most accurate machine learning model architectures.
To use your testing data and ensure that your model is accurate, add this:
This uses the training data you specified and stores the results after testing in a variable called (you guessed it) testing. For your information, it prints out the accuracy, but you can print other things as well, given enough time on Turi Create’s APIs.
Last but not least, you can save your model right into your file system with this one-liner after you give it a useful name:
Of course, you can also save your model in other formats, but for this example, I’ve saved it as a Core ML model.
Running and Output
For all you iOS developers out there — no, this isn’t an Xcode project that keeps compiling automatically and complaining for errors. In order for the code you just wrote to execute, we’ll need to do it via the terminal.
Running the Python File
Running the Python file is easy! Make sure you’re in the correct directory, and all you need to do is enter the following in your terminal window:
Output
After a couple of minutes of training, your images folder and dog_breeds.py file will be accompanied by an SFrame, a model folder, and a .mlmodel file, which is your Core ML model!
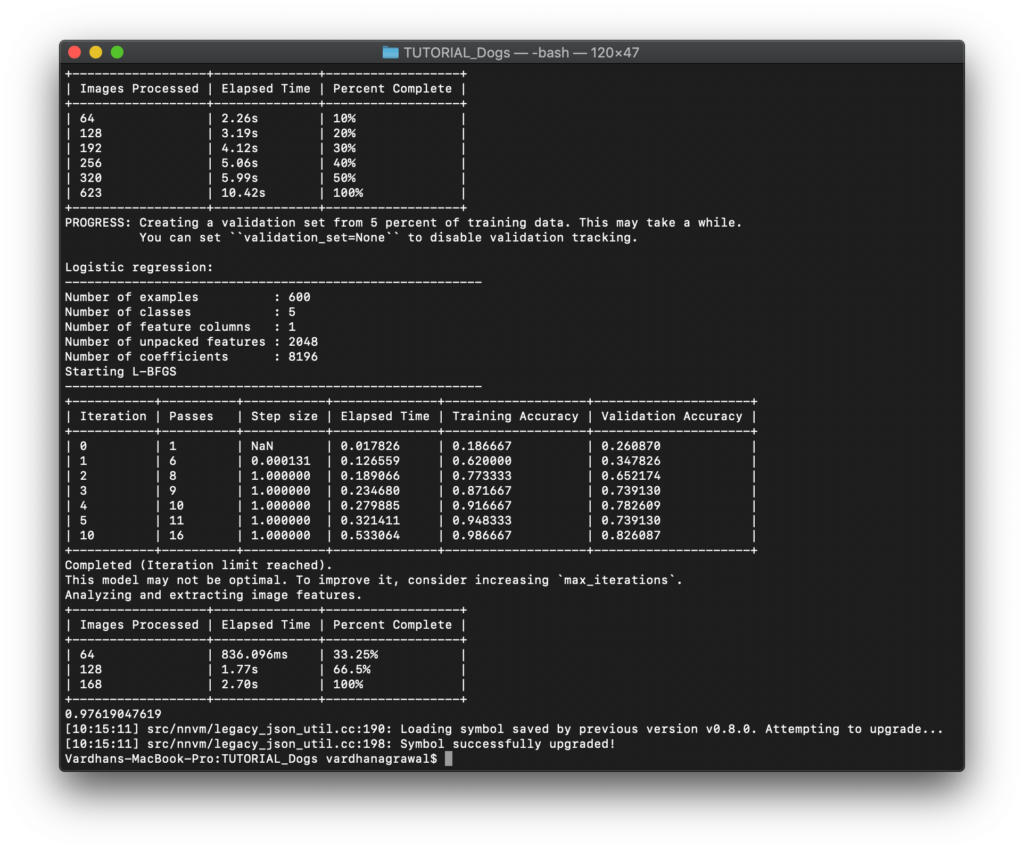
You’ll also be presented with output in your terminal window, which will look something like this:

This gives you information about training and training accuracy, the amount of images processed, and other useful information, which you can use to analyze your model without ever even using it.
Conclusion
I hope you enjoyed reading this tutorial as much as I enjoyed making it! Here are some steps on where to go from here. If you want to learn how to use your Core ML model in an iOS app, check out another one of my tutorials:
This tutorial will show you how to take your resulting dog_classifier.mlmodel model and implement it in a real-world iOS app. It will also teach you to parse a live video feed and take individual frames for image classification.
If you have any questions or comments regarding this tutorial, don’t hesitate to ask them down in the comments section below! I’m always eager to hear feedback, questions, or how you used your knowledge from this tutorial.
Discuss this post on Reddit and Hacker News
It’s easy to support my work!
Be sure to smash that “clap” button as many times as you can, share this tutorial on social media, and follow me on Twitter.

Comments 0 Responses