In the previous article of this series on developing Flutter applications with TensorFlow Lite, we looked at how we can develop digit recognizer with Flutter and TensorFlow Lite and image classification with Flutter and TensorFlow Lite.
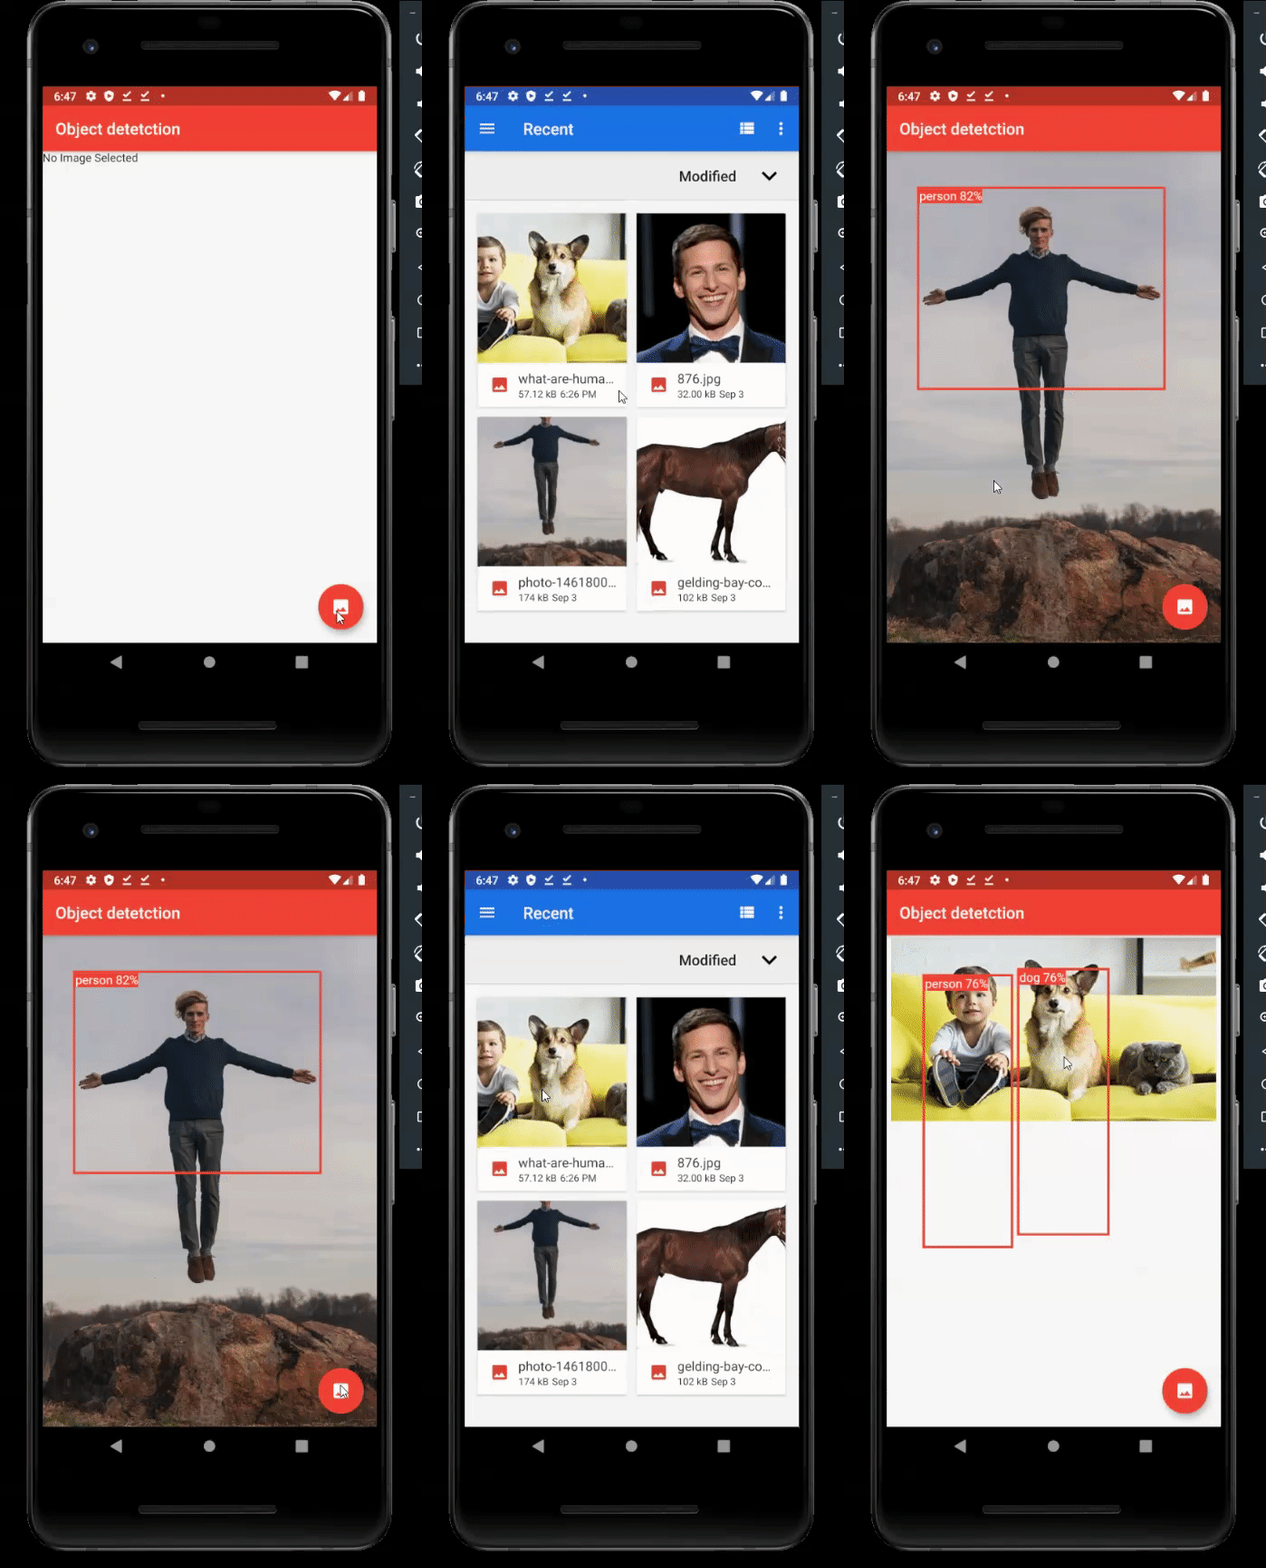
In the third article of this series, we’ll keep working with TensorFlow Lite, this time focusing on implementing object detection. The application we are going to build will be able to recognize objects presented in an image.
Application and Use cases
TensorFlow Lite gives us pre-trained and optimized models to identify hundreds of classes of objects including people, activities, animals, plants, and places. Using the SSD MobileNet model we can develop an object detection application.
Required Packages
- TensorFlow Lite
- Image Picker
- SSD MoblieNet (tflite) Model
The SSD MobileNet model is a single shot multibox detection (SSD) network intended to perform object detection.
Download the tflite folder from the above link, and put it inside the assets folder of the Flutter project.
Flutter Application
Now that we have put the model inside the project folder, we can develop our Flutter application to detect objects. Let’s get started.
We’ll need to initiate five variables to carry out the application properly. To receive the output, we’ll need a List variable, to get the uploaded image we’ll need a File variable, to get the image’s height and width we’ll need two double variables, and to manage errors we’ll need a Boolean variable:
Since the model is working offline, we need to load the model when the application is launched.
Using the above function we can load the model. First, we need to close any other running models using Tflite.close(). Then we can load our model inside a try-catch.
In the above function, we have used ImagePicker to pick an image from the phone’s gallery. After receiving an image we need to pass that image through the model. In order to do that, I have created another function called predictImage(image) and passed the selected image into it.
Using the above function’s FileImage we can get the image’s dimensions using listeners. The image will be passed on to the ssdMobileNet() function to run the image through the model.
When we use the SSD MobileNet model, we don’t need to give much information because it already has them as its default settings. We need to give the image path and the number of results per class.
Now we need to create a function to get detection boxes (to draw the boxes on the top of the image) which will get the size of the screen as an input.
First, we need to check that our _recognitions is not null. Secondly, we need to check the image width and height to see whether they are not null. Then we need to find the factorX and factorY using the above formula. Finally, we need to map the recognitions using interpolation. Now inside the child, we can define the name of the object and the confidence percentage.
Now that we’ve identified the required functions, we can develop the UI so that our app can actually surface these results to the user:
Results
Now that we’ve implemented the Flutter application code, let’s look at the output of the application when it’s up and running:

Full code:
import 'dart:io';

import 'package:flutter/material.dart';
import 'package:flutter/services.dart';
import 'package:tflite/tflite.dart';
import 'package:image_picker/image_picker.dart';

void main() {
  runApp(MyApp());
}

const String ssd = "SSD MobileNet";

class MyApp extends StatelessWidget {
  @override
  Widget build(BuildContext context) {
    return MaterialApp(
      debugShowCheckedModeBanner: false,
      home: TfliteHome(),
    );
  }
}

class TfliteHome extends StatefulWidget {
  @override
  _TfliteHomeState createState() => _TfliteHomeState();
}

class _TfliteHomeState extends State<TfliteHome> {
  File _image;

  double _imageWidth;
  double _imageHeight;
  bool _busy = false;

  List _recognitions;

  @override
  void initState() {
    super.initState();
    _busy = true;

    loadModel().then((val) {
      setState(() {
        _busy = false;
      });
    });
  }

  loadModel() async {
    Tflite.close();
    try {
      await Tflite.loadModel(
          model: "assets/tflite/ssd_mobilenet.tflite",
          labels: "assets/tflite/ssd_mobilenet.txt",
        );
    } on PlatformException {
      print("Failed to load the model");
    }
  }

  selectFromImagePicker() async {
    var image = await ImagePicker.pickImage(source: ImageSource.gallery);
    if (image == null) return;
    setState(() {
      _busy = true;
    });
    predictImage(image);
  }

  predictImage(File image) async {
    if (image == null) return;
      await ssdMobileNet(image);

    FileImage(image)
        .resolve(ImageConfiguration())
        .addListener((ImageStreamListener((ImageInfo info, bool _) {
          setState(() {
            _imageWidth = info.image.width.toDouble();
            _imageHeight = info.image.height.toDouble();
          });
        })));

    setState(() {
      _image = image;
      _busy = false;
    });
  }


  ssdMobileNet(File image) async {
    var recognitions = await Tflite.detectObjectOnImage(
        path: image.path, numResultsPerClass: 1);

    setState(() {
      _recognitions = recognitions;
    });
  }

  List<Widget> renderBoxes(Size screen) {
    if (_recognitions == null) return [];
    if (_imageWidth == null || _imageHeight == null) return [];

    double factorX = screen.width;
    double factorY = _imageHeight / _imageHeight * screen.width;

    Color blue = Colors.red;

    return _recognitions.map((re) {
      return Positioned(
        left: re["rect"]["x"] * factorX,
        top: re["rect"]["y"] * factorY,
        width: re["rect"]["w"] * factorX,
        height: re["rect"]["h"] * factorY,
        child: ((re["confidenceInClass"] > 0.50))? Container(
          decoration: BoxDecoration(
              border: Border.all(
            color: blue,
            width: 3,
          )),
          child: Text(
            "${re["detectedClass"]} ${(re["confidenceInClass"] * 100).toStringAsFixed(0)}%",
            style: TextStyle(
              background: Paint()..color = blue,
              color: Colors.white,
              fontSize: 15,
            ),
          ),
        ) : Container()
     );
    }).toList();
  }

  @override
  Widget build(BuildContext context) {
    Size size = MediaQuery.of(context).size;

    List<Widget> stackChildren = [];

    stackChildren.add(Positioned(
      top: 0.0,
      left: 0.0,
      width: size.width,
      child: _image == null ? Text("No Image Selected") : Image.file(_image),
    ));

    stackChildren.addAll(renderBoxes(size));

    if (_busy) {
      stackChildren.add(Center(
        child: CircularProgressIndicator(),
      ));
    }

    return Scaffold(
      appBar: AppBar(
        title: Text("Object detetction"),
        backgroundColor: Colors.red,
      ),
      floatingActionButton: FloatingActionButton(
        child: Icon(Icons.image),
        backgroundColor: Colors.red,
        tooltip: "Pick Image from gallery",
        onPressed: selectFromImagePicker,
      ),
      body: Stack(
        children: stackChildren,
      ),
    );
  }
}
Source Code available on GitHub here.
Conclusion
You can use other models that are compatible with TensorFlow Lite such as YOLOv2, v3, v4, Pose_net, and Deeplabv2 to develop your own object detection mobile application. These models have their own perks and accuracy levels which would be beneficial to the goal you’re trying to achieve.
That’s all for this article, but in the next article, I’ll try to integrate real-time object detection using the mobile camera.

Comments 0 Responses