Introduction
Computer vision is a branch of deep learning that focuses on the utilization of deep neural networks to model problems from images. In this article, we’ll be looking at how we can apply computer vision as a tool for football analytics.
Football is a sport that involves 2 teams; with each team having 11 players and a goalkeeper. Here are some analytics that could be explored from football games using AI.
- Predicting the feasibility of losing a goal via a penalty or free kick.
- Monitoring player interactions within the game.
- Predicting who gets the ball next on a given team.
- Predicting the feasibility of scoring a goal via corner kicks and others.
The notebook for this work can be found here.
At times, football fans of a various teams argue to the extent of predicting how their team could win a game or not. Some go the extra mile of forecasting the game score. The question is, what if we give computers the ability of monitoring various patterns of this game, and then develop a model that gives us an analytic breakdown of a football game that’s currently happening or that is yet to happen?
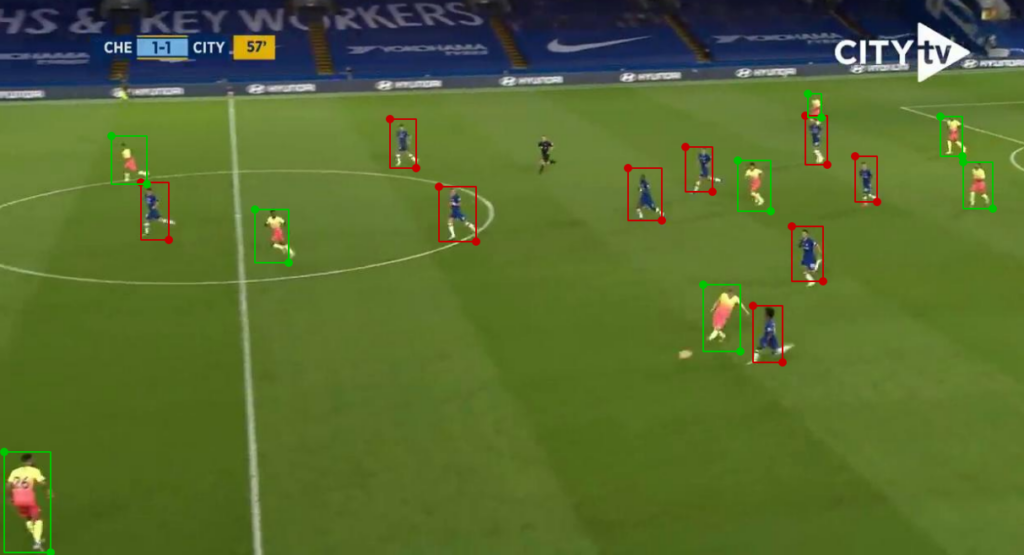
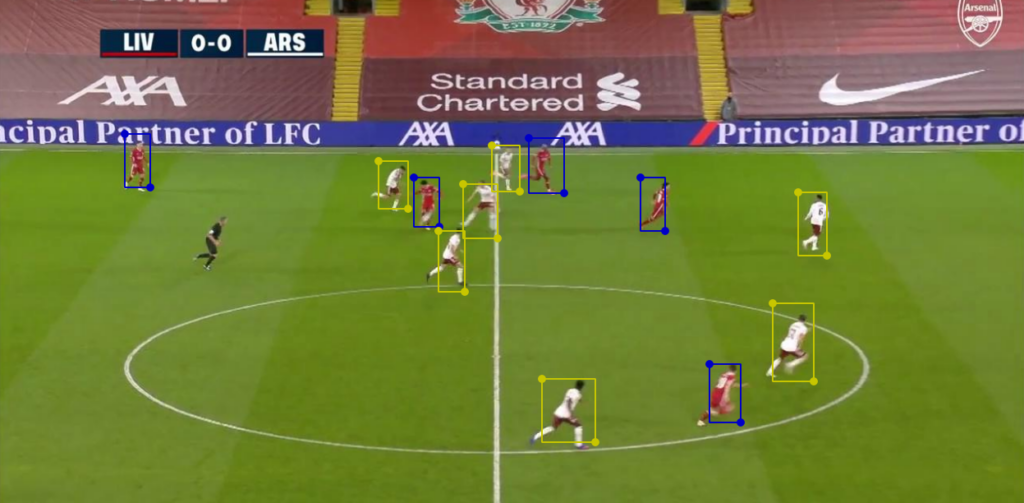
There are so many analytic insights we could uncover with the aid of computer vision, language modeling, and reinforcement learning architectures, but for the sake of simplicity, let’s look into building an object detection model that can track 4 prominent football teams: Chelsea, Man-City, Liverpool, and Arsenal.
Below is an outline on how we’ll solve this:
- Data Sourcing
- Labelme for data annotation
- Data preparation (exporting as TensorFlow records).
- Model setup and training
- Running inference on Raspberry Pi 3
- Results and conclusion
Data Sourcing
To proceed into building an object detection model that can track the 4 teams, we first a need to source of data for the 4 various teams. The source data was taken from matches between Chelsea-Man City and Liverpool — Arsenal. Using the source video, 94 frames representing the 4 various teams were extracted from each video link, using the code below:
vidcap = cv2.VideoCapture(ChelseaManCity)
count = 0
def getFrame(sec):
    vidcap.set(cv2.CAP_PROP_POS_MSEC,sec*1000)
    hasFrames,image = vidcap.read()
    if hasFrames:
        cv2.imwrite("images/frame"+str(count)+".jpg", image)     # save frame as JPG file
    return hasFrames
sec = 2
frameRate = 2 #//it will capture image in each 0.5 second
count=88
success = getFrame(sec)
while success:
    count = count + 1
    sec = sec + frameRate
    sec = round(sec, 2)
    success = getFrame(sec)
The next step is to apply an image annotation tool used in computer vision to label various team members by their team name. An efficient annotation tool for computer vision that we’ll work with here is LabelMe.
LabelMe
LabelMe is an open-sourced graphical labeling tool for image processing and annotations. Source code on how to use it locally can be found here. It’s easy to use and efficient because of its annotation properties. To label the images, click on createRect by the left window. This will give you the flexibility of creating your own polygon annotations for every object present in the images. We can label the images in this order:
- Chelsea (red annotation) — Class 0
- Man-City (green annotation) — Class 1
- Liverpool (yellow annotation)— Class 2
- Arsenal (blue annotation) — Class 3


Now that all classes across the frames have been correctly labeled, we can go ahead and prepare our model using an object detection architecture called EfficientDet. Do take note that before we model, we do need to convert this labeled data alongside the generated JSON files (files generated for each frame, containing the bounding box for each label in an image) into TensorFlow records.
Exporting data as TensorFlow records (tfrecords)
Now that we’ve been able to label the data conveniently, we can go ahead and export the data as tfrecords using the Roboflow, a data management platform. All you need to do is to complete the following processes:
- Create an account with Roboflow, and click on “Create a Dataset.”
- Fill in your dataset details, upload the data (images and .xml files). Make sure you select object detection when selecting the type of data for your computer vision modeling.
- Add pre-processing steps and augmentation steps if needed.
- Finally, in the topmost right corner after uploading, click on “Generate TensorFlow Records”. Go ahead and select “Generate as Code”—this will give you a link for you to download the tfrecords of your training data.
Model setup and training
Kindly follow the process as illustrated in the attached blog below, which addresses the following:
- How to setup Google Colab for object detection.
- Installation of the Object Detection API (tfrecords).
- Creating your custom configuration file.
- Model and data pipeline for training and prediction.
Here’s a bit of modification in the attached article for this project:
- In place of EfficientDet (D0) try implementing EfficientDet (D1).
- Training steps can be increased to 10,000.
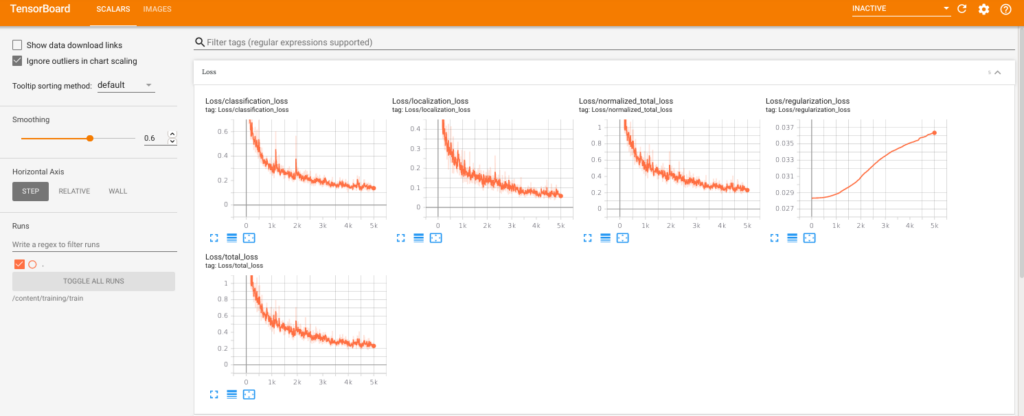
Having done the above, below is the result of the training performance via Tensorboard after 5,000 epochs:

Running inference on Raspberry Pi 3
The attached blog illustrates how to set up an object detection model architecture and also implement inference on a Raspberry Pi 3:
In addition to the attached article, take note of the following:
To avoid any form of importation error while running inference from the TensorFlow object detection model directory, you can add this at the start of the program:
import os, sys
#running the script from models dir

os.chdir('./models')
os.environ['PATH'] += "./models"
os.environ['PATH'] += "./models/official"

import sys
sys.path.append("./models/official")
sys.path.insert(0,"./models")
sys.path.insert(0,"./models/research")
sys.path.insert(0,"./models/official")
Furthermore, to pass the video frames into the Raspberry Pi 3 for real-time inference, kindly modify this:
cap = cv2.VideoCapture(0)into this:
#passing in the directory to videos for real time inference prediction.
cap = cv2.VideoCapture("[directory to video frames]")
Result and conclusion
Below is a full video demonstration of the object detection architecture in action on video frames.
In conclusion, computer vision can be applied to football games to further analyze game trends and game patterns; this could further be broken down into the following:
- Predicting the feasibility of losing a goal via a penalty or free kick.
- Monitoring player interactions within the game.
- Predicting who gets the ball next on a given team.
- Predicting the feasibility of scoring a goal via corner kicks and others.
If this article helps you to understand computer vision in details, do share with your friends. Thanks for reading!
References
- roboflow.ai
- https://heartbeat.comet.ml/end-to-end-object-detection-using-efficientdet-on-raspberry-pi-3-part-2-bb5133646630
- https://medium.com/@iKhushPatel/convert-video-to-images-images-to-video-using-opencv-python-db27a128a481
- https://heartbeat.comet.ml/end-to-end-object-detection-using-efficientdet-on-raspberry-pi-3-part-3-2bd6a7a6614d

Comments 0 Responses