Let say, for some reason, you process a huge load of images that contain some sort of logo (or even products). And you want to know which images are related to a specific companies. This is very common problem in AdTech and/or Data Mining companies.
Let’s imagine you have a user generated content in your application, so you want to know what’s inside the images, and if you have ads running (Bingo!), you can target a user based on the images they liked, commented on, published etc.
This can help you create an ad profile for your users, and the fact that the models are hosted on an API means you don’t have to ship an application with over 200MB in size.
Another use case could be if you have a search or recommendation feature in your application to ensure that you’re capturing the most out of the content, whether it’s straight text or images. In that case, you’d need to have an idea of what the image contains—hence, classification.
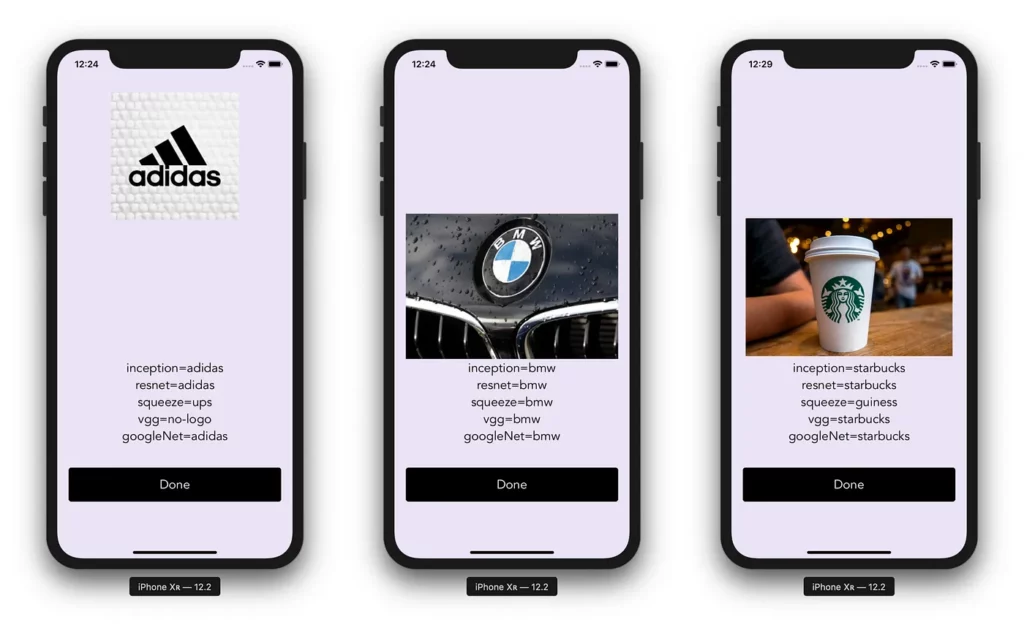
This is a look at what the final result will look like:
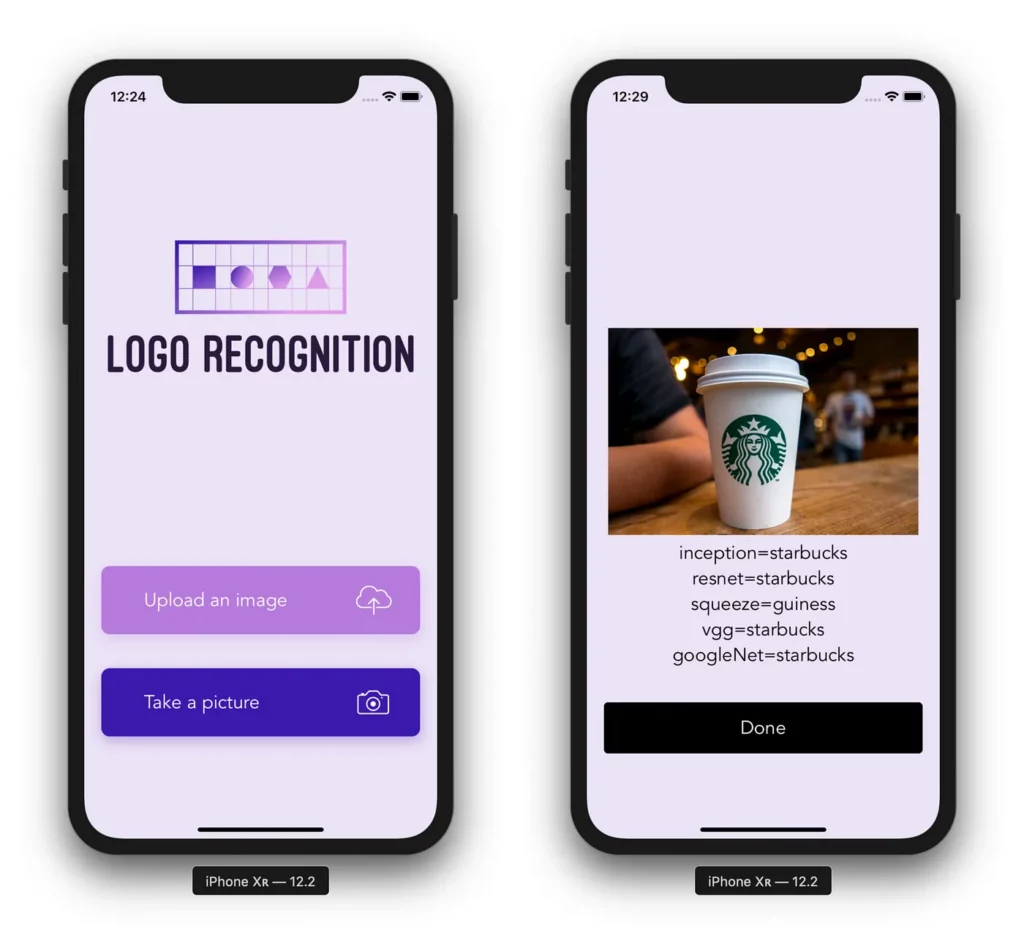
Transfer learning
Training a convolutional neural network from scratch is very expensive: the more layers that stack up, the higher the number of convolutions and parameters there are to optimize. The computer must be able to store several gigabytes of data and efficiently perform the calculations. That’s why hardware manufacturers are stepping up their efforts to provide high-performance graphics processors (GPUs) that can quickly drive a deep neural network by parallelizing calculations.
Transfer learning (or learning by transfer) allows you to do deep learning without having to spend a month doing compute-intensive calculations. The principle idea is to use the knowledge acquired by a neural network when solving a problem in order to solve another more or less similar problem. This is a transfer of knowledge, hence the name.
In addition to speeding up the training of the network, transfer learning makes it possible to avoid overfitting a model. Indeed, when the input image collection is small, it’s strongly discouraged to train the neural network from scratch (that is to say, with a random initialization): the number of parameters to learn ends up being much higher than the number of images, and so the risk of overfitting is huge!
Transfer learning is a technique that’s widely used in practice and is simple to implement. It requires having a network of neurons already trained, preferably on a problem close to the one we want to solve. Nowadays, we can easily retrieve one from the internet, especially in various deep learning libraries, such as Keras or PyTorch, that we’ll be using in this tutorial.
We can exploit the pre-trained neural network in a number of ways, depending on the size of the input dataset and its similarity to what’s used in pre-training.
Returning to our logo recognition project: The dataset
We’ll be using an open source dataset made by Flickr with 32 distinct company logos.
There are 320 logo images for training, 960 logo images for validation, 3960 images for testing, and 3000 no-logo images.
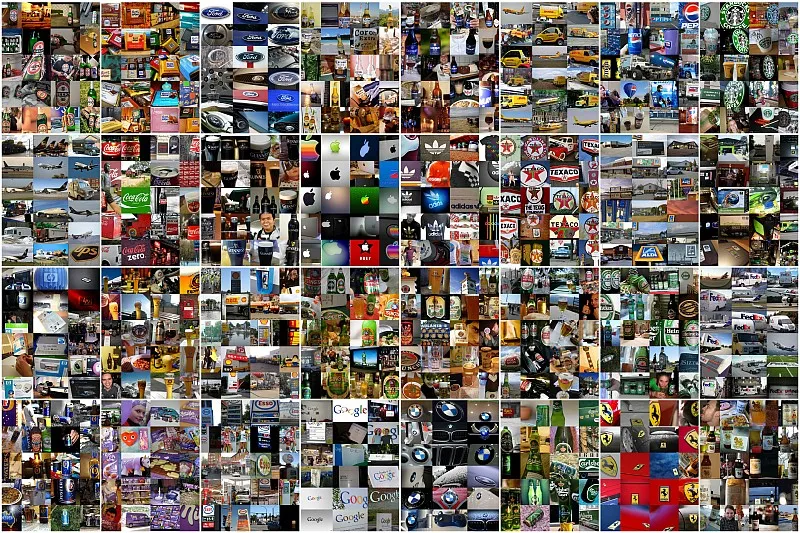
There’s no particular pre-processing needed for the images—they’re already pretty clean. Some would argue that it’s not enough to make a robust image classifier, and I do agree. That’s why we’ll be using transfer learning techniques discussed above.
Train
The training process will be easy and pretty much the same for all the models.
I would highly recommend that you use Colab to have access to a free GPU, which is why I’ve created a Colab notebook where I explain everything in more detail.
Networks results comparison
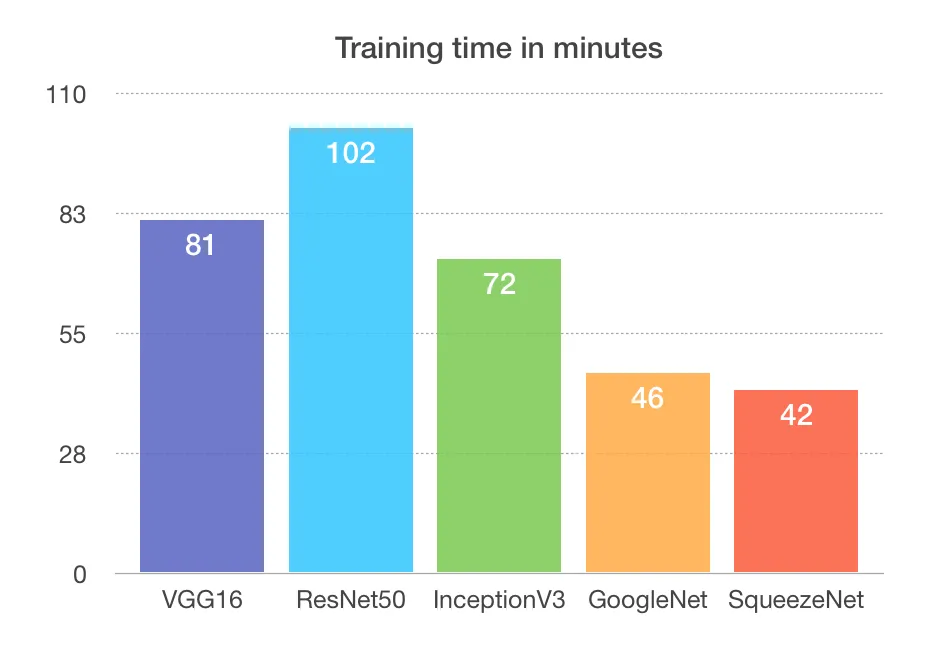
Training time
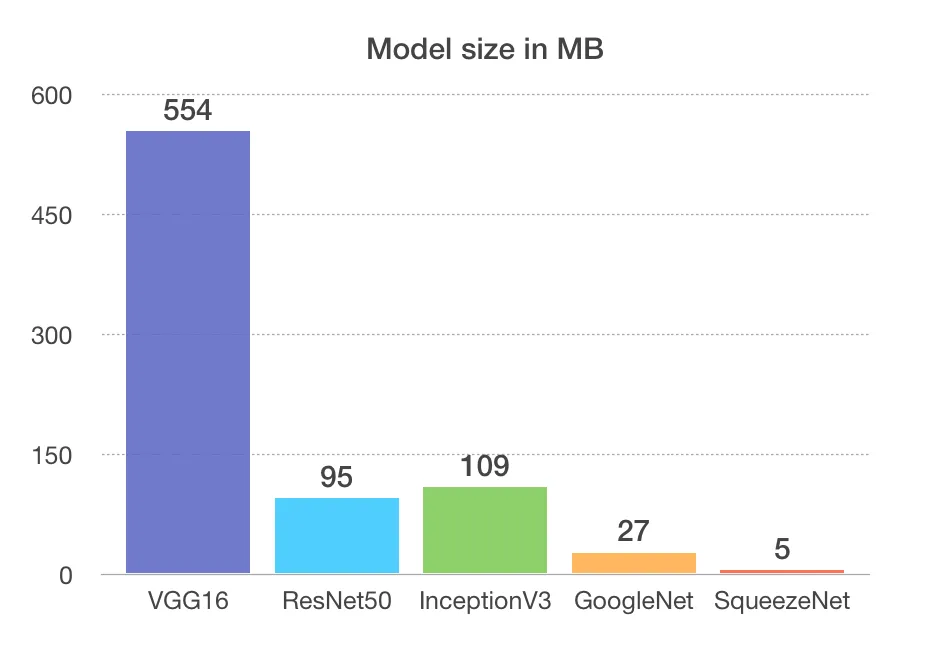
Models size
Evaluation accuracy
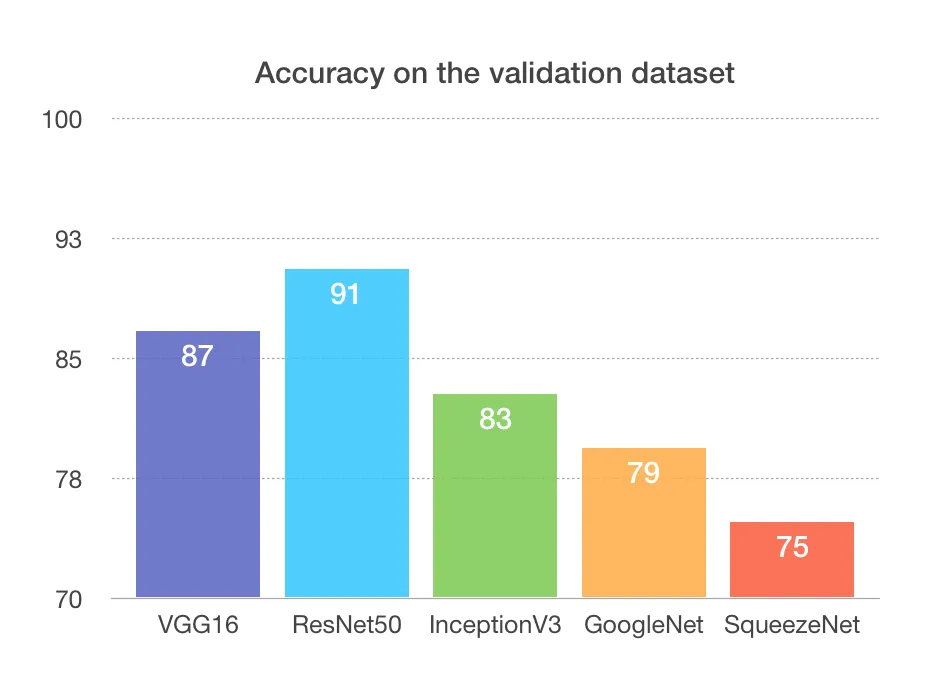
This is where you have to make compromises. If you think about it, SqueezeNet would be considered the most interesting because it wins in two important categories when it comes to production — the size and the training time. But, we can clearly see that it’s the least accurate.
VGG16 is the worst for me, because it’s just heavy (VGG19 has been reduced) and will be a problem when the network gets bigger with more training data.
My favorite is probably ResNet50 because it’s the most accurate, but even more interesting is that it’s probably the most scalable of them all thanks to the concept of residual networks (I would highly recommend reading this article).
You have to know and understand your production environment to decide which one best suits your needs. If, for example, storage is a problem, you can obviously use the smallest model (SqueezeNet). And the same goes for the other models—you have to decide what’s the most critical part of your application and eliminate the architectures that don’t fit your needs.
One of the most challenging part of production is dependencies and in our case Pytorch is the most important dependency, it can be tricky to install it on services like Heroku , you can check this article on this specific problem.
As for the Flask API there’s no particular setting needed, you can treat it like any other API, and if you are familiar with Alamofire it will be extremely easy and straightforward.
Flask API
Flask is a Python web application micro-framework built on the WSGI library of Werkzeug. Flask can be “micro”, but it’s ready for use in production on a variety of needs.
The “micro” in the micro-frame means that Flask aims to keep the kernel simple but expandable. Flask won’t make many decisions for you (like which database to use), and the decisions made are easy to change. Everything is yours, so Flask can be everything you need and nothing else.
The community also supports a rich ecosystem of extensions to make your application more powerful and easier to develop.
I chose a library called Flask-RESTful made by Twilio that encourages best practices when it comes to APIs.
We first need a function that will return a prediction. I’ve created a class called Logo with a static method called get_inference :
    def get_inference(image_path: str, model_dir: str, device: str, classes: list) -> str:
        """
        Predict the class name of an image - gets an image and returns the name
        of the BRAND

        :param image_path: image path in the directory
        :param model_dir: .pth model file path in the directory
        :param device: where the model will be loaded, either 'cpu' or 'gpu'
        :param classes: list of the classes that model was trained on
        :return: the class name corresponding to model prediction
        """
        model = torch.load(model_dir, map_location=device)

        test_transforms = transforms.Compose([transforms.Resize(224),
                                              transforms.ToTensor(),
                                              transforms.Normalize([0.485, 0.456, 0.406],
                                                                   [0.229, 0.224, 0.225])
                                              ])
        device = torch.device('cuda' if torch.cuda.is_available() else 'cpu')
        image = Image.open(Path(image_path))
        image_tensor = test_transforms(image).float()
        image_tensor = image_tensor.unsqueeze_(0)
        input = Variable(image_tensor)
        input = input.to(device)
        output = model(input)
        index = output.data.cpu().numpy().argmax()
        return classes[index]
Here’s the full code (Yeah I know, Flask is great 🙌 !):
import os
from flask import Flask, request
from flask_restful import Resource, Api
from logo_recognition import Logo


# .pth model path in the directory
model_dir_googlenet = './logo_googlenet.pth'
model_dir_inception_v3 = './logo_inception_v3.pth'
model_dir_resnet50 = './logo_resnet50.pth'
model_dir_squeezeNet = './logo_squeezeNet.pth'
model_dir_vgg16 = './logo_vgg16.pth'

# List of all the classes the model recognize
classes = ['HP', 'adidas', 'aldi', 'apple', 'becks', 'bmw',
           'carlsberg', 'chimay', 'cocacola', 'corona', 'dhl',
           'erdinger', 'esso', 'fedex', 'ferrari', 'ford', 'fosters',
           'google', 'guiness', 'heineken', 'milka', 'no-logo',
           'nvidia', 'paulaner', 'pepsi', 'rittersport', 'shell',
           'singha', 'starbucks', 'stellaartois', 'texaco', 'tsingtao', 'ups']


app = Flask(__name__)
api = Api(app)

file_name = 'photo.jpg'

class Api(Resource):
    def get(self, file_name):
        googleNet = GetLogoPredictionGoogleNet.get(self, file_name)
        inception = GetLogoPredictionInception.get(self, file_name)
        resnet = GetLogoPredictionResnet.get(self, file_name)
        squeeze = GetLogoPredictionSqueezeNet.get(self, file_name)
        vgg = GetLogoPredictionVgg.get(self, file_name)
        return {'googleNet': googleNet,
                'inception': inception,
                'resnet': resnet,
                'squeeze': squeeze,
                'vgg': vgg}

    def post(self):
        if request.files:
            image = request.files['image']
            print(os.path.join('/images'))
            image.save(os.path.join('/Users/omarmhaimdat/PycharmProjects/LogoRecognition/', image.filename))
            googleNet = GetLogoPredictionGoogleNet.get(self, file_name)
            inception = GetLogoPredictionInception.get(self, file_name)
            resnet = GetLogoPredictionResnet.get(self, file_name)
            squeeze = GetLogoPredictionSqueezeNet.get(self, file_name)
            vgg = GetLogoPredictionVgg.get(self, file_name)
            return {'googleNet': googleNet,
                    'inception': inception,
                    'resnet': resnet,
                    'squeeze': squeeze,
                    'vgg': vgg}


class GetLogoPredictionGoogleNet(Resource):
    def get(self, file_name):
        prediction = Logo.get_inference(model_dir=model_dir_googlenet,
                                        image_path=file_name,
                                        classes=classes,
                                        device='cpu')
        return prediction

class GetLogoPredictionInception(Resource):
    def get(self, file_name):
        prediction = Logo.get_inference(model_dir=model_dir_inception_v3,
                                        image_path=file_name,
                                        classes=classes,
                                        device='cpu')
        return prediction

class GetLogoPredictionResnet(Resource):
    def get(self, file_name):
        prediction = Logo.get_inference(model_dir=model_dir_resnet50,
                                        image_path=file_name,
                                        classes=classes,
                                        device='cpu')
        return prediction


class GetLogoPredictionSqueezeNet(Resource):
    def get(self, file_name):
        prediction = Logo.get_inference(model_dir=model_dir_squeezeNet,
                                        image_path=file_name,
                                        classes=classes,
                                        device='cpu')
        return prediction


class GetLogoPredictionVgg(Resource):
    def get(self, file_name):
        prediction = Logo.get_inference(model_dir=model_dir_vgg16,
                                        image_path=file_name,
                                        classes=classes,
                                        device='cpu')
        return prediction


api.add_resource(Api, '/')

if __name__ == '__main__':
    app.run(debug=True, port=5000)
All the models (.pth files) are all in the same directory.
Here are the steps:
- Create an instance of Flask.
- Feed the Flask app instance to the Api instance from Flask-RESTful.
- Create a class for each network that will be called in our main class
- Create the main API class that will be used as an entry point for our API.
- Add a POST method to the class.
- Add the class as a resource to the API and define the routing.
- That’s all 🤩
Build the iOS application
Create a new project
To begin, we need to create an iOS project with a single view app:

Now we have our project ready to go. I don’t like using storyboards myself, so the app in this tutorial is built programmatically, which means no buttons or switches to toggle — just pure code 🤗.
To follow this method, you’ll have to delete the main.storyboard and set your AppDelegate.swift file like so:
func application(_ application: UIApplication, didFinishLaunchingWithOptions launchOptions: [UIApplication.LaunchOptionsKey: Any]?) -> Bool {
        // Override point for customization after application launch.
        window = UIWindow(frame: UIScreen.main.bounds)
        window?.makeKeyAndVisible()
        let controller = ViewController()
        window?.rootViewController = controller

        return true
    }
Main ViewController
Now let’s set our ViewController with the buttons and logo. I used some custom buttons in the application—you can obviously use the system button.
First, you need to inherit from UIButton and create your own custom button— we inherit from UIButton because the custom button ‘is’ a UIButton, so we want to keep all its properties and only inherit to change the look of it:
import UIKit

class Button: UIButton {
    override func awakeFromNib() {
        super.awakeFromNib()
        titleLabel?.font = UIFont(name: "Avenir", size: 12)
    }
}
import UIKit
class BtnPlein: Button {
override func awakeFromNib() {
super.awakeFromNib()
}
var myValue: Int
///Constructor: - init
override init(frame: CGRect) {
// set myValue before super.init is called
self.myValue = 0
super.init(frame: frame)
layer.borderWidth = 6/UIScreen.main.nativeScale
layer.backgroundColor = UIColor(red:0.24, green:0.51, blue:1.00, alpha:1.0).cgColor
setTitleColor(.white, for: .normal)
titleLabel?.font = UIFont(name: "Avenir", size: 22)
layer.borderColor = UIColor(red:0.24, green:0.51, blue:1.00, alpha:1.0).cgColor
layer.cornerRadius = 5
}
required init?(coder aDecoder: NSCoder) {
fatalError("init(coder:) has not been implemented")
}
}import UIKit
class BtnPleinLarge: BtnPlein {
override func awakeFromNib() {
super.awakeFromNib()
contentEdgeInsets = UIEdgeInsets(top: 0, left: 16, bottom: 0, right: 16)
}
}BtnPleinLarge is our new button, and we use it to create our main two buttons for ViewController.swift, our main view.
Set the layout and buttons with some logic as well:
let upload: BtnPleinLarge = {
        let button = BtnPleinLarge()
        button.translatesAutoresizingMaskIntoConstraints = false
        button.addTarget(self, action: #selector(buttonToUpload(_:)), for: .touchUpInside)
        button.setTitle("Upload an image", for: .normal)
        let icon = UIImage(named: "upload")?.resized(newSize: CGSize(width: 50, height: 50))
        button.addRightImage(image: icon!, offset: 30)
        button.backgroundColor = #colorLiteral(red: 0.7133775353, green: 0.4786995649, blue: 0.8641391993, alpha: 1)
        button.layer.borderColor = #colorLiteral(red: 0.7133775353, green: 0.4786995649, blue: 0.8641391993, alpha: 1).cgColor
        button.layer.shadowOpacity = 0.3
        button.layer.shadowColor = #colorLiteral(red: 0.7133775353, green: 0.4786995649, blue: 0.8641391993, alpha: 1).cgColor
        button.layer.shadowOffset = CGSize(width: 1, height: 5)
        button.layer.cornerRadius = 10
        button.layer.shadowRadius = 8
        button.layer.masksToBounds = true
        button.clipsToBounds = false
        button.contentHorizontalAlignment = .left
        button.layoutIfNeeded()
        button.contentEdgeInsets = UIEdgeInsets(top: 0, left: 0, bottom: 0, right: 20)
        button.titleEdgeInsets.left = 0

        return button
    }()

    let openCamera: BtnPleinLarge = {
        let button = BtnPleinLarge()
        button.translatesAutoresizingMaskIntoConstraints = false
        button.addTarget(self, action: #selector(buttonToOpenCamera(_:)), for: .touchUpInside)
        button.setTitle("Take a picture", for: .normal)
        let icon = UIImage(named: "camera")?.resized(newSize: CGSize(width: 50, height: 50))
        button.addRightImage(image: icon!, offset: 30)
        button.backgroundColor = #colorLiteral(red: 0.2258982956, green: 0.1017847732, blue: 0.6820710897, alpha: 1)
        button.layer.borderColor = #colorLiteral(red: 0.2258982956, green: 0.1017847732, blue: 0.6820710897, alpha: 1).cgColor
        button.layer.shadowOpacity = 0.3
        button.layer.shadowColor = #colorLiteral(red: 0.2258982956, green: 0.1017847732, blue: 0.6820710897, alpha: 1).cgColor
        button.layer.shadowOffset = CGSize(width: 1, height: 5)
        button.layer.cornerRadius = 10
        button.layer.shadowRadius = 8
        button.layer.masksToBounds = true
        button.clipsToBounds = false
        button.contentHorizontalAlignment = .left
        button.layoutIfNeeded()
        button.contentEdgeInsets = UIEdgeInsets(top: 0, left: 0, bottom: 0, right: 20)
        button.titleEdgeInsets.left = 0

        return button
    }()
We now need to set up some logic. It’s important to change the Info.plist file and add a property so that an explanation of why we need access to the camera and the library is given to the user. Add some text to the “Privacy — Camera Usage Description”:
    @objc func buttonToUpload(_ sender: BtnPleinLarge) {
        if UIImagePickerController.isSourceTypeAvailable(.photoLibrary) {
            let imagePicker = UIImagePickerController()
            imagePicker.delegate = self
            imagePicker.sourceType = .photoLibrary
            imagePicker.allowsEditing = false
            self.present(imagePicker, animated: true, completion: nil)
        }
    }
@objc func buttonToOpenCamera(_ sender: BtnPleinLarge) {
if UIImagePickerController.isSourceTypeAvailable(.camera) {
let imagePicker = UIImagePickerController()
imagePicker.delegate = self
imagePicker.sourceType = .camera
imagePicker.allowsEditing = false
self.present(imagePicker, animated: true, completion: nil)
}
}Of course, you need to set up the layout and add the subviews to the view, too. I’ve added a logo on top of the view as well:
  override func viewDidLoad() {
        super.viewDidLoad()
        view.backgroundColor = #colorLiteral(red: 0.9260749221, green: 0.8886420727, blue: 0.9671153426, alpha: 1)
        addSubviews()
        setupLayout()
    }

    func addSubviews() {
        view.addSubview(logo)
        view.addSubview(upload)
        view.addSubview(openCamera)
    }

    func setupLayout() {

        logo.centerXAnchor.constraint(equalTo: self.view.centerXAnchor).isActive = true
        logo.topAnchor.constraint(equalTo: self.view.safeTopAnchor, constant: 20).isActive = true

        openCamera.centerXAnchor.constraint(equalTo: view.centerXAnchor).isActive = true
        openCamera.bottomAnchor.constraint(equalTo: view.bottomAnchor, constant: -120).isActive = true
        openCamera.widthAnchor.constraint(equalToConstant: view.frame.width - 40).isActive = true
        openCamera.heightAnchor.constraint(equalToConstant: 80).isActive = true

        upload.centerXAnchor.constraint(equalTo: view.centerXAnchor).isActive = true
        upload.widthAnchor.constraint(equalToConstant: view.frame.width - 40).isActive = true
        upload.heightAnchor.constraint(equalToConstant: 80).isActive = true
        upload.bottomAnchor.constraint(equalTo: openCamera.topAnchor, constant: -40).isActive = true


    }
Secondary ViewController: Where We Show Our Results
Here, we need three things:
- Our original image:
let outputImage: UIImageView = {
        let image = UIImageView(image: UIImage())
        image.translatesAutoresizingMaskIntoConstraints = false
        image.contentMode = .scaleAspectFit
        return image
    }()
2. A label with the results:
let result: UILabel = {
        let label = UILabel()
        label.textAlignment = .center
        label.font = UIFont(name: "Avenir", size: 22)
        label.textColor = .black
        label.translatesAutoresizingMaskIntoConstraints = false
        label.numberOfLines = 5
        return label
    }()
3. A button to dismiss the view:
let dissmissButton: BtnPleinLarge = {
        let button = BtnPleinLarge()
        button.translatesAutoresizingMaskIntoConstraints = false
        button.addTarget(self, action: #selector(buttonToDissmiss(_:)), for: .touchUpInside)
        button.setTitle("Done", for: .normal)
        button.backgroundColor = #colorLiteral(red: 0, green: 0, blue: 0, alpha: 1)
        button.layer.borderColor = #colorLiteral(red: 0, green: 0, blue: 0, alpha: 1).cgColor
        return button
    }()
Don’t forget to add the subviews to the main view and set up the layout, too.
API calls
All API calls will be made with the help of Alamofire.
To install the pod and set up your dependencies, you can look at the Cocoapods website.
Here’s the full code to send an image and receive a JSON response from the API:
 func imagePickerController(_ picker: UIImagePickerController, didFinishPickingMediaWithInfo info: [UIImagePickerController.InfoKey : Any]) {
        setupSpinner()
        self.spinner.startAnimating()
        if let pickedImage = info[UIImagePickerController.InfoKey.originalImage] as? UIImage {
            let image = pickedImage
            guard let imgData = image.jpegData(compressionQuality: 0.2) else {
                print("Could not get JPEG representation of UIImage")
                return
            }

            let parameters: Parameters = ["name": "test_place",
                                          "description": "testing image upload from swift"]

            Alamofire.upload(
                multipartFormData: { multipartFormData in
                    let imageData = imgData
                    multipartFormData.append(imageData, withName: "image", fileName: "photo.jpg", mimeType: "image/jpg")
                    for (key, value) in parameters {
                        if value is String || value is Int {
                            multipartFormData.append("(value)".data(using: .utf8)!, withName: key)
                        }
                    }
            },
                to: self.serverAddress,
                headers: nil,
                encodingCompletion: { encodingResult in
                    switch encodingResult {
                    case .success(let upload, _, _):
                        upload.responseJSON { response in
                            self.spinner.stopAnimating()
                            print(response)
                            let controller = OutputViewController()
                            controller.outputImage.image = image
                            controller.result.text = (response.result.value as! NSDictionary).queryString as String
                            self.present(controller, animated: true, completion: nil)
                            }
                    case .failure(let encodingError):
                        print("encoding Error : (encodingError)")
                    }
            })
        }

        picker.dismiss(animated: true, completion: nil)
    }
Final result
Sometimes we have a classification task in an area of interest, but we only have sufficient training data in another area of interest, where these latter data can be in a different functional space or follow a different data distribution. In such cases, transfer learning, if successful, would greatly improve learning performance by avoiding costly data labeling efforts.
If you have the resources to build a big and powerful network, I would say that you could use an already existing network, but it won’t be necessary. But if you’re limited in terms of dataset size and don’t have huge GPU servers to train your models, then transfer learning is the way to go.

Comments 0 Responses