
The idea of being able to easily add powerful chatbots for improving user experience is appealing to React Native developers. A hybrid framework like React Native relies on tools that work cross-platform and reduce the mundane work of platform-dependent customizations and configurations.
Let’s talk about how you can bring the power of conversational AI to your React Native apps.
Nowadays, most websites have automated triggers to drive engagement. It’s pretty straightforward to add a live chat widget on your website and then add some conversational workflows to it. Further, you can also add AI chatbots on your website pretty easily.
But when the same experience is missing from your app, it takes a toll on your overall user experience. Hence, today, we’ll discuss how to add a conversational interface and AI chatbots to your React Native apps.
Prerequisites
I’m going to divide this article into two parts. First, we’ll learn how to add a chat interface to your React Native apps to support AI-based chatbots and conversational workflows.
In the subsequent section, we’ll learn how to integrate your chatbot in the newly-added chat interface. You can either add your existing chatbots made on any bot builder platform such as Dialogflow or Amazon Lex. Or, you can make your own chatbot (easily and quickly) and add it to your app.
For this, you should have a basic working knowledge of React Native. Additionally, we’ll be using Kommunicate’s chat interface and chatbot integration to add our AI bots to a React Native app.
Let’s dive right in.
Adding a Chat Interface in Your React Native App
Set up your Kommunicate account
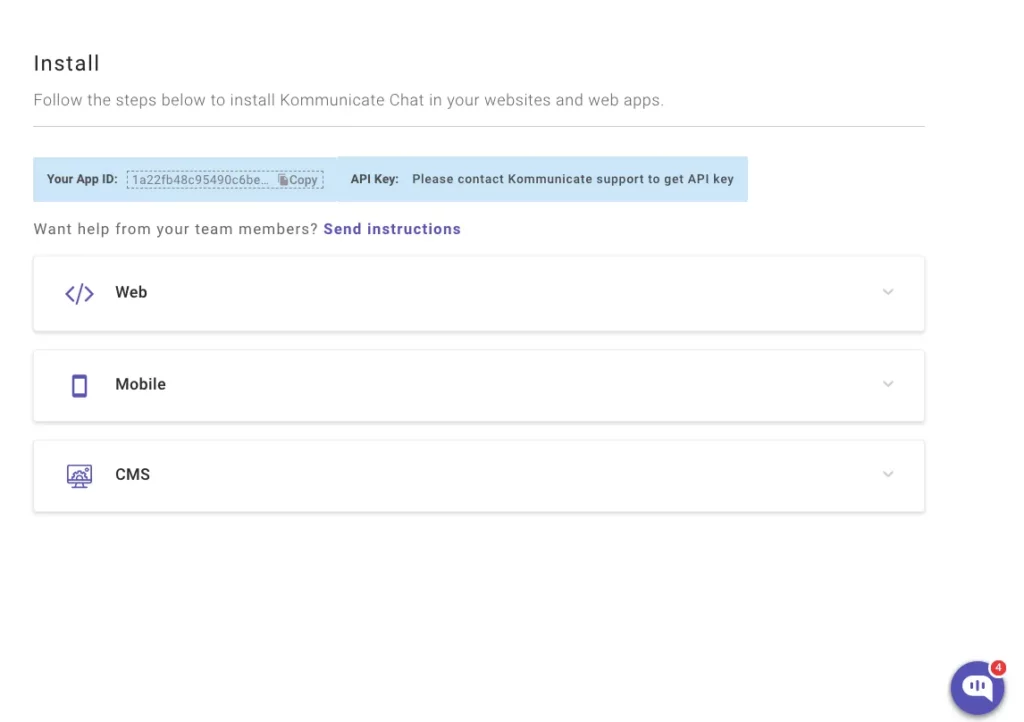
Kommunicate comes with a free account, so you can get started by just signing up. Once you sign up, navigate to the Install section and copy your APP ID.
Install Kommunicate’s React Native SDK
You can use npm to add the Kommunicate module to your React Native app:
Now, link the module:
Next, navigate to YourApp/iOS directory from the terminal and run the below command:
Please make sure you’re running on the minimum iOS platform version 10 since Kommunciate uses dynamic frameworks. Additionally, make sure you have the below settings at the top of your Podfile:
Import the module
Now import the module in your React Native app by using the below method:
Launching the Chat Interface
Kommunicate provides a buildConversation function to create and launch chats directly. This way, you can save the extra steps of authentication, creation, initialization, and deployment for quick testing.
You can always come back and customize the chat according to your need. Here is more information about the customization of the SDK.
To launch the chat, you need to create a conversation object. This object is passed to the buildConversation function, and based on the parameters of the object, the chat is created/launched.
For simplicity’s sake, use the below method to launch the chat interface. Remember when I mentioned saving the APP ID? Use that here:
At this point, you should have your chat interface ready in your React Native app. Now, let’s move the second part — adding a chatbot to it.
Adding a Chatbot to Your React Native App
Chatbots can be as smart as you can make them. In this step, you are free to choose which platform you will use to create a chatbot and how sophisticated you want it to be.
The Kommunicate SDK allows you to add any third-party or custom chatbot to your app. Additionally, Kommunicate has its own chatbot builder if you don’t have a chatbot yet. Let’s take these two scenarios and explore them further.
1. You Do Not Have a Chatbot
If you do not have a chatbot, you can get started quickly using one of the methods below.
Use Kompose Chatbot Builder
Simple, effective, and backed by a powerful NLP engine, you can use Kommunciate’s own chatbot builder — Kompose.
It comes with a GUI builder where you can define your intent and the corresponding answers. Additionally, you can add rich messaging elements for smoother conversational AI workflows. Here’s the complete guide to help your make the perfect chatbot with Kompose, and a video:
To integrate this chatbot in your React Native app, log in to your Kommunicate account and assign the conversation to this chatbot from the Conversation Rules section.
Use Dialogflow (API.ai) from Google
Dialogflow is a hugely popular chatbot-building platform. You can make chatbots of various sophistication levels, from a simple FAQ chatbot to an advanced chatbot using Dialogflow fulfillment.
Here are a video and a complete tutorial of making advanced Dialogflow chatbots.
Once you’ve made your chatbot using Dialogflow, you can integrate it with Kommunicate easily. Move to the Bot integration section and choose Dialogflow. Now, follow these instructions to associate your Dialogflow account in Kommunicate:
- Login to the Dialogflow console.
- Select your Agent from the dropdown in the left panel.
- Click on the Setting button. It will open a setting page for the Agent.
- Inside the General tab, search for GOOGLE PROJECTS and click on your service account.
- After being redirected to your SERVICE ACCOUNT, create a key in JSON format for your project from the actions section—it automatically downloads.
- Now upload the key file, choose your primary language, and you are done.
- In the subsequent steps, add a name and picture for your chatbot.
- Most importantly, in the last step — please choose to assign all the incoming conversations to this chatbot.
Use Amazon Lex
AWS Lex is another popular platform for building AI chatbots. Lex runs on the same machine learning engine as that of Alexa, making it a powerful tool to build both text-based and voice-based chatbots.
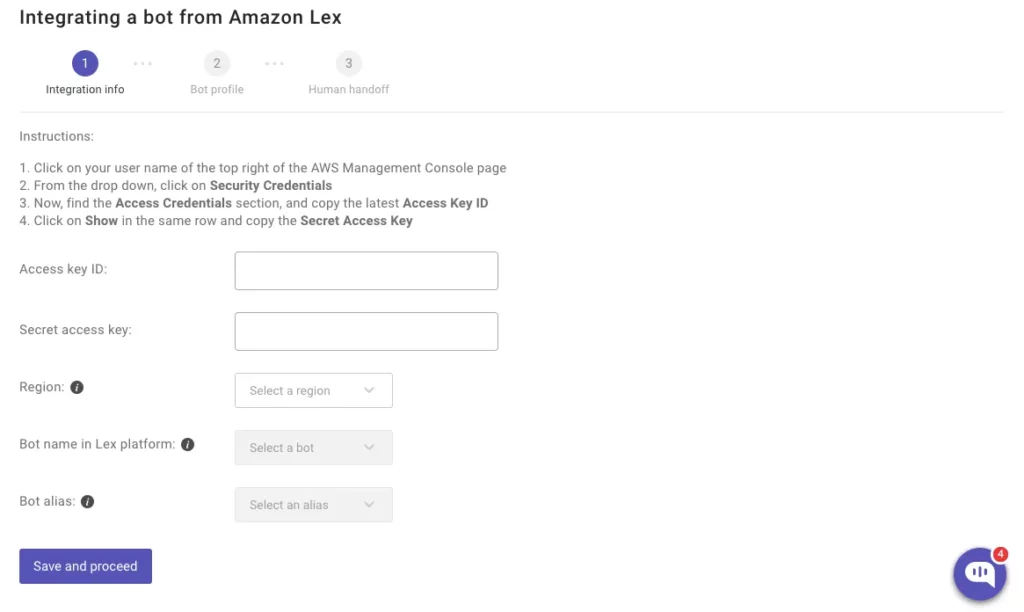
Here is a step-by-step guide on making a chatbot in Amazon Lex. Once you’ve made it, navigate to the Bot Integration section in Kommunicate and follow these steps:
- Click on your user name at the top right of the AWS Management Console page
- From the dropdown, click on Security Credentials
- Now, find the Access Credentials section, and copy the latest Access Key ID
- Click on Show in the same row and copy the Secret Access Key
- Now copy the Key and ID and paste in their respective fields.
- Choose your AWS region and add your Bot name and Alias here as well. And you’re done!
Use Any Other Chatbot Builder Platform
The best part about Kommunicate is — you’re not restricted to any of the platforms mentioned above. Though I highly recommend the ones mentioned above, if you want to build your chatbot in any other tool and integrate into your React Native app, all the instructions to do so are given here.
2. You Already Have a Chatbot
If you already have a chatbot with you, it’s just a matter of minutes to get it up and running in your React Native app. More so if you have Dialogflow or Amazon Lex chatbot. Kommunicate support code-less integration with these two platforms along with any other, through custom bot integration.
I have mentioned the integration instructions in the previous section. You can add your existing chatbots in the same way in Kommunicate, facilitating the chatbot on your React Native app.
Wrapping Up
In this tutorial, we used Kommunicate + any chatbot platform to deploy chatbots inside React Native apps. You can use the same Kommunicate account to replicate the chatbot experience on your website, so you can ensure similar experiences for both your mobile apps and websites.
Comments 0 Responses