Nowadays, people check their watches for important notifications as much as they do the time. Wearable devices, like Android-based watches, are gaining more momentum as Google continues to improve its Android Wear platform for developers.
A couple of months ago, I was working on a simple application called Location-based tasks using Geofence. If you don’t know what Geofencing is, check out the link below:
https://developer.android.com/training/location/geofencing
In the application I was building, I needed to notify users about tasks they’d added, which were connected to particular locations. Also, I needed to send the notification to Android Wear, as well. Most importantly, I needed to test out this functionality while developing.
So in this article, we’ll learn about how to connect Android devices with a Wear OS emulator.
But before jumping directly into configuration steps, let’s first take a look at how to add a Wear module in your application.
Add a Wear module to your Android project
To support Android Wear, we need to add a Wear module in our application. To do this, we need to follow these steps.
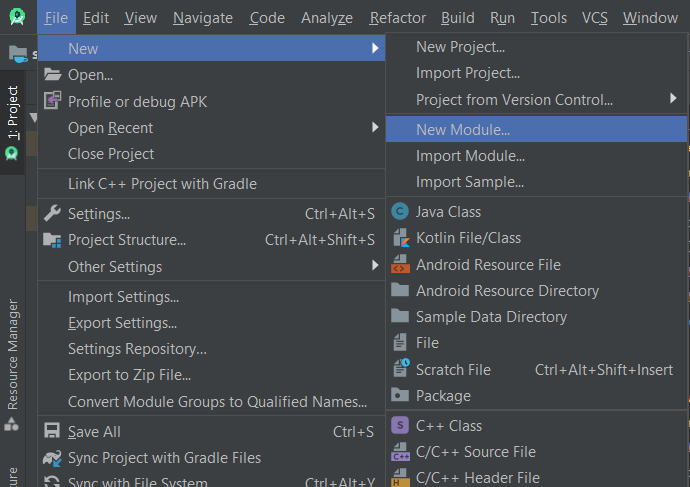
Open your existing project in an Android Studio, then go to File → New → New Module
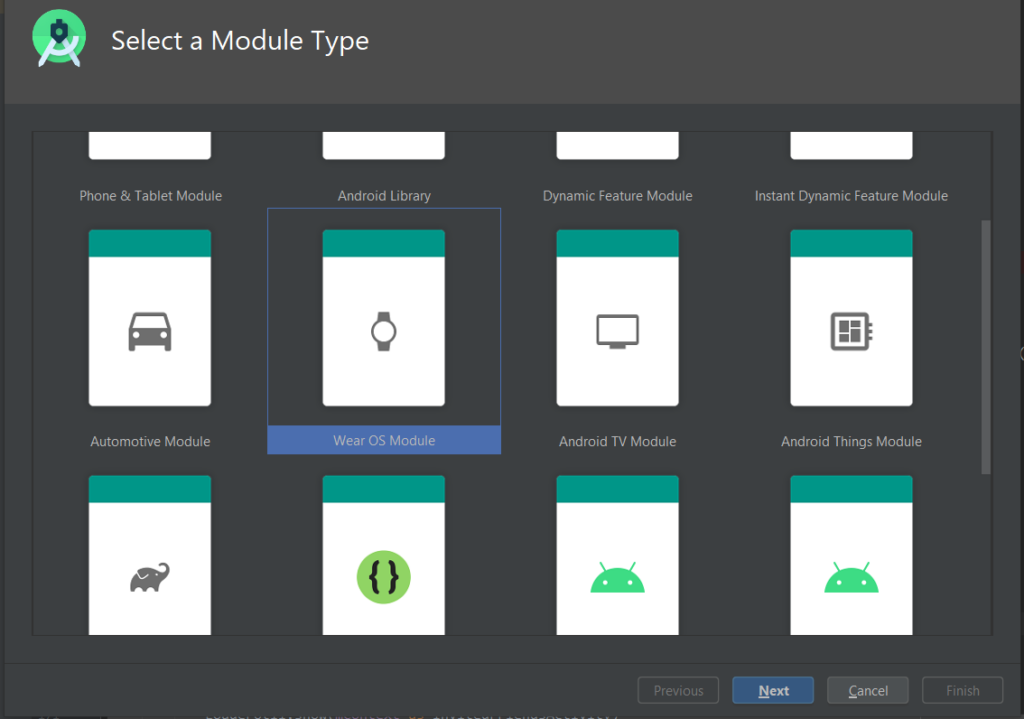
Then select the Wear OS Module
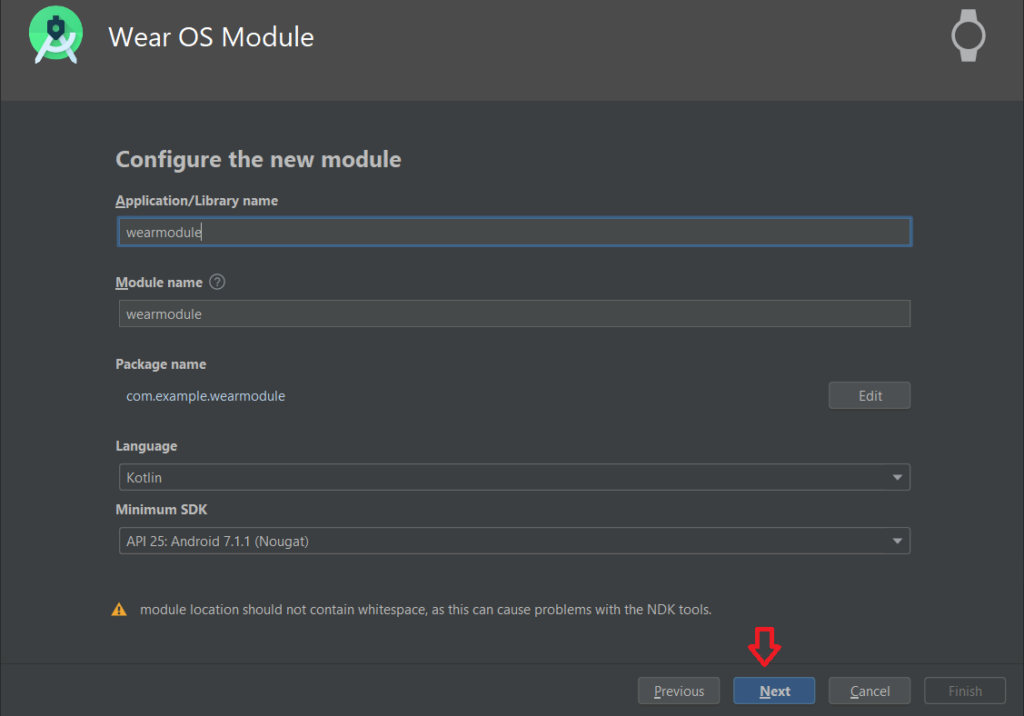
Give your Wear module a suitable name and click Next
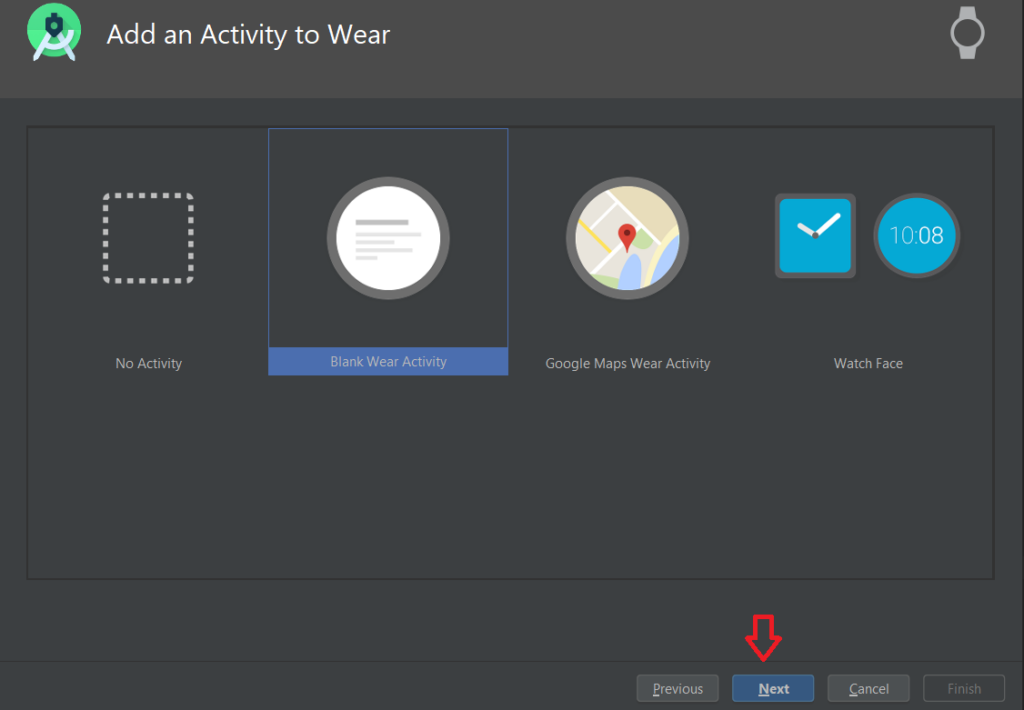
We have a couple of options in terms of what kind of activity we want to add to our project:
- No Activity (create a module without an activity)
- Blank Wear Activity (the simplest activity you can create)
- Google Maps Wear Activity (the simplest activity with Google Maps support)
- Watch Face (a service packaged in a Wear OS app)
After that, you simply select a Blank Wear activity, as we need an activity with the layout file (the XML file).
- Then give the Wear Activity a name and click Finish
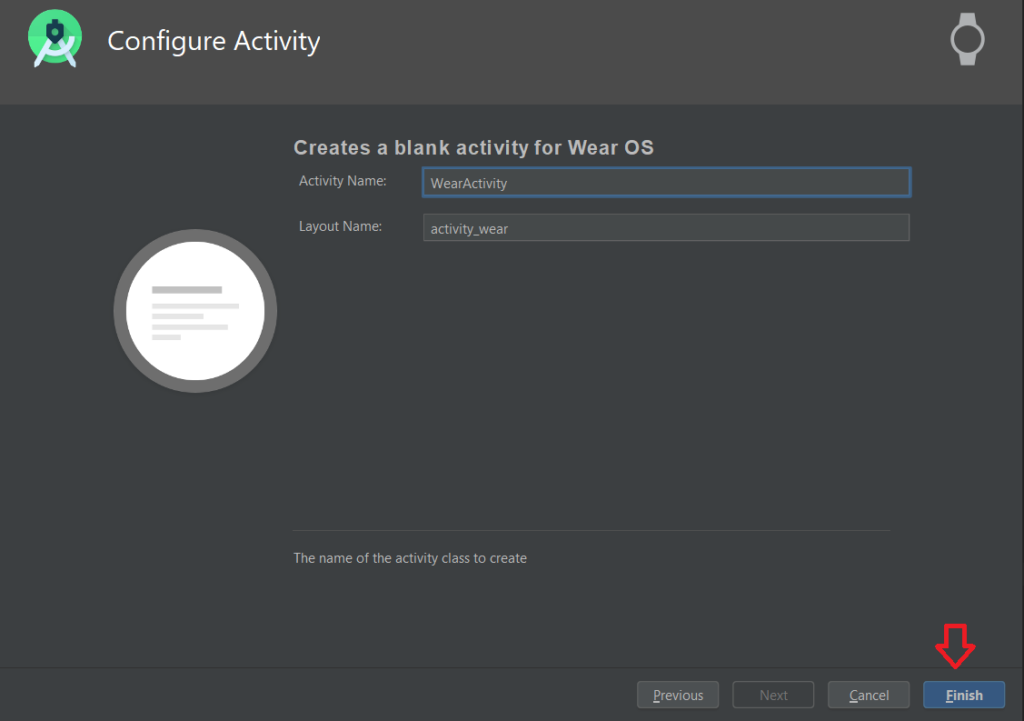
There it is! We’ve successfully added a wear module in our application. Now let’s jump towards the configuration steps on how to connect with Wear emulator in order to test our application.
Wearable Configuration
So far we’ve set up our Wear module, and now we’re going to look at how to set up the Wear emulator and pair it with the Android device, which will allow us to get phone notifications on your wearable device.
The following configuration steps need to be followed.
Step 1
First, we need to first make a connection between the emulator and the device. For that, we need an application.
Install the Android Wear application from the Google Play Store on both the devices —the actual Android device & the Wear emulator. Here’s the link to the app:
Step 2
In step 2, we need to enable the developer option in the Wear emulator, which will allow us to test our app(s).
In the Wear emulator, go to Settings → System → About →Tap the build number option 7 times to enable the developer option.
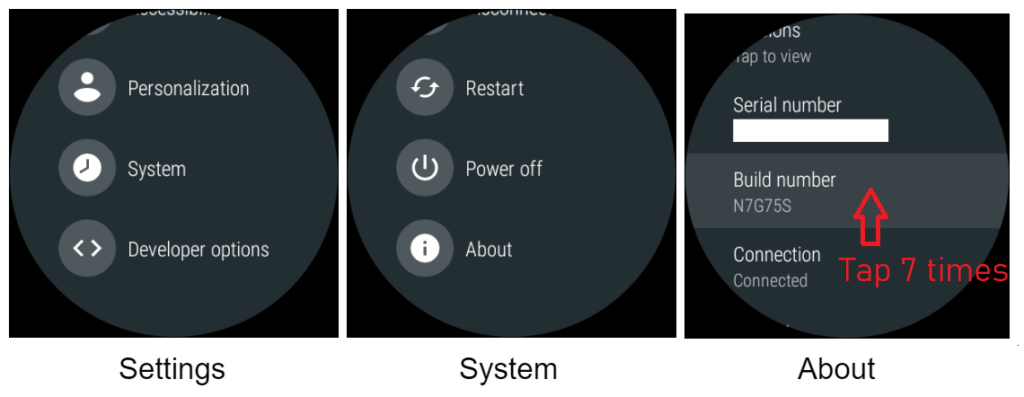
Android Developer Options allow you to enable debugging.
Step 3
Next, head over to the Wear emulator’s developer option and check (✅) “ADB Debugging” and “Debug over Bluetooth”.
These options will connect with the device to debug our Wear OS Watch using Bluetooth.
Step 4
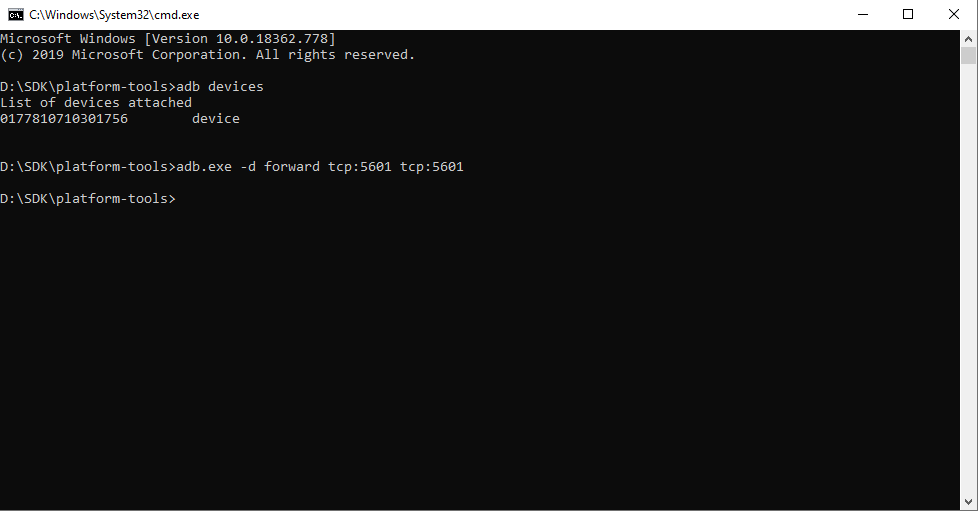
Then go to the Android SDK location “platform-tools”, open a command window, and run the below commands:
The TCP-port will forward the AVD’s (Android Virtual Device) communication port to the connected phone (each time the phone is connected).
Step 5
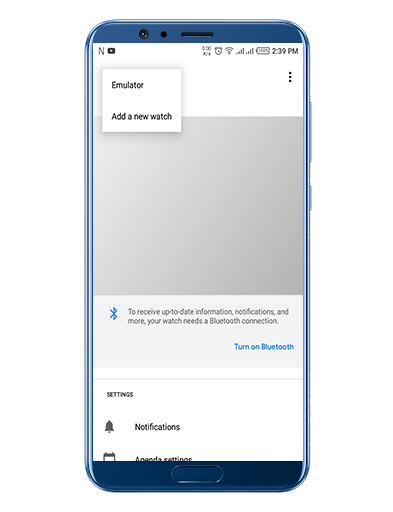
On the phone, in the Android Wear app, begin the standard pairing process. On the Welcome screen, tap the Set it up button. Alternatively, if an existing watch is already paired, in the upper-left drop-down, tap “Add a new watch”.
Step 6
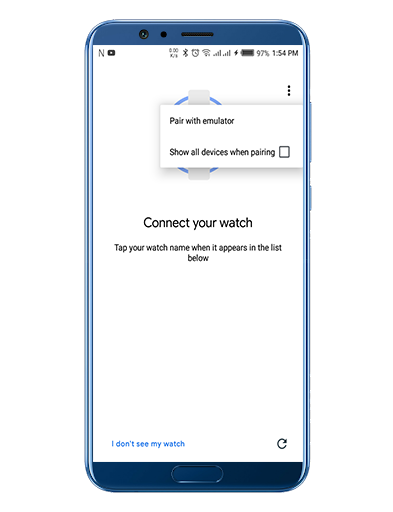
On the phone, in the Android Wear app, tap the overflow button, and then tap “Pair with the emulator.”
Step 7
Tap the Settings icon ⚙. Under Device Settings, tap Emulator.
Tap “Accounts” and select a Google account, and follow the steps in the wizard to sync the account with the emulator.
That’s it! We’ve successfully paired the device with android wear.
Now that the connection is set up, let’s return to the application I introduced previously. Using this, we’ll take a quick look at how to use the emulator to test for specific functionality.
Application Overview
If you’ll recall, the use case in question is an app that sends allows users to create tasks that are linked to specific locations, and the task at hand is to make sure the app can send location-based reminders to these users.
For example, if I need to pick up a new smartphone from a specific store location, then I can simply add a task in the application that’s linked to the store’s real-world location, and it will send a notification reminder using geofencing.
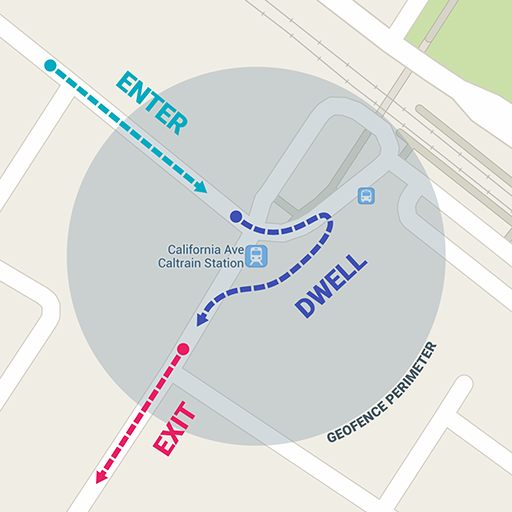
When the user leaves that location, they will be asked is their task has been completed. If yes, a message will be sent to the user that the “Task has been completed successfully”.
Below is a visualization of how this would work:
How Location is Fetched
A user’s location is fetched with the help of the Fused API. Every 15 seconds, a user’s new location will be fetched, and the Geofencing class will check whether the user has entered the desired location or not.
Application Features
- Location-based tasks with Geofencing
- Support for wearables
- Google autocomplete places (when searching any location it will give the suggestion of the locations)
- Current location shown on Google Maps. (The user current location)
- Tasks handled locally via the Realm database
Result
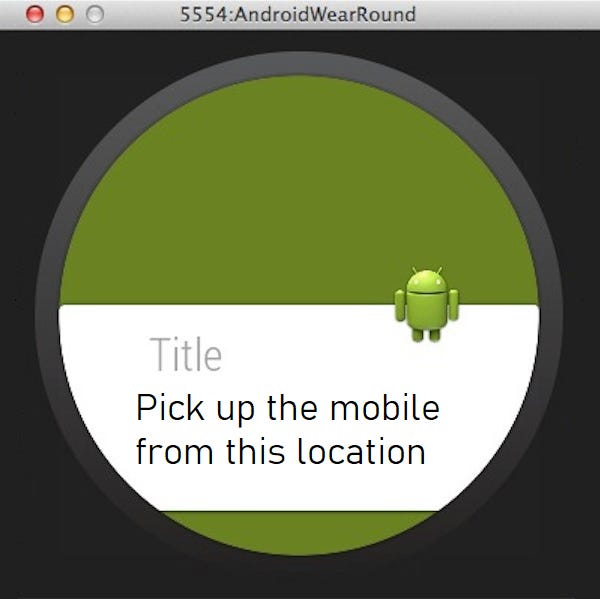
Using our connection with the emulator, we can test this functionality out during development. Here, you can see that my device has successfully connected to Android Wear, and it shows me the relevant location-based notification.
This is an essential functionality we need to test, as synced notifications are key in many Android Wear apps.
Conclusion
In this article, we learned how to simply connect your Android device with a Wear OS emulator and use that connection to test out key app functionality.
I hope this article is helpful. If you think something is missing, have questions, or would like to offer any thoughts or suggestions, go ahead and leave a comment below. I’d appreciate the feedback.
I’ve written some other Android-related content, and if you liked what you read here, you’ll probably also enjoy these:
Sharing (knowledge) is caring 😊 Thanks for reading this article. Be sure to clap or recommend this article if you found it helpful. It means a lot to me.
If you need any help, join me on Twitter, LinkedIn, GitHub, and Facebook.

Comments 0 Responses