Natural Language Processing — iOS

Since the beginning of the coronavirus pandemic, the news has been overwhelmingly negative and somewhat depressing. You open Twitter or your favorite news application, and you’re left with loads and loads of information that can drain your energy.
In a world saturated with information, more and more people are choosing to offer positive news, even if it’s still often confined to a specific section.
For example, The British daily newspaper The Guardian offers “The Upside”, while Fox News, MSN, the HuffPost site, and Yahoo! all have “good news” pages.
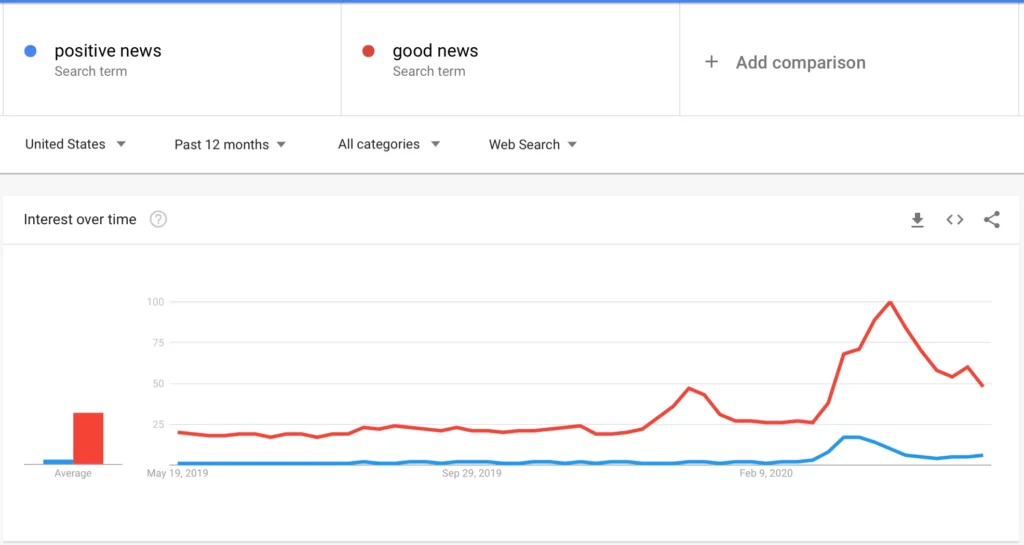
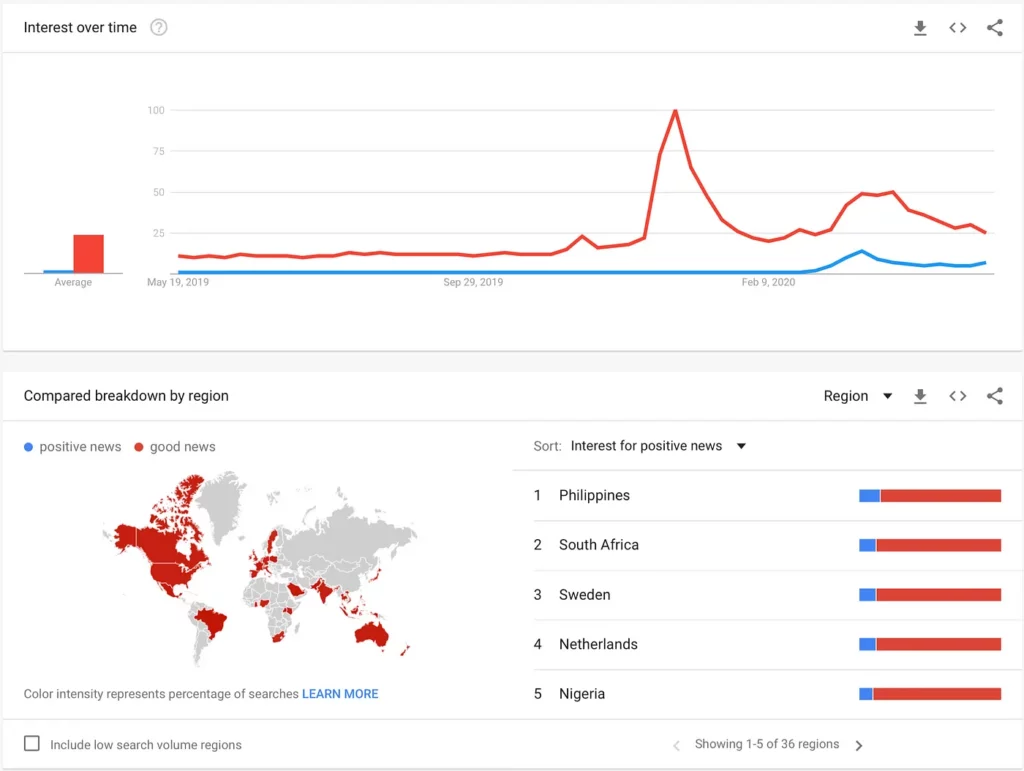
The most surprising lesson of this crisis is probably the need for people to access ‘good’ news. Google trends data shows a spike of interesting queries (Figure 1) such as good news or positive news during the months of March and April.
The data shows that this is also the case in multiple regions (Europe, India…).
After seeing this, I decided that I might be able to choose what kinds of information to consume in order to break the chain of negativity. I’m a developer so I thought, why not create an application that’ll select only positive news and remove negative and neutral ones for me?
With recent advances in natural language processing (NLP) and mobile processing, we can select, with a certain level of accuracy, the most positive news and create our own custom feeds.
In this article, I’ll create an iOS application that will consume an API and select the most positive articles.
Overview
- Find the right news API
- Create our iOS application
- Create a decodable to parse the API calls
- Customize the feed view
- Final results and possible improvements
I have included code in this article where it’s most instructive. Full code and data can be found on my GitHub page. Let’s get started.
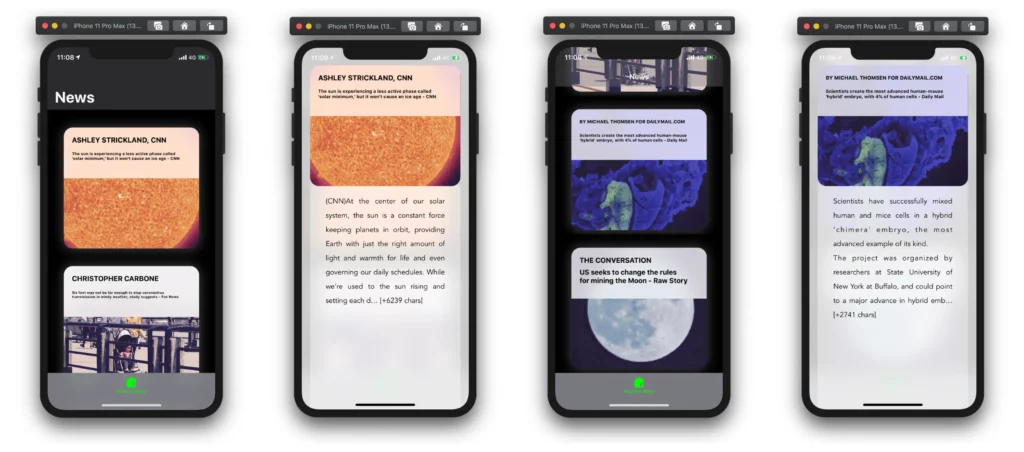
This is a look at what the final result will look like:
Find the right news API
In order to get a stream of articles, we need to find a good API that will get us articles from various sources. These articles will be used to create our custom news feed. The simplest one is News API — you can customize the API calls and get articles related to a specific country or/and a specific topic.
I chose to get top and breaking news headlines from the United States curated in an API called “Top headlines from the United States”, but you can choose whatever topic interests you.
You do need to create an account to get an apiKey, and the rest is pretty straightforward. You choose the “News sources” and the subcategory, and the website will then generate a GET URL with the appropriate key and news sources.
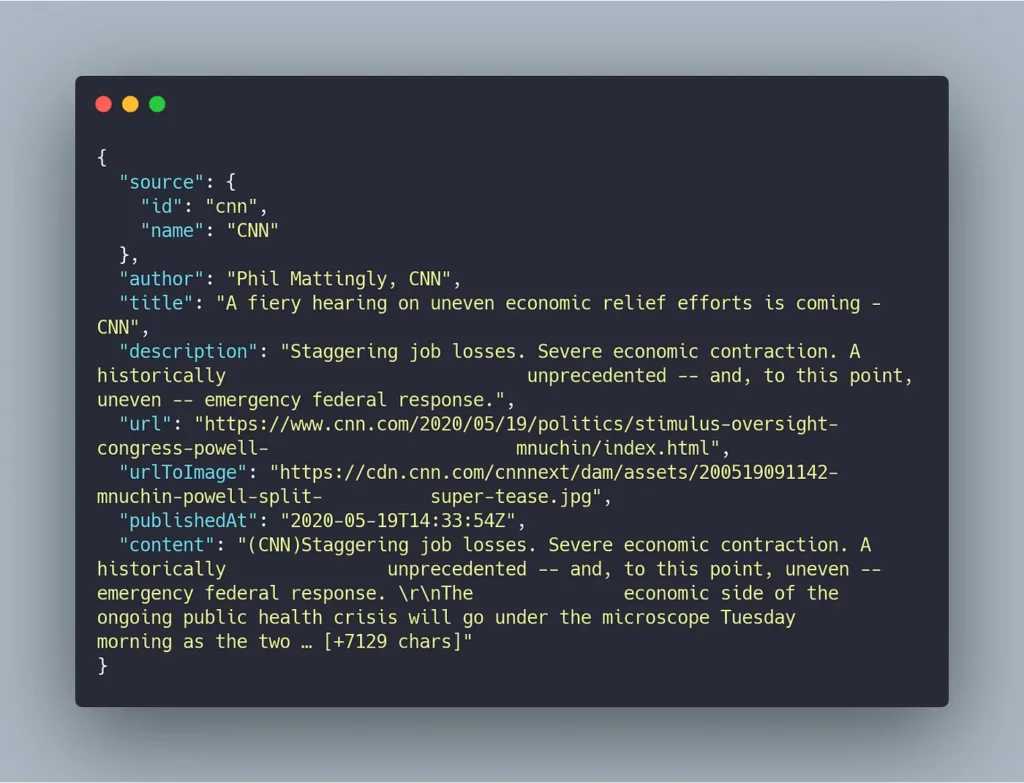
You can easily test your link in your browser and understand the structure of the API call:
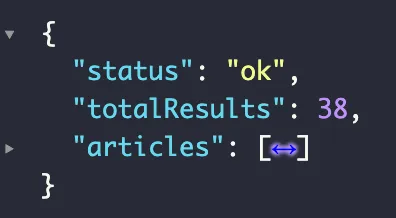
The API call is structured as such:
- error: Indicates whether the request was successful or not—“ok” for a successful request, and an “error” for a problem.
- totalResults: Number of articles
- articles: An array of articles
Create our iOS application
Create a new “Single View Application” and make sure you choose Storyboard as User Interface.

Now we have our project ready to go. I don’t like using storyboards myself, so the app in this tutorial is built programmatically, which means no buttons or switches to toggle — just pure code.
To follow this method, you’ll have to delete the main.storyboard file and set your SceneDelegate.swift file (Xcode 11 only).
With Xcode 11, you’ll have to change the Info.plist file like so:
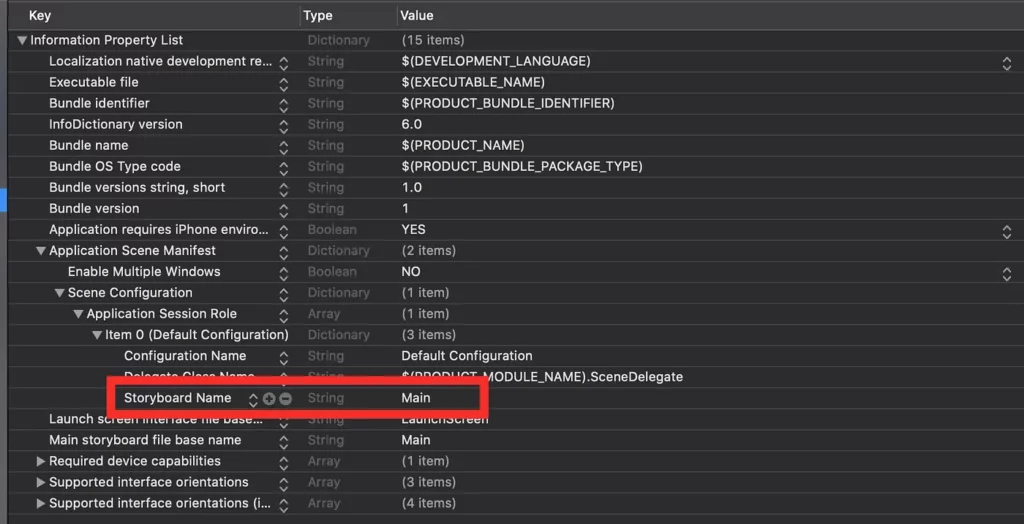
You need to delete the “Storyboard Name” in the file, and that’s about it.
Change the SceneDelegate with the following code:
var window: UIWindow?

func scene(_ scene: UIScene, willConnectTo session: UISceneSession, options connectionOptions: UIScene.ConnectionOptions) {
    guard let windowScene = (scene as? UIWindowScene) else { return }

    window = UIWindow(frame: windowScene.coordinateSpace.bounds)
    window?.windowScene = windowScene
    window?.rootViewController = ViewController()
    window?.makeKeyAndVisible()
}
Create View Controllers
We need two ViewControllers:
- ViewController():
This is where we’ll set our UICollectionView with all the articles retrieved from the news API.
- DetailsViewController():
This is where we will show the article’s body.
Create a navigation
- MainTabBarController():
This is our main navigation, where we’ll create the full navigation structure for our application.
Navigation in iOS is pretty straightforward and easy to implement. Here, I’ve changed some things like the color and icon for the navigation bar (and others) so it looks nice.
Create a decodable to parse the API calls
Starting with Swift 4, we can create a representation of an API call using a struct and conforming it to the Decodable protocol. The protocol only works when you read JSON data.
The API returns a series of elements that could be parsed using two important structures. The first one will mimic the API call upper node with a status, totalResult, and finally articles, which is an array of articles. The other one will abstract a representation of an article, and thus will be used to create the array of articles.
Here the structure of the Article struct:
Now that we have defined the properties of an Article , we create the ultimate API call object Articles:
Both structures conform to the Decodable protocol. And the former is using the first one to create an array of Article. Make sure that the properties’ names are the exact same as the API call.
Customize the feed view
Next we will need to customize our feed by adding a UICollectionView that will host our articles.
Create a UICollectionView :
The news feed will have a stream of articles, we will use UICollectionView() that will be instantiated in ViewController() with the following code:
- Create an object of type UICollectionView()
- Set the scroll direction
- Change the background color
- Toggle the Collection View to be constrained using auto layout
Then, we need to register the cells and set the data source, as well as set up the ViewController() to conform to the UICollectionView() protocol:
Finally, we need to add the UICollectionView to the subview and set up the layout:
- Add the collection to the subview of the UIViewController()
- Change the background color to be compatible with Dark Mode
The final step, which is the conformance to UICollectionViewDataSource and UICollectionViewDelegate, is available in the GitHub repository. In this part we will feed the collection view with the data.
Create a custom UICollectionViewCell :
The collection is made up of cells that are members of the feed, think of it as Medium’s homepage, UICollectionViewCell is an instance of an article, and the homepage is the UICollectionView — each cell will have a title, author name and will also lead to the full article. Thus, the homepage is a ‘Collection’ of articles.
I’m using a package made by Paolo Cuscela called Cards that mimics the iOS app store.

For the sake of simplicity, I manually included the files in the project and created a new Class that conforms to the CardDelegate protocol. The Class is also included in the GitHub repository.

class CustomCell: UICollectionViewCell, CardDelegate {

    var card: CardArticle!
    var article: Article!

    override init(frame: CGRect) {
        super.init(frame: frame)
        self.card = setupCardTest() as? CardArticle
        self.card.delegate = self
        self.article = Article(author: "", title: "", description: "", url: "", publishedAt: "", urlToImage: "", content: "")
    }

    func setupCardTest() -> Card {

        let screenSize = UIScreen.main.bounds
        let screenHeight = screenSize.height
        let card = CardArticle(frame: CGRect(x: 30, y: 140, width: self.frame.width - 32 , height: self.frame.height/3))
        self.addSubview(card)
        card.translatesAutoresizingMaskIntoConstraints = false

        switch UIScreen.main.nativeBounds.height {
        case 1136:
            //iPhones_5_5s_5c_SE
            card.heightAnchor.constraint(equalToConstant: screenHeight/2.5).isActive = true
            card.topAnchor.constraint(equalTo: self.topAnchor, constant: 15).isActive = true
            card.bottomAnchor.constraint(equalTo: self.bottomAnchor, constant: -20).isActive = true
        case 1334:
            //iPhones_6_6s_7_8
            card.heightAnchor.constraint(equalToConstant: screenHeight/2.5).isActive = true
            card.topAnchor.constraint(equalTo: self.topAnchor, constant: 15).isActive = true
            card.bottomAnchor.constraint(equalTo: self.bottomAnchor, constant: -20).isActive = true
        case 1792:
            //iPhone_XR
            card.heightAnchor.constraint(equalToConstant: screenHeight/3).isActive = true
            card.topAnchor.constraint(equalTo: self.topAnchor, constant: self.frame.height/5 - 30).isActive = true
        case 1920, 2208:
            //iPhones_6Plus_6sPlus_7Plus_8Plus
            card.heightAnchor.constraint(equalToConstant: screenHeight/2.5).isActive = true
        case 2436:
            //iPhones_X_XS
            card.heightAnchor.constraint(equalToConstant: screenHeight/3).isActive = true
            card.topAnchor.constraint(equalTo: self.topAnchor, constant: self.frame.height/5 - 30).isActive = true
        case 2688:
            //iPhone_XSMax
            card.heightAnchor.constraint(equalToConstant: screenHeight/2.5).isActive = true
        default:
            card.heightAnchor.constraint(equalToConstant: screenHeight/4).isActive = true
            card.topAnchor.constraint(equalTo: self.topAnchor, constant: self.frame.height/5 - 30).isActive = true
        }

        card.centerXAnchor.constraint(equalTo: self.centerXAnchor).isActive = true
        card.widthAnchor.constraint(equalToConstant: self.frame.width - 32).isActive = true
        card.backgroundColor = .systemBackground
        card.subtitle = ""
        card.title = "titre"
        card.category = "author"
        card.textColor = UIColor.black
        card.hasParallax = false
        return card
    }

    override func prepareForReuse() {
        self.card.title = "titre"
        self.card.subtitle = ""
        self.card.category = "author"
        self.card.textColor = UIColor.white
    }

    required init?(coder aDecoder: NSCoder) {
        fatalError("init(coder:) has not been implemented")
    }
}
Here’s a breakdown of the CustomCell() our UICollectionViewCell() :
- First, we need to instantiate an object of type CardArticle which will be the design structure of the cell
- Then an object of type Article that contains the data
- Create an initializer where we initialize the Card and the Article object
- Create a function that will set up the Card’s bounds and attributes (title, author, background color, text color and many more)
- Finally, we need to override an important function that gets invoked every time a cell is reused by the UICollectionView() . This function exists to improve the efficiency and the performance of the feed. Thus, when a cell is not visible on the screen, the collection view dequeues it and remove it from the stack.
Predict and populate the feed
Since iOS 13, Apple has included in its NaturalLanguage framework the ability to leverage a built-in solution without any external resource.
This feature, more broadly, is known as sentiment analysis, and it gives you the power to access the general sentiment in a given word, sentence, paragraph, or document. The sentiment score is structured as a float number that can range from -1.0 to 1.0. A score of 1.0 is the most positive, a score of -1.0 is the most negative, and a score of 0.0 is neutral.
Since we only want positive text, we’ll only surface articles that have a score strictly above 0.
Here’s a break down of the code:
- Instantiate a NLTagger and choose sentimentScore as an option.
- Set the object’s string by passing the input text.
- Run inference by calling the method tag(), specifying that the text is a paragraph for better prediction.
- Parse the output as a Double.
- Test the output and set the final score if the text is positive (1), negative (0) or neutral (-1).
Before loading the CollectionView, we’ll run inference on each and every article’s text.
Final results and possible improvements
The application calls an API and only shows the most positive articles. Unfortunately, the News API is not free and only returns a portion of articles. Thus, there are a number of possibilities for improving the overall experience by adding or modifying the following elements:
- Create your own API by scraping and parsing your own favorite news outlet, which will help you customize your feed even more.
- Create your own custom NLP model using state-of-the-art architectures such as Transformer GPT-2 or BERT. In these cases, the model will perform the inference on the server-side rather than on-device. I wrote an article that can help you get started with sentiment analysis using Transformers.
- Improve the overall experience by running inference in backend while scraping and parsing articles.
- Add a section for the most important and breaking news articles in order to stay up to date.
- Setup a notification system in order to receive intermittent news alerts.
- Add a share functionality to spread positivity around you 😃
The Internet is full of positive news, you just need to search harder on the various news sites and you will find good news. By using your coding skills you can leverage the power of ML and programming and totally automate the process. The news feed can also cover subjects that you deem important, as long as the news fits your own expectations.
Thanks for reading this article. If you have any questions, don’t hesitate to send me an email at [email protected].


Comments 0 Responses